搜索到
154
篇与
的结果
-
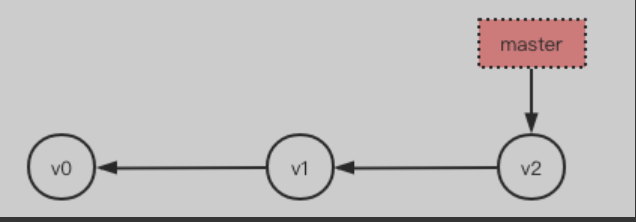
 GIt的分支管理 一、分支介绍分支是Git的杀手级特征,而且Git鼓励在工作流程中频繁使用分支与合并,哪怕一天之内进行许多次都没有关系。因为Git分支非常轻量级,不像其他的版本控制,创建分支意味着要把项目完整的拷贝一份,而Git创建分支是在瞬间完成的,而与你工程的复杂程度无关。二、创建分支与合并分支分支可以被理解为一条时间线,这一条时间线上串着一个个节点,每个节点都是一次提交记录/版本。 git默认只有一条时间线or分支,该时间线or分支称之为主分支,即master分支,文件.git/refs/heads/master 内存放着指向master分支最新版本的指针,如果下所示红色块即master指针,指向master分支 # 注意箭头方向,因为每一次提交都有一个指向上一次提交的指针,所以箭头方向向左,更为合理每次提交,master分支都会向前移动一步,master指针指向最新提交的一个版本,这样,随着你不断提交master分支的线也越来越长,如下如果我们有多个分支,那么GIT如何实现在多个分支之间来回切换的呢,·git文件夹下的HEAD文件负责存放当前所在的分支ref:refs/heads/分支名称》,切换分支就是修改HEAD文件中的内容为对应分支,并将工作区的文件恢复至对应分支的内容,所以严格来说HEAD不是指向提交,而是指向当前所在的分支,比如master,master才是指向提交的,一开始的时候,master分支是一条线,Git用master指向最新的提交,再用HEAD指向就能确定当前分支,以及当前分支的提交点:当我们创建并切换到一个新的分支,例如dev时 1、Git会新建一个指针叫dev,指向master相同的提交 2、然后再把HEAD指向dev,就表示当前分支在dev上 Git创建一个分支很快,因为除了增加一个dev指针,改改HEAD的指向,工作区的文件都没有任何变化如果HEAD指向dev,那么代表当前分支在dev上,这意味着接下来对工作的修改和提交都是针对dev分支了,如果master是小河的主干,那么dev就是这条河的支流,主干的水被引入了支流. 比如提交一次后,dev指针往后移动一步,而master指针不变当在master分支合并dev分支时,因为他们在一条线上,这种单线的历史分支不存在任何需要解决的分歧,所以只需要master指针指向dev分支的最新一次提交即可,所以非常快。所以你看,git不仅创建分支快,合并分支也很快!就改改指针,工作区内容也不变!合并完分支后,甚至可以删除dev分支。删除dev分支就是把dev指针给删掉,删掉后,我们就剩下了一条master分支,甚至都看不出来添加过dev分支,毁尸灭迹了实操:1、在当前分支下创建子分支并切换# 1.1 创建+切换=>两条命令搞定 git branch dev # 在当前分支下创建子分支 git checkout dev # 由当前分支切换到子分支 #1.2 创建+切换=>一条命令搞定 git checkout -b dev # 等同于上述两条命令,代表创建并切换到子分支2、直接切换到已有分支git checkout dev3、查看当前分支devmaster4、切换到dev分支下修改并提交记录/版本git checkout dev echo "111" > c.txt git add . git commit -m "v4" git checkout master git merge dev # git merge命令用于合并指定分支到当前分支。如果顺着一个分支走下去可以到达另一个分支的话,那么 Git 在合并两者时,只会简单地把指针右移因为这种单线的历史分支不存在任何需要解决的分歧,所以这种合并过程可以称为快进(Fastforward),上述合并git merge dev用的就是Fast-forward快进模式,毫无疑问不是每次合并都能采用Fast-forward。 合并完成后,就可以放心地删除dev分支了 $ git branch -d dev Deleted branch dev (was f1d9621). master因为创建、合并和删除分支非常快,所以Git鼓励你使用分支完成某个任务,合并后再删掉分支,这和直接在master分支上工作效果是一样的,但过程更安全。5、switch因为get checkout -- 文件通常是用来撤销修改的,又用它来创建并切换分支,有点容易让人混淆,所以 最新版本的Git提供了新的git switch命令来创建or切换分支,推荐使用 $ git switch -c dev # 创建并切换到新的dev分支,等同于git checkout -b dev $ git switch master # 直接切换到已有的master分支三、分支管理策略
 -
Git基本使用 一、创建仓库并出事还//查看某个命令文档 git help <command> git <command> -h git <command> --help # 1、创建仓库 mkdir /Users/linhaifeng/pro # 2、初始化,表示即将对当前文件夹进行版本控制 cd /Users/linhaifeng/pro git init #注意 1、创建版本库,版本库又名仓库,英文名repository,你可以简单理解成一个目录,这个目录里面的所有文件都可以被Git管理起来,每个文件的修改、删除,Git都能跟踪,以便任何时刻都可以追踪历史,或者在将来某个时刻可以“还原”。 2、在仓库目录下执行git init后会生成一个隐藏目录.git,该隐藏目录就是Git用来跟踪管理版本库的,没事千万不要手动修改这个目录里面的文件,不然改乱了,就把Git仓库给破坏了。 3、如果你使用Windows系统,为了避免遇到各种莫名其妙的问题,请确保目录名(包括父目录)不包含中文。 4、后期的git命令都需要在仓库目录下执行,在仓库目录外执行git命令是没有意义的二、工作区与版本库2.1、Git只能管理文本文件不能管理二进制文件所有的版本控制系统,其实只能跟踪文本文件的改动,比如TXT文件,网页,所有的程序代码等等,Git也不例外。版本控制系统可以告诉你每次的改动,比如在第5行加了一个单词“Linux”,在第8行删了一个单词“Windows”。而图片、视频这些二进制文件,虽然也能由版本控制系统管理,但没法跟踪文件的变化,只能把二进制文件每次改动串起来,也就是只知道图片从100KB改成了120KB,但到底改了啥,版本控制系统不知道,也没法知道。 不幸的是,Microsoft的Word格式是二进制格式,因此,版本控制系统是没法跟踪Word文件的改动的,前面我们举的例子只是为了演示,如果要真正使用版本控制系统,就要以纯文本方式编写文件。 因为文本是有编码的,比如中文有常用的GBK编码,日文有Shift_JIS编码,如果没有历史遗留问题,强烈建议使用标准的UTF-8编码,所有语言使用同一种编码,既没有冲突,又被所有平台所支持。 使用Windows的童鞋要特别注意: 千万不要使用Windows自带的**记事本**编辑任何文本文件。原因是Microsoft开发记事本的团队使用了一个非常弱智的行为来保存UTF-8编码的文件,他们自作聪明地在每个文件开头添加了0xefbbbf(十六进制)的字符,你会遇到很多不可思议的问题,比如,网页第一行可能会显示一个“?”,明明正确的程序一编译就报语法错误,等等,都是由记事本的弱智行为带来的。建议你下载Notepad++代替记事本,不但功能强大,而且免费!记得把Notepad++的默认编码设置为UTF-8 without BOM即可2.2、Git每一次提交版本保存的都是对文件内容的完整快照,快照是什么呢?1、针对已变化的文件,那么git保存的是把该文件的完整内容拷贝一份保存下来,而不是差异变化或者文件补丁。因此你可以完全恢复到以前的任一个提交而不会发生任何区别。 2、未变化的文件只保存上一个版本的指针如果我的项目大小是10M,那Git占用的空间是不是随着提交次数的增加线性增加呢?我提交(commit)了10次,占用空间是不是100M呢?很显然不是,Git是很智能的,如果文件没有变化,它只会保存一个指向上一个版本的文件的`指针`,即,对于一个特定版本的文件,Git只会保存一个副本,但可以有多个指向该文件的`指针`。Git最适合保存文本文件,事实上Git就是被设计出来就是为了保存文本文件的,像各种语言的源代码,因为Git可以对文本文件进行很好的压缩和差异分析(大家都见识过了,Git的差异分析可以精确到你添加或者删除了某个字母)。而二进制文件像视频,图片等,Git也能管理,但不能取得较好的效果(压缩比率低,不能差异分析)。实验证明,一个 500k 的文本文件经Git压缩后仅 50k 左右,稍微改变内容后两次提交,会有两个 50k 左右的文件,没错的,保存的是完整快照。而对于二进制文件,像视频,图片,压缩率非常小, Git 占用空间几乎随着提交次数线性增长。2.3、Git把管理的文本呢文件分为两个区域、四种状态。2.3.1、工作区:仓库目录# 当前开发程序所在目录称为工作区,即:工作开发都是在该目录。在我们提交一个版本到版本库后,git会自动检测自该版本之后我们对仓库目录下文件的改动(增、删、改),并标记为修改过的内容,我们可以使用 【git status】命令查看,如下所示 $ cd /Users/linhaifeng/pro # 必须确保已经在仓库目录下执行git命令 $ git status # 查看当前git状态,未检测到任何变化 $ echo "hello egon" >> readme.txt # 在仓库目录下或仓库的子目录下新增文件 $ git status # git会自动检测到工作区的变化:新增了文件readme.txt,显示内容略2.3.2、版本库:即仓库目录下的.git目录,.git不属于工作区# 如果我们想将git检测到的修改过的内容提交为一个新的版本,需要 # 1、先将git检测到的修改过的内容添加到暂存区,用到【git add】命令 git add 文件1 # 可以添加单个文件 git add 文件1 文件2 # 也可以添加多个文件 git add . # 也可以直接添加整个当前目录 #当然,也可以add多次 # 2、然后再执行【git commit -m '又一个版本'】提交到版本库的分支即可 git commit -m "第一次提交" # 注意:执行git commit 命令时,可能会提示进行用户和邮箱的配置,该配置用于记录当前版本由那个用户提交 git config --local user.name 'egon' git config --local user.email 'egon@example.com' 配置级别 –local(默认,高级优先):只影响本地仓库 –global(中优先级):只影响所有当前用户的git仓库 –system(低优先级):影响到全系统的git仓库 # 3、之后可以使用【git log】命令查看版本记录。 git log git log --pretty=oneline # 如果嫌输出信息太多,可以加上--pretty=oneline参数 git log --color --graph 查看reflog,用于找到回滚后的日志 git reflog三、命令小结目前已使用命令如下,使用下述命令已经可以代替本地多个文件保存版本的方式# 一:创建并初始化仓库 mkdir /Users/linhaifeng/pro cd /Users/linhaifeng/pro git init # 二:设置用户与邮箱 git config --local user.name 'Egon' git config --local user.email 'egon@example.com' # 三:查看Git当前状态,如:哪些文件被修改过、哪些文件还在暂存区里尚未被提交到版本库等。 git status # 四:将检测到修改的文件添加到暂存区 git add 文件名 # 五:将暂存区的文件提交到版本库的分支。 git commit -m '提交信息' # 六:查看提交记录,即:历史版本记录 git log git log --pretty=oneline git reflog四、版本回退与前进我们创建Git版本库时,Git自动为我们创建了唯一一个master分支,所以,目前为止,我们执行的git commit就是往master分支上提交更改。 Git的版本库里存了很多东西,其中最重要的就是称为stage(或者叫index)的暂存区,还有Git为我们自动创建的第一个分支master,以及指向master的一个指针叫HEAD,HEAD指针指向的就是当前在用的版本Git的版本回退速度非常快,因为当你回退版本的时候,Git仅仅是把HEAD指向一个制定的版本,然后顺便把工作区的文件更新了。从当前版本,回到过去的版本,如下图所示是向左回退当前版本为版本3,回退到版本1,命令如下:# 1、查看版本信息 $ git log --pretty=oneline 87e199e0a766ecb10028ab93fe57fb4b326445fa (HEAD -> master) 版本3 353b5afb8784f0e19c8dab83be1cb97a93b13bd4 版本2 b740905aaf2753572a714ccdf3bd58a1d437148a 版本1 # 2、回滚到上一个版本 # 2.1 方式1:HEAD指向当前版本,HEAD^代表指向当前版本的上一个,HEAD^^代表指向当前版本的上上个,依次类推,HEAD~n代表指向当前版本的上上上...n个 $ git reset --hard HEAD^ # 如果执行的是git resert --hard HEAD~2 往后数两个版本,就会回到版本1 HEAD is now at 353b5af 版本2 # 2.1 方式2:回到某个指定的版本用git log查询出的commit id号 $ git reset --hard 353b5afb8784f0e19c8dab83be1cb97a93b13bd4从当前版本,回到未来的版本呢,如下图所示是向右前进当前版本为版本1,前进到版本3,命令如下 # 1、用git log查看会发现最新的版本“版本3”不见了!!! $ git log --pretty=oneline 353b5afb8784f0e19c8dab83be1cb97a93b13bd4 (HEAD -> master) 版本2 b740905aaf2753572a714ccdf3bd58a1d437148a 版本1 # 2、我们当然可以在命令终端中往上翻阅查找当初版本3还在时,我们用git log查出的commit id进行操作,但是这种做法毕竟不靠谱。我们可以用更靠谱的命令 $ git reflog ...... 87e199e HEAD@{6}: commit: 版本3 353b5af HEAD@{7}: commit: 版本2 b740905 (HEAD -> master) HEAD@{8}: commit (initial): 版本1 # 3、前进到版本3 $ git reset --hard 87e199e HEAD is now at 87e199e 版本3总结:1、HEAD指向的版本就是当前版本,因此,Git允许我们在版本的历史之间穿梭,使用命令git reset--hard commit id. 2、穿梭前,用git 1og可以查看提交历史,以便确定要回退到哪个版本。 3、要重返未来,用git reflog查看命令历史,以便确定要回到未来的哪个版本3、五、撤销修改场景1:已经提交了不合适的修改到版本库时,想要撤销本次提交,参考上一小节版本回退,不过前提是没有推送到远程库。 场景2: 前提:如果当前文件的内容已经被提交到版本库 操作:之后又修改了该文件,并且git add添加到了暂存区,后续又修改了文件 撤销: 先执行git reset HEAD`将文件从暂存区拿回工作区 再执行git checkout -`将工作区的修改还原到原来的状态(即上一次git commit的状态) 场景3: 前提:如果当前文件的内容从未被提交到版本库 操作:修改了该文件,并且git add添加到了暂存区,后续又修改了文件 撤销: 此时无法执行git reset HEAD 应该执行git checkout - 将工作区的修改还原到git add时文件的内容 总之,git checkout - 就是让这个文件回到最近一次git commit或git add 时的状态。注意:git checkout -- fi1e命令中的--很重要,没有--,就变成了"切换到另一个分支"的命令,我们在后面的分支管理中会再次遇到git checkout命令。六、管理修改Git比其他版本控制系统优秀的一个重要原因就是:Git跟踪并管理的是修改,而非文件。每次修改都需要先add到暂存区,才能提交到版本库,如果每次修改后,不用add添加到暂存区,就不会被commit提交到版本库 $ echo "hello" > a.txt # 第一次修改 $ git add a.txt $ echo "world" >> a.txt # 第二次修改,本次修改并没有add到暂存区,暂存区的a.txt内容为“hello” $ git commit -m "版本1" # 把暂存区的内容提交到版本库 $ git status # 查看到第二次修改仍然存在于工作区,并未提交 $ git diff HEAD -- a.txt # 可以用命令查看版本库最新版本与工作区的区别 diff --git a/a.txt b/a.txt index ce01362..94954ab 100644 --- a/a.txt +++ b/a.txt @@ -1 +1,2 @@ hello +world上述情况,我们可以在版本1的基础上继续操作:将第二次修改也add到暂存区,然后再commit一个“版本2到版本库,也可以在当初的时候先别着急将第一次的修改commit提交成"版本1",先将第二次修改的内容也add到暂存区,然后与第一次的修改合并到一起提交成一个版本七、删除文件在Git中,删除也是一个修改操作,我们实战一下,先添加一个新文件test.txt到Git并且提交: $ git add test.txt $ git commit -m "v1"一般情况下,你通常直接在文件管理器中把没用的文件删了,或者用r命令删了: $ rm test.txt这个时候,Git知道你删除了文件,因此,工作区和版本库就不一致了,git status命令会立刻告诉你哪些文件被删除了: $ git status On branch master Changes not staged for commit: (use "git add/rm <file>..." to update what will be committed) (use "git checkout -- <file>..." to discard changes in working directory) deleted: test.txt no changes added to commit (use "git add" and/or "git commit -a")现在你有两个选择,一是确实要从版本库中删除该文件,那就用命令gitrm删掉,并且gitcommit: $ git rm -f test.txt rm 'test.txt' $ git commit -m "remove test.txt" [master d46f35e] remove test.txt 1 file changed, 1 deletion(-) delete mode 100644 test.txt文件就从版本库中被删除了补充: 可以配置.gitignore配置忽略文件,这些文件不被git追踪 git rm --cached :仅从暂存区删除 git rm :从暂存区与工作目录同时删除 git rm $(git ls-files --deleted):删除所有被跟踪,但是在工作目录被删除的文件小提示:先手动删除文件,然后使用git rm 和git add效果是一样的,都会从版本库中删除掉文件。 另一种情况是删错了,因为版本库里还有呢,所以可以很轻松地把误删的文件恢复到最新版本: $ git checkout -- test.txtgit checkout其实是用版本库里的版本替换工作区的版本,无论工作区是修改还是删除,都可以"一键还原"。 注意:从来没有被添加到版本库就被删除的文件,是无法恢复的! 命令git rm用于删除一个文件。如果一个文件已经被提交到版本库,那么你永远不用担心误删,但是要小心,你只能恢复文件到最新版本,你会丢失最近一次提交后你修改的内容。
-
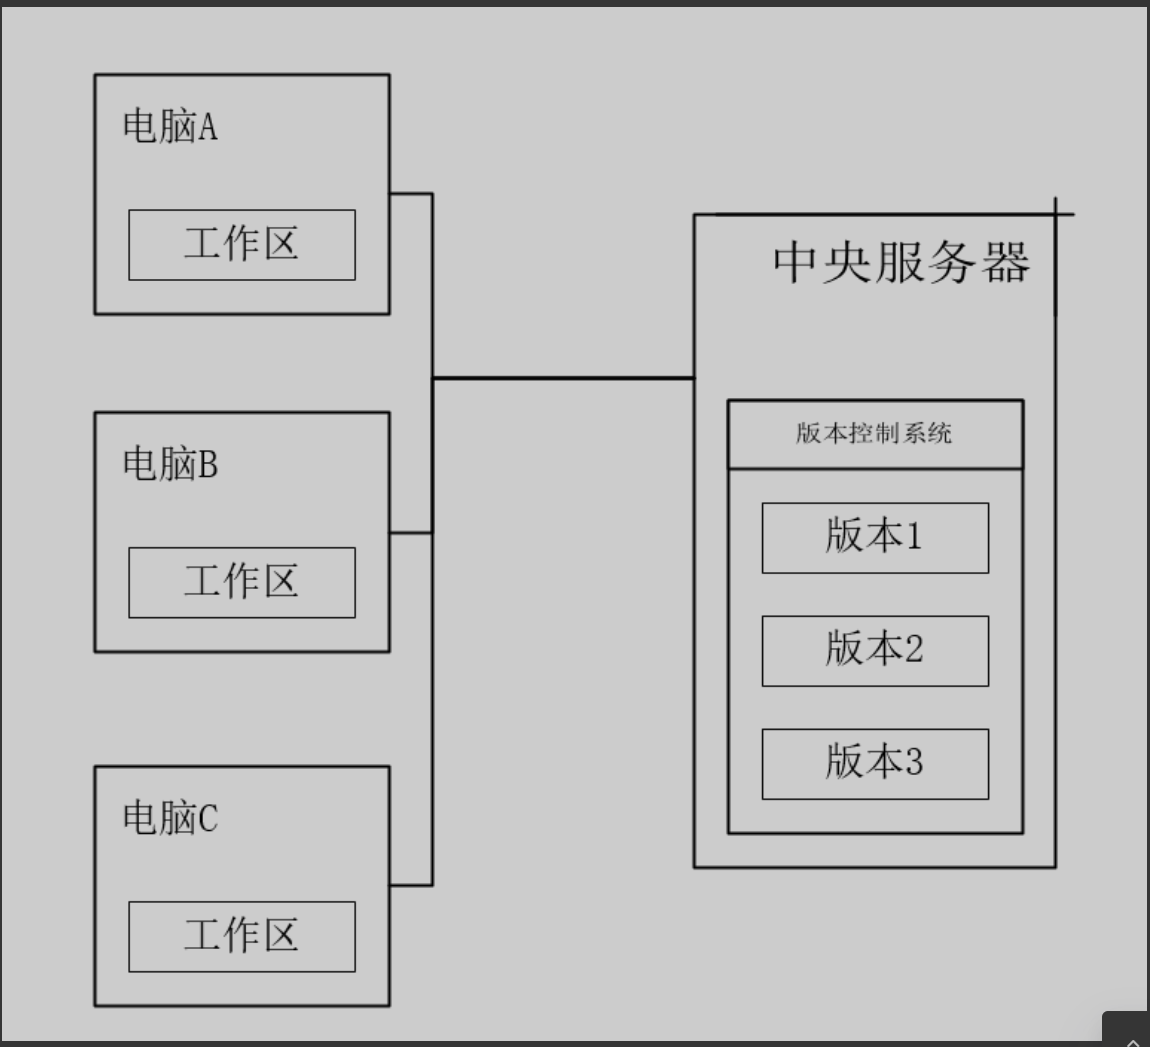
GIt简介 一、Git是什么Git是目前世界上最先进的分布式版本控制系统(没有之一)。 版本控制软件:VSS、CVS、SVN、Git属于霸主地位 版本控制工具包含两部分:、 客户端(本地):本地编写内容以及版本记录 服务端(网盘):将内容和笨笨记录同时保存在远程(可有可无)二、Git的诞生很多人都知道,Linus在1991年创建了开源的Linux,从此,Linux系统不断发展,已经成为最大的服务器系统软件了。 Linus虽然创建了Linux,但Linux的壮大是靠全世界热心的志愿者参与的,这么多人在世界各地为Linux编写代码,那Linux的代码是如何管理的呢? 事实是,在2002年以前,世界各地的志愿者把源代码文件通过dif的方式发给Linus,然后由Linus本人通过手工方式合并代码! 你也许会想,为什么Linus不把Linux代码放到版本控制系统里呢?不是有CVS、SVN这些免费的版本控制系统吗?因为Linus坚定地反对CVS和SVN,这些集中式的版本控制系统不但速度慢,而且必须联网才能使用。有一些商用的版本控制系统,虽然比CVS、SVN好用,但那是付费的,和Linux的开源精神不符 不过,到了2002年,Linux系统已经发展了十年了,代码库之大让Linus很难继续通过手工方式管理了,社区的弟兄们也对这种方式表达了强烈不满,于是Linus选择了一个商业的版本控制系统BitKeeper,BitKeeper的东家BitMover公司出于人道主义精神,授权Linux社区免费使用这个版本控制系统。 安定团结的大好局面在2005年就被打破了,原因是Linux社区牛人聚集,不免沾染了一些梁山好汉的江湖习气。开发Samba的Andrew试图破解BitKeeper的协议(这么干的其实也不只他一个),被BitMover公司发现了(监控工作做得不错!),于是BitMover公司怒了,要收回Linux社区的免费使用权。 Linus可以向BitMover公司道个歉,保证以后严格管教弟兄们,嗯,这是不可能的。实际情况是这样的: Linus花了两周时间自己用C写了一个分布式版本控制系统,这就是Git!一个月之内,Linux系统的源码已经由Git管理了!牛是怎么定义的呢?大家可以体会一下。 Git迅速成为最流行的分布式版本控制系统,尤其是2008年,GitHub网站上线了,它为开源项目免费提供Git存储,无数开源项目开始迁移至GitHub,包括jQuery,PHP,Ruby等等。 历史就是这么偶然,如果不是当年BitMover公司威胁Linux社区,可能现在我们就没有免费而超级好用的Git了三、集中式VS分布式Linus一直痛恨的CVS及SVN都是集中式的版本控制系统,而Git是分布式版本控制系统,集中式和分布式版本控制系统有什么区别呢? 简单地讲: 1、集中式 (1)必须有中央服务器 (2)中央服务器存放所有的版本信息,程序员的机器上只有某个版本 (3)程序的开发工作离不开中央服务器,因为需要将新版本提交到中央服务器or从中央服务器拉下来最新版本进行开发 2、分布式 (1)可以有中央服务器 (2)中央服务器存放所有的版本信息,程序员的机器上也保存了所有版本 (3)中央服务器存在的核心意义就是一个网盘的作用,即便没有中央服务器,程序员照样可以工作
-
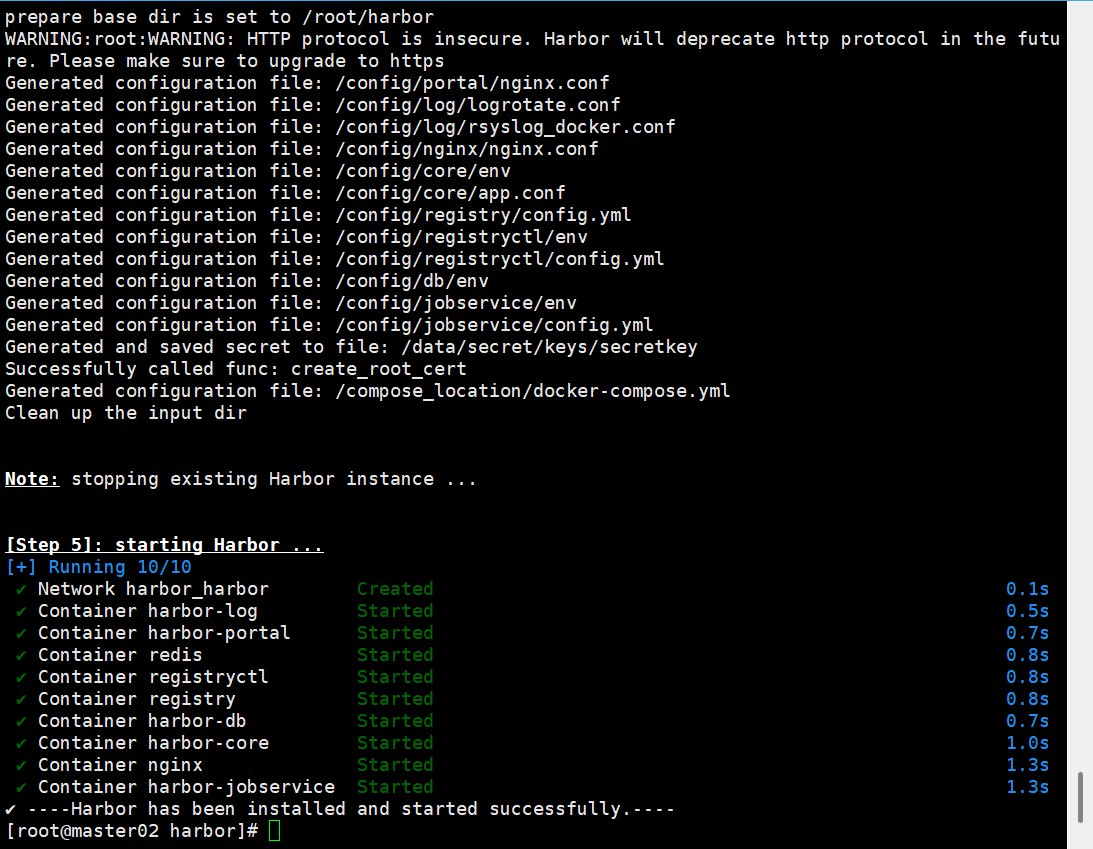
Harbor仓库安装 一、安装harborhttps://github.com/docker/compose/releases/download/v2.32.2/docker-compose-linux-x86_64 #docker-compose-linux-x86_64改docker-compose 放到/usr/local/bin/二、安装dockersudo yum update -y sudo yum install -y yum-utils device-mapper-persistent-data lvm2 #添加docker仓库 sudo yum-config-manager --add-repo https://download.docker.com/linux/centos/docker-ce.repo #安装docker CE社区版 # 列出可用版本 yum list docker-ce --showduplicates | sort -r # 安装指定版本,例如 20.10.10 sudo yum install -y docker-ce-20.10.10 docker-ce-cli-20.10.10 containerd.io #安装最新版 sudo yum install -y docker-ce docker-ce-cli containerd.io #启动 sudo systemctl start docker sudo systemctl enable docker直接运行sudo ./install.sh支持http 默认拉取、推送到镜像仓库要使用https , 由于我们这里没有https,需要用http , 所以我们要在deploy-server.com服务器上执行如下 $ echo '{"insecure-registries":["192.168.3.20:8077"] }' >> /etc/docker/daemon.json三、秘钥mkdir /opt/cert && cd /opt/cert#创建admin-csr.json(kubernetes) cat > admin-csr.json << EOF { "CN":"admin", "key":{ "algo":"rsa", "size":2048 }, "names":[ { "C":"CN", "L":"BeiJing", "ST":"BeiJing", "O":"system:masters", "OU":"System" } ] } EOF#下载工具和添加执行权限 wget https://pkg.cfssl.org/R1.2/cfssl_linux-amd64 wget https://pkg.cfssl.org/R1.2/cfssljson_linux-amd64 chmod +x cfssljson_linux-amd64 chmod +x cfssl_linux-amd64 #移动到/usr/local/bin mv cfssljson_linux-amd64 cfssljson mv cfssl_linux-amd64 cfssl mv cfssljson cfssl /usr/local/bin#创建证书私钥 cfssl gencert -ca=/etc/kubernetes/pki/ca.crt -ca-key=/etc/kubernetes/pki/ca.key --profile=kubernetes admin-csr.json | cfssljson -bare admin#配置证书(kubernetes) openssl pkcs12 -export -out ./jenkins-admin.pfx -inkey ./admin-key.pem -in ./admin.pem -passout pass:123456[root@master01 cert]# kubectl create secret generic kubeconfig --from-file=/root/.kube/config secret/kubeconfig created
-
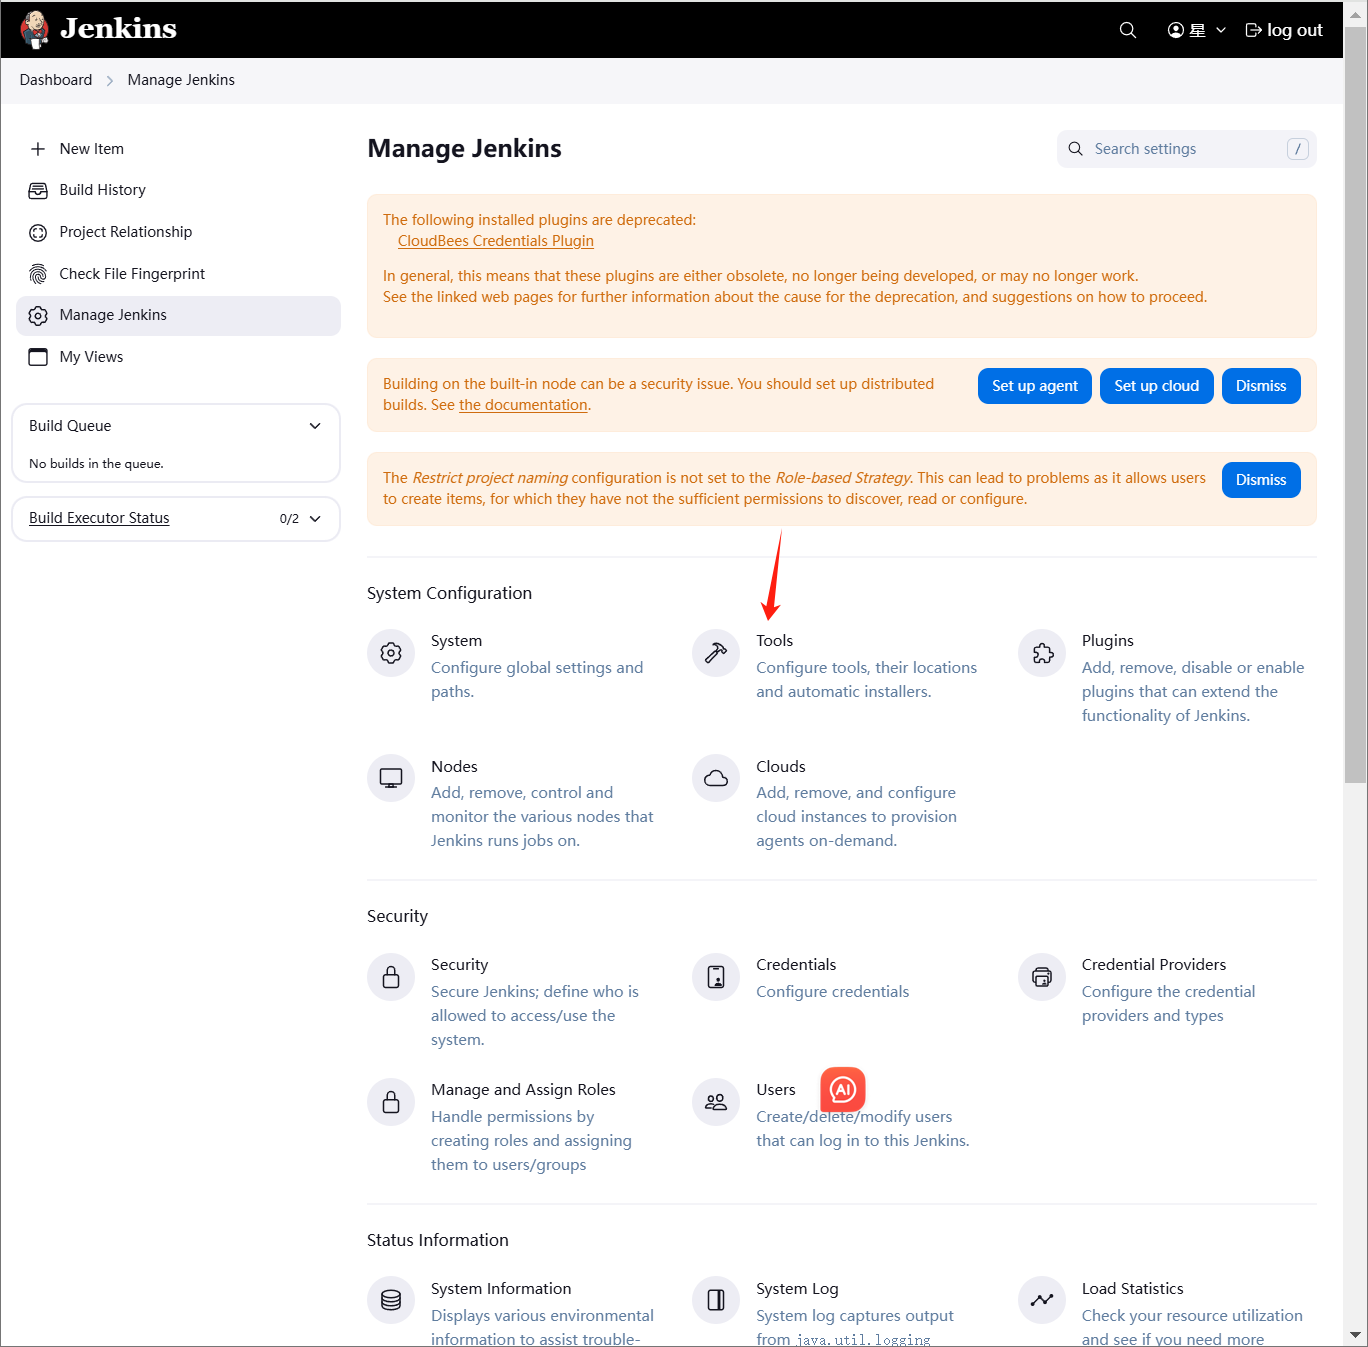
jenkins部署tomcat jenkins部署tomcatmaven编译环境(jenkins服务器) 运行环境(web服务器)一、部署maven编译环境(jenkins)Maven是一个Java项目管理和构建工具,它可以定义项目结构、项目依赖,并使用统一的方式进行自动化构建,是Java项目不可缺少的工具。1.jenkins部署maven软件1.1下载安装包cd /opt wget https://mirrors.aliyun.com/apache/maven/maven-3/3.9.9/binaries/apache-maven-3.9.9-bin.tar.gz1.2解压tar -xf apache-maven-3.9.9-bin.tar.gz -C /usr/local/1.3配置环境变量[root@master01 opt]# vim /etc/profile.d/maven.sh [root@master01 opt]# cat /etc/profile.d/maven.sh export MAVEN_HOME=/usr/local/apache-maven-3.9.9 export PATH=$MAVEN_HOME/bin:$PATH [root@master01 opt]# source /etc/profile [root@master01 opt]# #刷新1.4安装JDK#jenkins安装的时候部署过 [root@master01 opt]# mvn --version Apache Maven 3.9.9 (8e8579a9e76f7d015ee5ec7bfcdc97d260186937) Maven home: /usr/local/apache-maven-3.9.9 Java version: 17.0.0.1, vendor: Oracle Corporation, runtime: /opt/jdk-17.0.0.1 Default locale: zh_CN, platform encoding: UTF-8 OS name: "linux", version: "3.10.0-1160.el7.x86_64", arch: "amd64", family: "unix"2.配置jenkins+maven2.1配置JDK2.2配置maven环境变量2.3安装maven插件3.创建代码仓库4.模拟代码上传4.1拉取新仓库[root@master01 opt]# cd /root [root@master01 ~]# git clone git@192.168.3.100:root/tomcat.git 正克隆到 'tomcat'... remote: Enumerating objects: 3, done. remote: Counting objects: 100% (3/3), done. remote: Compressing objects: 100% (2/2), done. remote: Total 3 (delta 0), reused 0 (delta 0), pack-reused 0 (from 0) 接收对象中: 100% (3/3), done. [root@master01 ~]# cd /tmp/ [root@master01 tmp]# cd /root/tomcat/ [root@master01 tomcat]# ls README.md4.2配置个人信息[root@master01 tomcat]# git config --global user.email "123@qq.com" [root@master01 tomcat]# git config --global user.name "axingkf"4.3模拟代码上传vi javatest.java public class JavaVersion { public static void main(String[] args) { // 打印当前 Java 版本信息 System.out.println("Java Version: " + System.getProperty("java.version")); System.out.println("Java Vendor: " + System.getProperty("java.vendor")); System.out.println("Java Vendor URL: " + System.getProperty("java.vendor.url")); System.out.println("Java Home: " + System.getProperty("java.home")); } }#添加所有文件到暂存区 [root@master01 tomcat]# git add . #提交暂存区的制定文件到仓库区 [root@master01 tomcat]# git commit -m "第一次java开发" [main 51687a7] 第一次java开发 1 file changed, 9 insertions(+) create mode 100644 javatest.java #没有master这个分区 [root@master01 tomcat]# git push -u origin master error: src refspec master does not match any. error: 无法推送一些引用到 'git@192.168.3.100:root/tomcat.git' # 上传到远程 [root@master01 tomcat]# git push -u origin main Counting objects: 4, done. Delta compression using up to 8 threads. Compressing objects: 100% (3/3), done. Writing objects: 100% (3/3), 488 bytes | 0 bytes/s, done. Total 3 (delta 0), reused 0 (delta 0) To git@192.168.3.100:root/tomcat.git c086be9..51687a7 main -> main 分支 main 设置为跟踪来自 origin 的远程分支 main。 [root@master01 tomcat]# 5、创建maven仓库mkdir -pv /data/software/repository chown jenkins.jenkins /data/software/repository/vim /usr/local/apache-maven-3.6.3/conf/settings.xml #添加本地仓库路径和阿里云镜像 <?xml version="1.0" encoding="UTF-8"?> <!-- Licensed to the Apache Software Foundation (ASF) under one or more contributor license agreements. See the NOTICE file distributed with this work for additional information regarding copyright ownership. The ASF licenses this file to you under the Apache License, Version 2.0 (the "License"); you may not use this file except in compliance with the License. You may obtain a copy of the License at http://www.apache.org/licenses/LICENSE-2.0 Unless required by applicable law or agreed to in writing, software distributed under the License is distributed on an "AS IS" BASIS, WITHOUT WARRANTIES OR CONDITIONS OF ANY KIND, either express or implied. See the License for the specific language governing permissions and limitations under the License. --> <!-- | This is the configuration file for Maven. It can be specified at two levels: | | 1. User Level. This settings.xml file provides configuration for a single user, | and is normally provided in ${user.home}/.m2/settings.xml. | | NOTE: This location can be overridden with the CLI option: | | -s /path/to/user/settings.xml | | 2. Global Level. This settings.xml file provides configuration for all Maven | users on a machine (assuming they're all using the same Maven | installation). It's normally provided in | ${maven.conf}/settings.xml. | | NOTE: This location can be overridden with the CLI option: | | -gs /path/to/global/settings.xml | | The sections in this sample file are intended to give you a running start at | getting the most out of your Maven installation. Where appropriate, the default | values (values used when the setting is not specified) are provided. | |--> <settings xmlns="http://maven.apache.org/SETTINGS/1.2.0" xmlns:xsi="http://www.w3.org/2001/XMLSchema-instance" xsi:schemaLocation="http://maven.apache.org/SETTINGS/1.2.0 https://maven.apache.org/xsd/settings-1.2.0.xsd"> <!-- localRepository --> <localRepository>/data/software/repository</localRepository> <!-- Mirrors --> <mirrors> <!-- Add Aliyun Maven Mirror --> <mirror> <id>aliyun</id> <mirrorOf>central</mirrorOf> <name>Aliyun Maven Mirror</name> <url>https://maven.aliyun.com/repository/public</url> <blocked>false</blocked> </mirror> <mirror> <id>maven-default-http-blocker</id> <mirrorOf>external:http:*</mirrorOf> <name>Pseudo repository to mirror external repositories initially using HTTP.</name> <url>http://0.0.0.0/</url> <blocked>true</blocked> </mirror> </mirrors> <!-- interactiveMode --> <!-- This will determine whether maven prompts you when it needs input. If set to false, maven will use a sensible default value, perhaps based on some other setting, for the parameter in question. --> <!-- <interactiveMode>true</interactiveMode> --> <!-- offline --> <!-- Determines whether maven should attempt to connect to the network when executing a build. This will have an effect on artifact downloads, artifact deployment, and others. --> <!-- <offline>false</offline> --> <!-- pluginGroups --> <pluginGroups> <!-- pluginGroup | Specifies a further group identifier to use for plugin lookup. <pluginGroup>com.your.plugins</pluginGroup> --> </pluginGroups> <!-- proxies --> <!-- This is a list of proxies which can be used on this machine to connect to the network. Unless otherwise specified (by system property or command-line switch), the first proxy specification in this list marked as active will be used. --> <proxies> <!-- proxy | Specification for one proxy, to be used in connecting to the network. | <proxy> <id>optional</id> <active>true</active> <protocol>http</protocol> <username>proxyuser</username> <password>proxypass</password> <host>proxy.host.net</host> <port>80</port> <nonProxyHosts>local.net|some.host.com</nonProxyHosts> </proxy> --> </proxies> <!-- servers --> <!-- This is a list of authentication profiles, keyed by the server-id used within the system. Authentication profiles can be used whenever maven must make a connection to a remote server. --> <servers> <!-- server | Specifies the authentication information to use when connecting to a particular server, identified by | a unique name within the system (referred to by the 'id' attribute below). | | NOTE: You should either specify username/password OR privateKey/passphrase, since these pairings are | used together. | <server> <id>deploymentRepo</id> <username>repouser</username> <password>repopwd</password> </server> --> <!-- Another sample, using keys to authenticate. <server> <id>siteServer</id> <privateKey>/path/to/private/key</privateKey> <passphrase>optional; leave empty if not used.</passphrase> </server> --> </servers> <!-- profiles --> <!-- This is a list of profiles which can be activated in a variety of ways, and which can modify the build process. Profiles provided in the settings.xml are intended to provide local machine- specific paths and repository locations which allow the build to work in the local environment. --> <profiles> <!-- profile | Specifies a set of introductions to the build process, to be activated using one or more of the | mechanisms described above. For inheritance purposes, and to activate profiles via <activatedProfiles/> | or the command line, profiles have to have an ID that is unique. | | An encouraged best practice for profile identification is to use a consistent naming convention | for profiles, such as 'env-dev', 'env-test', 'env-production', 'user-jdcasey', 'user-brett', etc. | This will make it more intuitive to understand what the set of introduced profiles is attempting | to accomplish, particularly when you only have a list of profile id's for debug. | | This profile --> </profiles> </settings>6、测试maven测试二、部署运行环境1、安装tomcat略2、配置方便启动[Unit] Description=Tomcat 9 After=network.target [Service] Type=forking User=tomcat Group=tomcat Environment=JAVA_HOME=/usr/local/java/jdk-17.0.0.1 Environment=CATALINA_PID=/opt/apache-tomcat-9.0.98/temp/tomcat.pid Environment=CATALINA_HOME=/opt/apache-tomcat-9.0.98 Environment=CATALINA_BASE=/opt/apache-tomcat-9.0.98 Environment='CATALINA_OPTS=-Xms512M -Xmx1024M' ExecStart=/opt/apache-tomcat-9.0.98/bin/startup.sh ExecStop=/opt/apache-tomcat-9.0.98/bin/shutdown.sh [Install] WantedBy=multi-user.target访问测试2、修改tomcat监控权限vim /opt/apache-tomcat-9.0.98/conf/tomcat-users.xml<?xml version="1.0" encoding="UTF-8"?> <!-- Licensed to the Apache Software Foundation (ASF) under one or more contributor license agreements. See the NOTICE file distributed with this work for additional information regarding copyright ownership. The ASF licenses this file to You under the Apache License, Version 2.0 (the "License"); you may not use this file except in compliance with the License. You may obtain a copy of the License at http://www.apache.org/licenses/LICENSE-2.0 Unless required by applicable law or agreed to in writing, software distributed under the License is distributed on an "AS IS" BASIS, WITHOUT WARRANTIES OR CONDITIONS OF ANY KIND, either express or implied. See the License for the specific language governing permissions and limitations under the License. --> <tomcat-users xmlns="http://tomcat.apache.org/xml" xmlns:xsi="http://www.w3.org/2001/XMLSchema-instance" xsi:schemaLocation="http://tomcat.apache.org/xml tomcat-users.xsd" version="1.0"> <!-- By default, no user is included in the "manager-gui" role required to operate the "/manager/html" web application. If you wish to use this app, you must define such a user - the username and password are arbitrary. Built-in Tomcat manager roles: - manager-gui - allows access to the HTML GUI and the status pages - manager-script - allows access to the HTTP API and the status pages - manager-jmx - allows access to the JMX proxy and the status pages - manager-status - allows access to the status pages only --> <role rolename="tomcat"/> <role rolename="role1"/> <role rolename="manager-script"/> <role rolename="manager-gui"/> <role rolename="manager-status"/> <role rolename="admin-gui"/> <role rolename="admin-script"/> <user username="tomcat" password="tomcat" roles="manager-gui,manager-script,tomcat,admin-gui,admin-script"/> </tomcat-users> /opt/apache-tomcat-9.0.98/webapps/manager/META-INF/context.xml <?xml version="1.0" encoding="UTF-8"?> <!-- Licensed to the Apache Software Foundation (ASF) under one or more contributor license agreements. See the NOTICE file distributed with this work for additional information regarding copyright ownership. The ASF licenses this file to You under the Apache License, Version 2.0 (the "License"); you may not use this file except in compliance with the License. You may obtain a copy of the License at http://www.apache.org/licenses/LICENSE-2.0 Unless required by applicable law or agreed to in writing, software distributed under the License is distributed on an "AS IS" BASIS, WITHOUT WARRANTIES OR CONDITIONS OF ANY KIND, either express or implied. See the License for the specific language governing permissions and limitations under the License. --> <Context antiResourceLocking="false" privileged="true" > <CookieProcessor className="org.apache.tomcat.util.http.Rfc6265CookieProcessor" sameSiteCookies="strict" /> <Valve className="org.apache.catalina.valves.RemoteAddrValve" allow=".*" /> <Manager sessionAttributeValueClassNameFilter="java\.lang\.(?:Boolean|Integer|Long|Number|String)|org\.apache\.catalina\.filters\.CsrfPreventionFilter\$LruCache(?:\$1)?|java\.util\.(?:Linked)?HashMap"/> </Context> systemctl restart tomcat #重启3、配置jenkisn操作tomcat3.1下载部署插件3.2添加凭证3.3部署创建后操作3.4检查3.5jenkins构建记录