搜索到
8
篇与
的结果
-
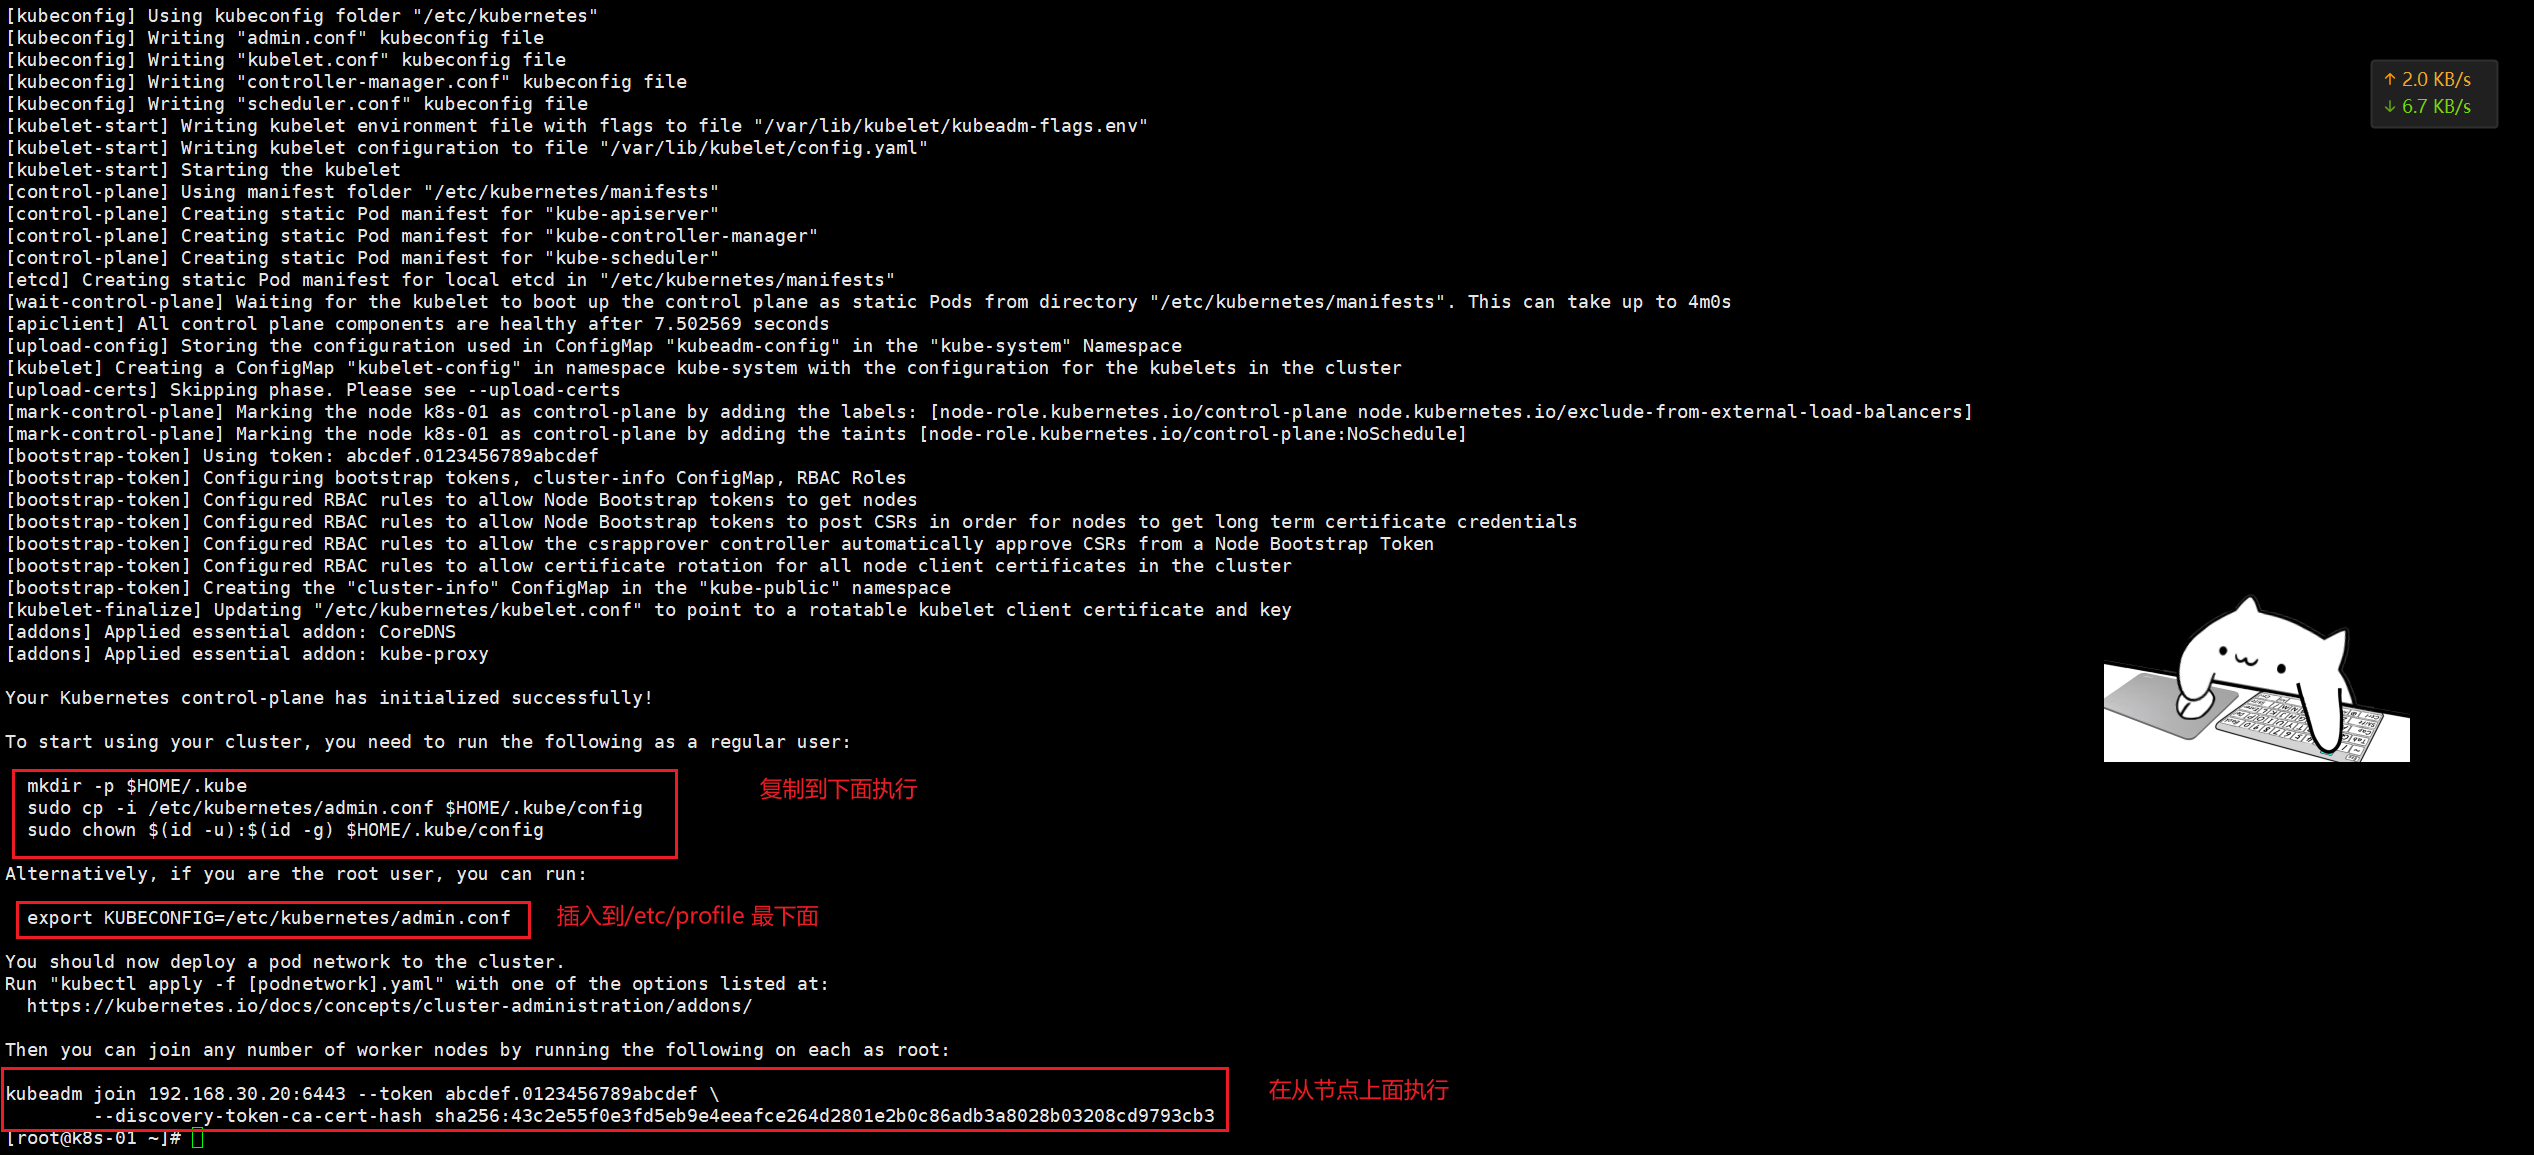
 rocky linux 9 安装 多主架构 一、固定IP地址#配置 sudo nmcli connection modify ens160 \ ipv4.method manual \ ipv4.addresses 192.168.30.50/24 \ ipv4.gateway 192.168.30.2 \ ipv4.dns "8.8.8.8,8.8.4.4" #更新配置 sudo nmcli connection down ens160 && sudo nmcli connection up ens160二、准备工作 2.0 修改主机名#每个节点对应一个 hostnamectl set-hostname k8s-01 hostnamectl set-hostname k8s-02 hostnamectl set-hostname k8s-03#提前配好vip ip 三个节点都要做 cat >>/etc/hosts <<'EOF' 192.168.30.50 k8s-01 192.168.30.51 k8s-02 192.168.30.52 k8s-03 192.168.30.58 k8s-vip EOF2.1 配置yum源#sudo mkdir /etc/yum.repos.d/backup #sudo mv /etc/yum.repos.d/*.repo /etc/yum.repos.d/backup/ 直接执行下面的 # 使用阿里云推荐的配置方法 sudo sed -e 's!^mirrorlist=!#mirrorlist=!g' \ -e 's!^#baseurl=http://dl.rockylinux.org/$contentdir!baseurl=https://mirrors.aliyun.com/rockylinux!g' \ -i /etc/yum.repos.d/Rocky-*.repo #清理并重建缓存 sudo dnf clean all sudo dnf makecache #测试更新 sudo dnf -y update sudo dnf -y install wget curl vim tar gzip2.2设置时区#查看当前时区设置 timedatectl #设置时区为中国时区(上海时间) sudo timedatectl set-timezone Asia/Shanghai2.3设置时间#安装并配置 Chrony(推荐) # RHEL/CentOS/Alma/Rocky sudo dnf -y install chrony || sudo yum -y install chrony sudo systemctl enable --now chronyd # 编辑配置文件 sudo vi /etc/chrony.conf #把默认的 pool/server 行注释掉(没外网也无用),然后加入(或确认存在)以下内容: # 把 30.50 作为“本地时间源”,无外部上游时自成一体 local stratum 10 # 允许本网段客户端访问 allow 192.168.30.0/24 # 绑定监听到这块网卡(可选,但建议写上) bindaddress 192.168.30.50 # 客户端第一次偏差大时允许快速步进校时 makestep 1 3 # 用系统时钟做源,且把系统时间同步到硬件时钟(断电后也较准) rtcsync #保存重启 sudo systemctl restart chronyd #防火墙放行 # firewalld(RHEL系) sudo firewall-cmd --add-service=ntp --permanent sudo firewall-cmd --reload #验证服务器状态 # 查看 chrony 源与自我状态 chronyc tracking # 查看已连接的客户端(执行一会儿后能看到) chronyc clients # 确认监听 123/udp sudo ss -lunp | grep :123# 客户端安装 # RHEL系 sudo dnf -y install chrony || sudo yum -y install chrony # Debian/Ubuntu sudo apt -y install chrony # 配置(RHEL: /etc/chrony.conf;Ubuntu/Debian: /etc/chrony/chrony.conf) # 注释掉原来的 pool/server 行,新增: server 192.168.30.50 iburst # 重启并查看 sudo systemctl restart chronyd chronyc sources -v chronyc tracking2.4关闭swap分区sudo swapoff -a sudo sed -ri '/\sswap\s/s/^#?/#/' /etc/fstab2.5关闭selinuxsudo systemctl disable --now firewalld #推荐:保持 Enforcing(Kubernetes + containerd 在 RHEL9 系已支持),同时安装策略包: sudo dnf -y install container-selinux getenforce # 看到 Enforcing 即可 #图省事(不太安全):设为 Permissive: sudo setenforce 0 sudo sed -i 's/^SELINUX=enforcing/SELINUX=permissive/' /etc/selinux/config2.6内核模块与 sysctl(所有节点)# 加载并持久化必须内核模块 cat <<'EOF' | sudo tee /etc/modules-load.d/k8s.conf overlay br_netfilter EOF sudo modprobe overlay sudo modprobe br_netfilter # 必备内核参数(转发与桥接) cat <<'EOF' | sudo tee /etc/sysctl.d/99-kubernetes-cri.conf net.bridge.bridge-nf-call-iptables = 1 net.bridge.bridge-nf-call-ip6tables = 1 net.ipv4.ip_forward = 1 EOF sudo sysctl --system #说明:RHEL9/ Rocky9 默认 cgroup v2,Kubernetes + containerd 完全支持,无需改动。2.7文件描述符(fd/ulimit)与进程数# 系统级最大打开文件数 cat > /etc/security/limits.d/k8s.conf <<EOF * soft nofile 65535 * hard nofile 131070 EOF ulimit -Sn ulimit -Hn2.8kube-proxy 的 IPVS 模式#安装 sudo dnf -y install ipset ipvsadm cat <<'EOF' | sudo tee /etc/modules-load.d/k8s.conf overlay br_netfilter # 如启用 IPVS,取消以下行的注释: ip_vs ip_vs_rr ip_vs_wrr ip_vs_sh nf_conntrack EOF # 立即加载 sudo modprobe overlay sudo modprobe br_netfilter # 如果要用 IPVS,再执行: for m in ip_vs ip_vs_rr ip_vs_wrr ip_vs_sh nf_conntrack; do sudo modprobe $m; done #验证模块 lsmod | egrep 'br_netfilter|ip_vs|nf_conntrack'三、安装containerd(所有k8s节点都要做) 3.1 使用阿里云的源sudo dnf config-manager --set-enabled powertools # Rocky Linux 8/9需启用PowerTools仓库 sudo dnf install -y yum-utils device-mapper-persistent-data lvm2 #1、卸载之前的 dnf remove docker docker-ce containerd docker-common docker-selinux docker-engine -y #2、准备repo sudo tee /etc/yum.repos.d/docker-ce.repo <<-'EOF' [docker-ce-stable] name=Docker CE Stable - AliOS baseurl=https://mirrors.aliyun.com/docker-ce/linux/centos/$releasever/$basearch/stable enabled=1 gpgcheck=1 gpgkey=https://mirrors.aliyun.com/docker-ce/linux/centos/gpg EOF # 3、安装 sudo dnf install -y containerd.io sudo dnf install containerd* -y3.2配置# 1、配置 mkdir -pv /etc/containerd containerd config default > /etc/containerd/config.toml #为containerd生成配置文件 #2、替换默认pause镜像地址:这一步非常非常非常非常重要 grep sandbox_image /etc/containerd/config.toml sudo sed -i 's|registry.k8s.io/pause:3.8|registry.cn-guangzhou.aliyuncs.com/xingcangku/registry.k8s.io-pause:3.8|g' /etc/containerd/config.toml grep sandbox_image /etc/containerd/config.toml #请务必确认新地址是可用的: sandbox_image = "registry.cn-guangzhou.aliyuncs.com/xingcangku/registry.k8s.io-pause:3.8" #3、配置systemd作为容器的cgroup driver grep SystemdCgroup /etc/containerd/config.toml sed -i 's/SystemdCgroup \= false/SystemdCgroup \= true/' /etc/containerd/config.toml grep SystemdCgroup /etc/containerd/config.toml # 4、配置加速器(必须配置,否则后续安装cni网络插件时无法从docker.io里下载镜像) #参考:https://github.com/containerd/containerd/blob/main/docs/cri/config.md#registry-configuration #添加 config_path="/etc/containerd/certs.d" sed -i 's/config_path\ =.*/config_path = \"\/etc\/containerd\/certs.d\"/g' /etc/containerd/config.tomlmkdir -p /etc/containerd/certs.d/docker.io cat>/etc/containerd/certs.d/docker.io/hosts.toml << EOF server ="https://docker.io" [host."https ://dockerproxy.com"] capabilities = ["pull","resolve"] [host."https://docker.m.daocloud.io"] capabilities = ["pull","resolve"] [host."https://docker.chenby.cn"] capabilities = ["pull","resolve"] [host."https://registry.docker-cn.com"] capabilities = ["pull","resolve" ] [host."http://hub-mirror.c.163.com"] capabilities = ["pull","resolve" ] EOF#5、配置containerd开机自启动 #5.1 启动containerd服务并配置开机自启动 systemctl daemon-reload && systemctl restart containerd systemctl enable --now containerd #5.2 查看containerd状态 systemctl status containerd #5.3查看containerd的版本 ctr version四、安装nginx+keepalived#安装与开启 dnf install -y nginx keepalived curl dnf install -y nginx-mod-stream systemctl enable nginx keepalived #配置 Nginx(两台 Master 都要配) #目标:在本机 0.0.0.0:16443 监听,转发到两个后端的 kube-apiserver(50:16443、51:16443) #编辑 /etc/nginx/nginx.conf(保留 http 段也没关系,关键是顶层加上 stream 段;Rocky9 的 nginx 支持动态模块): # /etc/nginx/nginx.conf user nginx; worker_processes auto; error_log /var/log/nginx/error.log; pid /run/nginx.pid; # 使用系统提供的动态模块配置(若已安装将自动加载 stream 模块) include /usr/share/nginx/modules/*.conf; events { worker_connections 10240; } # 四层转发到两台 apiserver stream { upstream k8s_apiserver { server 192.168.30.50:6443 max_fails=3 fail_timeout=10s; server 192.168.30.51:6443 max_fails=3 fail_timeout=10s; } server { listen 0.0.0.0:16443; proxy_connect_timeout 5s; proxy_timeout 30s; proxy_pass k8s_apiserver; } } http { # 这里保持nginx默认 http 配置即可,删与不删均可。 include /etc/nginx/mime.types; default_type application/octet-stream; sendfile on; keepalive_timeout 65; server { listen 81; return 200 "ok\n"; } } #配置 Keepalived(两台 Master) #创建健康检查脚本 /etc/keepalived/check_nginx_kube.sh: cat >/etc/keepalived/check_nginx_kube.sh <<'EOF' #!/usr/bin/env bash # 通过本地Nginx转发口探活K8s apiserver(无认证的 /readyz,HTTP 200 即通过) curl -fsSk --connect-timeout 2 https://127.0.0.1:16443/readyz >/dev/null EOF chmod +x /etc/keepalived/check_nginx_kube.sh #Master1(192.168.30.50) 的 /etc/keepalived/keepalived.conf: ! Configuration File for keepalived global_defs { router_id LVS_K8S_50 # vrrp_strict # 若使用部分虚拟化/容器网络会引发问题,可注释掉 } vrrp_script chk_nginx_kube { script "/etc/keepalived/check_nginx_kube.sh" interval 3 timeout 2 fall 2 rise 2 weight -20 } vrrp_instance VI_1 { state BACKUP interface ens160 # 改为你的网卡 virtual_router_id 58 # 1-255 任意一致值,这里取 58 priority 150 # Master1 高优先 advert_int 1 # 单播,避免二层组播受限环境(强烈推荐) unicast_src_ip 192.168.30.50 unicast_peer { 192.168.30.51 } authentication { auth_type PASS auth_pass 9c9c58 } virtual_ipaddress { 192.168.30.58/24 dev ens160 } track_script { chk_nginx_kube } } #Master2(192.168.30.151) 的 /etc/keepalived/keepalived.conf: ! Configuration File for keepalived global_defs { router_id LVS_K8S_51 # vrrp_strict } vrrp_script chk_nginx_kube { script "/etc/keepalived/check_nginx_kube.sh" interval 3 timeout 2 fall 2 rise 2 weight -20 } vrrp_instance VI_1 { state BACKUP interface ens160 virtual_router_id 58 priority 100 # 次优先 advert_int 1 unicast_src_ip 192.168.30.51 unicast_peer { 192.168.30.50 } authentication { auth_type PASS auth_pass 9c9c58 } virtual_ipaddress { 192.168.30.58/24 dev ens160 } track_script { chk_nginx_kube } } #启动 systemctl restart keepalived ip a | grep 192.168.30.58 #停掉 Master1 的 keepalived:systemctl stop keepalived,VIP 应在 Master2 出现,验证完再 systemctl start keepalived。五、安装k8s 5.1 准备k8s源# 创建repo文件 cat <<EOF | sudo tee /etc/yum.repos.d/kubernetes.repo [kubernetes] name=Kubernetes baseurl=https://mirrors.aliyun.com/kubernetes/yum/repos/kubernetes-el7-x86_64/ enabled=1 gpgcheck=1 repo_gpgcheck=1 gpgkey=https://mirrors.aliyun.com/kubernetes/yum/doc/yum-key.gpg https://mirrors.aliyun.com/kubernetes/yum/doc/rpm-package-key.gpg EOF sudo dnf makecache #参考:https://developer.aliyun.com/mirror/kubernetes/setenforce dnf install -y kubelet-1.27* kubeadm-1.27* kubectl-1.27* systemctl enable kubelet && systemctl start kubelet && systemctl status kubelet 安装锁定版本的插件 sudo dnf install -y dnf-plugin-versionlock 锁定版本不让后续更新sudo dnf versionlock add kubelet-1.27* kubeadm-1.27* kubectl-1.27* containerd.io [root@k8s-01 ~]# sudo dnf versionlock list Last metadata expiration check: 0:35:21 ago on Fri Aug 8 10:40:25 2025. kubelet-0:1.27.6-0.* kubeadm-0:1.27.6-0.* kubectl-0:1.27.6-0.* containerd.io-0:1.7.27-3.1.el9.* #sudo dnf update就会排除锁定的应用5.2 主节点操作(node节点不执行)[root@k8s-01 ~]# kubeadm config images list I0906 16:16:30.198629 49023 version.go:256] remote version is much newer: v1.34.0; falling back to: stable-1.27 registry.k8s.io/kube-apiserver:v1.27.16 registry.k8s.io/kube-controller-manager:v1.27.16 registry.k8s.io/kube-scheduler:v1.27.16 registry.k8s.io/kube-proxy:v1.27.16 registry.k8s.io/pause:3.9 registry.k8s.io/etcd:3.5.7-0 registry.k8s.io/coredns/coredns:v1.10.1 kubeadm config print init-defaults > kubeadm.yaml[root@k8s-01 ~]# cat kubeadm.yaml # kubeadm-config.yaml apiVersion: kubeadm.k8s.io/v1beta3 kind: InitConfiguration bootstrapTokens: - token: abcdef.0123456789abcdef ttl: 24h0m0s usages: ["signing","authentication"] groups: ["system:bootstrappers:kubeadm:default-node-token"] localAPIEndpoint: # 这里必须是你要执行 kubeadm init 的这台机器的真实IP(Master1) advertiseAddress: 192.168.30.50 bindPort: 6443 nodeRegistration: criSocket: unix:///run/containerd/containerd.sock imagePullPolicy: IfNotPresent # 不要在这里硬编码 name,默认会用主机的 hostname,避免复用此文件时出错 taints: null --- apiVersion: kubeadm.k8s.io/v1beta3 kind: ClusterConfiguration clusterName: kubernetes kubernetesVersion: v1.27.16 controlPlaneEndpoint: "192.168.30.58:16443" # 指向 Nginx+Keepalived 的 VIP:PORT certificatesDir: /etc/kubernetes/pki imageRepository: registry.cn-hangzhou.aliyuncs.com/google_containers networking: dnsDomain: cluster.local serviceSubnet: 10.96.0.0/12 podSubnet: 10.244.0.0/16 # 供 Calico 使用,此网段可保持不变 apiServer: timeoutForControlPlane: 4m0s certSANs: # 建议把 VIP、两台 Master 的 IP 和主机名都放进 SAN,避免证书不信任 - "192.168.30.58" # VIP - "192.168.30.50" - "192.168.30.51" - "k8s-01" # 如你的主机名不同,请改成实际 hostname - "k8s-02" - "127.0.0.1" - "localhost" - "kubernetes" - "kubernetes.default" - "kubernetes.default.svc" - "kubernetes.default.svc.cluster.local" controllerManager: {} scheduler: {} etcd: local: dataDir: /var/lib/etcd --- apiVersion: kubeproxy.config.k8s.io/v1alpha1 kind: KubeProxyConfiguration mode: "ipvs" --- apiVersion: kubelet.config.k8s.io/v1beta1 kind: KubeletConfiguration cgroupDriver: "systemd"root@k8s-01 ~]# kubeadm init --config kubeadm.yaml --upload-certs [init] Using Kubernetes version: v1.27.16 [preflight] Running pre-flight checks [preflight] Pulling images required for setting up a Kubernetes cluster [preflight] This might take a minute or two, depending on the speed of your internet connection [preflight] You can also perform this action in beforehand using 'kubeadm config images pull' W0906 17:26:53.821977 54526 checks.go:835] detected that the sandbox image "registry.cn-guangzhou.aliyuncs.com/xingcangku/registry.k8s.io-pause:3.8" of the container runtime is inconsistent with that used by kubeadm. It is recommended that using "registry.cn-hangzhou.aliyuncs.com/google_containers/pause:3.9" as the CRI sandbox image. [certs] Using certificateDir folder "/etc/kubernetes/pki" [certs] Generating "ca" certificate and key [certs] Generating "apiserver" certificate and key [certs] apiserver serving cert is signed for DNS names [k8s-01 k8s-02 kubernetes kubernetes.default kubernetes.default.svc kubernetes.default.svc.cluster.local localhost] and IPs [10.96.0.1 192.168.30.50 192.168.30.58 192.168.30.51 127.0.0.1] [certs] Generating "apiserver-kubelet-client" certificate and key [certs] Generating "front-proxy-ca" certificate and key [certs] Generating "front-proxy-client" certificate and key [certs] Generating "etcd/ca" certificate and key [certs] Generating "etcd/server" certificate and key [certs] etcd/server serving cert is signed for DNS names [k8s-01 localhost] and IPs [192.168.30.50 127.0.0.1 ::1] [certs] Generating "etcd/peer" certificate and key [certs] etcd/peer serving cert is signed for DNS names [k8s-01 localhost] and IPs [192.168.30.50 127.0.0.1 ::1] [certs] Generating "etcd/healthcheck-client" certificate and key [certs] Generating "apiserver-etcd-client" certificate and key [certs] Generating "sa" key and public key [kubeconfig] Using kubeconfig folder "/etc/kubernetes" [kubeconfig] Writing "admin.conf" kubeconfig file [kubeconfig] Writing "kubelet.conf" kubeconfig file [kubeconfig] Writing "controller-manager.conf" kubeconfig file [kubeconfig] Writing "scheduler.conf" kubeconfig file [kubelet-start] Writing kubelet environment file with flags to file "/var/lib/kubelet/kubeadm-flags.env" [kubelet-start] Writing kubelet configuration to file "/var/lib/kubelet/config.yaml" [kubelet-start] Starting the kubelet [control-plane] Using manifest folder "/etc/kubernetes/manifests" [control-plane] Creating static Pod manifest for "kube-apiserver" [control-plane] Creating static Pod manifest for "kube-controller-manager" [control-plane] Creating static Pod manifest for "kube-scheduler" [etcd] Creating static Pod manifest for local etcd in "/etc/kubernetes/manifests" [wait-control-plane] Waiting for the kubelet to boot up the control plane as static Pods from directory "/etc/kubernetes/manifests". This can take up to 4m0s [apiclient] All control plane components are healthy after 12.002658 seconds [upload-config] Storing the configuration used in ConfigMap "kubeadm-config" in the "kube-system" Namespace [kubelet] Creating a ConfigMap "kubelet-config" in namespace kube-system with the configuration for the kubelets in the cluster [upload-certs] Storing the certificates in Secret "kubeadm-certs" in the "kube-system" Namespace [upload-certs] Using certificate key: 0574b43d75ac9722533a3a5042cb86b97441b855371cb34e5fdd3c8733a39d8d [mark-control-plane] Marking the node k8s-01 as control-plane by adding the labels: [node-role.kubernetes.io/control-plane node.kubernetes.io/exclude-from-external-load-balancers] [mark-control-plane] Marking the node k8s-01 as control-plane by adding the taints [node-role.kubernetes.io/control-plane:NoSchedule] [bootstrap-token] Using token: abcdef.0123456789abcdef [bootstrap-token] Configuring bootstrap tokens, cluster-info ConfigMap, RBAC Roles [bootstrap-token] Configured RBAC rules to allow Node Bootstrap tokens to get nodes [bootstrap-token] Configured RBAC rules to allow Node Bootstrap tokens to post CSRs in order for nodes to get long term certificate credentials [bootstrap-token] Configured RBAC rules to allow the csrapprover controller automatically approve CSRs from a Node Bootstrap Token [bootstrap-token] Configured RBAC rules to allow certificate rotation for all node client certificates in the cluster [bootstrap-token] Creating the "cluster-info" ConfigMap in the "kube-public" namespace [kubelet-finalize] Updating "/etc/kubernetes/kubelet.conf" to point to a rotatable kubelet client certificate and key [addons] Applied essential addon: CoreDNS [addons] Applied essential addon: kube-proxy Your Kubernetes control-plane has initialized successfully! To start using your cluster, you need to run the following as a regular user: mkdir -p $HOME/.kube sudo cp -i /etc/kubernetes/admin.conf $HOME/.kube/config sudo chown $(id -u):$(id -g) $HOME/.kube/config Alternatively, if you are the root user, you can run: export KUBECONFIG=/etc/kubernetes/admin.conf You should now deploy a pod network to the cluster. Run "kubectl apply -f [podnetwork].yaml" with one of the options listed at: https://kubernetes.io/docs/concepts/cluster-administration/addons/ You can now join any number of the control-plane node running the following command on each as root: kubeadm join 192.168.30.58:6443 --token abcdef.0123456789abcdef \ --discovery-token-ca-cert-hash sha256:26d30a8cbfabc6d8a5b3965b9577a3ce33b01c4958a3e19fd001f06a0f3cb019 \ --control-plane --certificate-key 0574b43d75ac9722533a3a5042cb86b97441b855371cb34e5fdd3c8733a39d8d Please note that the certificate-key gives access to cluster sensitive data, keep it secret! As a safeguard, uploaded-certs will be deleted in two hours; If necessary, you can use "kubeadm init phase upload-certs --upload-certs" to reload certs afterward. Then you can join any number of worker nodes by running the following on each as root: kubeadm join 192.168.30.58:6443 --token abcdef.0123456789abcdef \ --discovery-token-ca-cert-hash sha256:26d30a8cbfabc6d8a5b3965b9577a3ce33b01c4958a3e19fd001f06a0f3cb019 #如果出现失败的情况 kubeadm reset -f [root@k8s-01 ~]# kubeadm reset -f [preflight] Running pre-flight checks W0906 17:08:03.892290 53705 removeetcdmember.go:106] [reset] No kubeadm config, using etcd pod spec to get data directory [reset] Deleted contents of the etcd data directory: /var/lib/etcd [reset] Stopping the kubelet service [reset] Unmounting mounted directories in "/var/lib/kubelet" W0906 17:08:03.899240 53705 cleanupnode.go:134] [reset] Failed to evaluate the "/var/lib/kubelet" directory. Skipping its unmount and cleanup: lstat /var/lib/kubelet: no such file or directory [reset] Deleting contents of directories: [/etc/kubernetes/manifests /etc/kubernetes/pki] [reset] Deleting files: [/etc/kubernetes/admin.conf /etc/kubernetes/kubelet.conf /etc/kubernetes/bootstrap-kubelet.conf /etc/kubernetes/controller-manager.conf /etc/kubernetes/scheduler.conf] The reset process does not clean CNI configuration. To do so, you must remove /etc/cni/net.d The reset process does not reset or clean up iptables rules or IPVS tables. If you wish to reset iptables, you must do so manually by using the "iptables" command. If your cluster was setup to utilize IPVS, run ipvsadm --clear (or similar) to reset your systems IPVS tables. The reset process does not clean your kubeconfig files and you must remove them manually. Please, check the contents of the $HOME/.kube/config file. #还需要手动删除 rm -rf /$HOME/.kube/config systemctl restart containerd rm -rf ~/.kube /etc/kubernetes/pki/* /etc/kubernetes/manifests/*#安装 CNI #Flannel(简单) kubectl apply -f https://raw.githubusercontent.com/flannel-io/flannel/v0.25.5/Documentation/kube-flannel.yml #Calico(功能更全) kubectl apply -f https://raw.githubusercontent.com/projectcalico/calico/v3.27.3/manifests/calico.yaml [root@k8s-02 ~]# kubectl get pod -A NAMESPACE NAME READY STATUS RESTARTS AGE kube-system calico-kube-controllers-59765c79db-rvqm5 1/1 Running 0 8m3s kube-system calico-node-4jlgw 1/1 Running 0 8m3s kube-system calico-node-lvzgx 1/1 Running 0 8m3s kube-system calico-node-qdrmn 1/1 Running 0 8m3s kube-system coredns-65dcc469f7-gktmx 1/1 Running 0 51m kube-system coredns-65dcc469f7-wmppd 1/1 Running 0 51m kube-system etcd-k8s-01 1/1 Running 0 51m kube-system etcd-k8s-02 1/1 Running 0 20m kube-system kube-apiserver-k8s-01 1/1 Running 0 51m kube-system kube-apiserver-k8s-02 1/1 Running 0 19m kube-system kube-controller-manager-k8s-01 1/1 Running 1 (20m ago) 51m kube-system kube-controller-manager-k8s-02 1/1 Running 0 19m kube-system kube-proxy-k7z9v 1/1 Running 0 22m kube-system kube-proxy-sgrln 1/1 Running 0 51m kube-system kube-proxy-wpkjb 1/1 Running 0 20m kube-system kube-scheduler-k8s-01 1/1 Running 1 (19m ago) 51m kube-system kube-scheduler-k8s-02 1/1 Running 0 19m #测试切换 #在当前 VIP 所在主机执行: systemctl stop keepalived #观察另外一台是否接管 VIP: ip a | grep 192.168.30.58 #再次访问: 正常会返回ok curl -k https://192.168.30.58:6443/readyz #恢复 vip会自动漂移回来 systemctl start keepalived#kubectl 正常 [root@k8s-01 ~]# kubectl get cs 2>/dev/null || \ kubectl get --raw='/readyz?verbose' | head NAME STATUS MESSAGE ERROR scheduler Healthy ok controller-manager Healthy ok etcd-0 Healthy
 -
rocky-linux-9离线安装k8s 1.27 一、阶段 A:在「有网打包机」制作离线包打包机推荐同为 Rocky 9;也可用任意 x86_64 Linux。以下默认使用 dnf 和 ctr/docker 二选一抓镜像。1.1 目录与变量export K8S_VER="1.27.16" export K8S_MINOR="v1.27" export WORK="/opt/k8s-offline-${K8S_VER}" sudo mkdir -p $WORK/{rpms,images,cni,calico,tools}1.2 配置 Kubernetes 1.27 专属 RPM 仓库(仅打包机临时用)#/etc/yum.repos.d/kubernetes-1.27.repo [kubernetes-1.27] name=Kubernetes 1.27 baseurl=https://pkgs.k8s.io/core:/stable:/v1.27/rpm/ enabled=1 gpgcheck=1 gpgkey=https://pkgs.k8s.io/core:/stable:/v1.27/rpm/repodata/repomd.xml.keyKubernetes 从 2023 起使用 pkgs.k8s.io 的分小版本仓库,上面这个是 1.27 专用源。1.3 下载 RPM(含依赖,供离线节点安装)sudo dnf -y install dnf-plugins-core # containerd / runc / 常用依赖 sudo dnf -y download --resolve --destdir=$WORK/rpms \ containerd runc conntrack-tools iptables iproute-tc ethtool socat \ tar openssl curl bash-completion #Rocky 默认仓库里没有叫 containerd 的包,所以 dnf download 在严格模式下直接退出了 所以要加下面这步 # 安装 dnf 插件并添加 Docker CE 源(RHEL/EL9 适用) sudo dnf -y install dnf-plugins-core sudo dnf config-manager --add-repo https://download.docker.com/linux/rhel/docker-ce.repo # 更新元数据 sudo dnf clean all && sudo dnf makecache # kube 组件(固定 1.27.16) #sudo dnf -y download --resolve --destdir=$WORK/rpms \ #kubelet-${K8S_VER} kubeadm-${K8S_VER} kubectl-${K8S_VER} \ #kubernetes-cni cri-tools #上面别用 # 仅下载,不解析依赖 sudo dnf -y download --destdir="$WORK/rpms" \ kubelet-${K8S_VER} kubeadm-${K8S_VER} kubectl-${K8S_VER} \ kubernetes-cni cri-tools1.4 下载 CNI 插件与 crictl 工具# CNI plugins(官方二进制包,放到 /opt/cni/bin) curl -L -o $WORK/cni/cni-plugins-linux-amd64-v1.3.0.tgz \ https://github.com/containernetworking/plugins/releases/download/v1.3.0/cni-plugins-linux-amd64-v1.3.0.tgz # crictl(来自 cri-tools) CRICTL_VER="v1.27.0" # 与集群兼容即可 curl -L -o $WORK/tools/crictl-${CRICTL_VER}-linux-amd64.tar.gz \ https://github.com/kubernetes-sigs/cri-tools/releases/download/${CRICTL_VER}/crictl-${CRICTL_VER}-linux-amd64.tar.gz1.5 下载 Calico 清单与镜像curl -L -o $WORK/calico/calico-v3.26.4.yaml \ https://raw.githubusercontent.com/projectcalico/calico/v3.26.4/manifests/calico.yaml # 提取镜像名(也可手工列出) grep -E "image: .*calico" $WORK/calico/calico-v3.26.4.yaml | awk '{print $2}' | sort -u > $WORK/images/calico-images.txt [root@localhost ~]# cat $WORK/images/calico-images.txt docker.io/calico/cni:v3.26.4 docker.io/calico/kube-controllers:v3.26.4 docker.io/calico/node:v3.26.4 1.6 生成 kubeadm 所需镜像清单(精确到 v1.27.16)# 本机先临时装 kubeadm(或用容器)来打印镜像列表 sudo dnf -y install kubeadm-${K8S_VER} kubeadm config images list --kubernetes-version v${K8S_VER} > $WORK/images/k8s-images.txt #kubeadm config images list 是官方推荐获取离线镜像列表的方式;也支持 --config 指定自定义仓库。1.7 拉取并打包镜像(二选一:有 Docker 或有 containerd)# 方式 A:Docker while read -r img; do docker pull "$img"; done < $WORK/images/k8s-images.txt while read -r img; do docker pull "$img"; done < $WORK/images/calico-images.txt docker save $(cat $WORK/images/k8s-images.txt $WORK/images/calico-images.txt) \ -o $WORK/images/k8s-${K8S_VER}-and-calico-v3.26.4.tar # 方式 B:containerd(ctr) sudo systemctl enable --now containerd || true while read -r img; do sudo ctr -n k8s.io i pull "$img"; done < $WORK/images/k8s-images.txt while read -r img; do sudo ctr -n k8s.io i pull "$img"; done < $WORK/images/calico-images.txt sudo ctr -n k8s.io i export $WORK/images/k8s-${K8S_VER}-and-calico-v3.26.4.tar $(cat $WORK/images/k8s-images.txt $WORK/images/calico-images.txt) 1.8 打总包cd $(dirname $WORK) sudo tar czf k8s-offline-${K8S_VER}-rocky9.tar.gz $(basename $WORK) # 把这个 tar.gz 拷贝到所有离线节点(控制面/工作节点) 二、docker安装离线包 2.1在线机器上打离线包# 0) 变量 export WORK="/opt/docker-offline-$(date +%F)" sudo mkdir -p "$WORK"/{rpms,images,scripts} ARCH=$(uname -m) # 一般是 x86_64;如是 ARM64 则为 aarch64 # 1) 加 Docker 官方仓库(RHEL/EL 系列通用,Rocky 9 适用) sudo dnf -y install dnf-plugins-core sudo dnf config-manager --add-repo https://download.docker.com/linux/rhel/docker-ce.repo sudo dnf clean all && sudo dnf makecache # 2) 下载“完整功能”所需 RPM(含依赖) PKGS="docker-ce docker-ce-cli containerd.io docker-buildx-plugin docker-compose-plugin docker-ce-rootless-extras" # 用 --resolve 拉全依赖;若个别包临时不可用,strict=0 可跳过不中断 sudo dnf -y download --resolve --setopt=strict=0 \ --destdir="$WORK/rpms" --arch="$ARCH" $PKGS # 同时把 Rootless 相关常见依赖也一并打包(如尚未被上面带下) sudo dnf -y download --resolve --setopt=strict=0 \ --destdir="$WORK/rpms" --arch="$ARCH" \ slirp4netns fuse-overlayfs container-selinux # 3)(可选)打基础测试镜像离线包 docker pull hello-world:latest docker pull alpine:latest docker pull busybox:stable docker save hello-world:latest alpine:latest busybox:stable -o "$WORK/images/docker-base-images.tar" # 4) 生成本地仓库元数据 + 安装脚本 sudo dnf -y install createrepo_c createrepo_c "$WORK/rpms" cat > "$WORK/scripts/install-offline.sh" <<"EOF" #!/usr/bin/env bash set -euo pipefail DIR="$(cd "$(dirname "$0")"/.. && pwd)" # 临时本地仓库安装方法(更稳妥) sudo dnf -y install createrepo_c || true sudo createrepo_c "$DIR/rpms" sudo tee /etc/yum.repos.d/docker-offline.repo >/dev/null <<REPO [docker-offline] name=Docker Offline baseurl=file://$DIR/rpms enabled=1 gpgcheck=0 REPO # 安装 sudo dnf -y install docker-ce docker-ce-cli containerd.io \ docker-buildx-plugin docker-compose-plugin docker-ce-rootless-extras # 启动并开机自启 sudo systemctl enable --now docker # 可选:把当前用户加入 docker 组(需要重新登录生效) if id -u "$SUDO_USER" &>/dev/null; then sudo usermod -aG docker "$SUDO_USER" || true fi # 导入基础镜像(如存在) if [ -f "$DIR/images/docker-base-images.tar" ]; then sudo docker load -i "$DIR/images/docker-base-images.tar" fi echo "Done. Check: docker version && docker compose version && docker buildx version" EOF chmod +x "$WORK/scripts/install-offline.sh" # 5) 打一个总包 sudo tar -C "$(dirname "$WORK")" -czf "${WORK}.tar.gz" "$(basename "$WORK")" echo "离线包已生成:${WORK}.tar.gz" 2.2 离线机器上安装#把 ${WORK}.tar.gz 拷贝到离线主机,解压并执行脚本: sudo tar -C /opt -xzf /path/to/docker-offline-*.tar.gz cd /opt/docker-offline-*/scripts #sudo ./install-offline.sh sudo dnf -y --disablerepo='*' --nogpgcheck install \ /opt/docker-offline-2025-09-01/rpms/*.rpm # 重新登录后验证 docker version [root@localhost opt]# docker version Client: Docker Engine - Community Version: 28.3.3 API version: 1.51 Go version: go1.24.5 Git commit: 980b856 Built: Fri Jul 25 11:36:28 2025 OS/Arch: linux/amd64 Context: default Server: Docker Engine - Community Engine: Version: 28.3.3 API version: 1.51 (minimum version 1.24) Go version: go1.24.5 Git commit: bea959c Built: Fri Jul 25 11:33:28 2025 OS/Arch: linux/amd64 Experimental: false containerd: Version: 1.7.27 GitCommit: 05044ec0a9a75232cad458027ca83437aae3f4da runc: Version: 1.2.5 GitCommit: v1.2.5-0-g59923ef docker-init: Version: 0.19.0 GitCommit: de40ad0 docker compose version # 注意:是 docker compose(v2 插件),不是老的 docker-compose docker run --rm hello-world三、阶段 B:在「离线节点」安装与初始化 3.1 系统准备(所有节点)sudo tar xzf k8s-offline-1.27.16-rocky9.tar.gz -C / OFF="/opt/k8s-offline-1.27.16" hostnamectl set-hostname k8s-01 echo "192.168.30.150 k8s-01" >> /etc/hosts ping -c1 k8s-01swapoff -a sed -ri 's/^\s*([^#].*\sswap\s)/#\1/' /etc/fstab cat >/etc/sysctl.d/k8s.conf <<'EOF' net.ipv4.ip_forward=1 net.bridge.bridge-nf-call-iptables=1 net.bridge.bridge-nf-call-ip6tables=1 EOF sysctl --system #先加载 IPVS 内核模块 cat >/etc/modules-load.d/ipvs.conf <<'EOF' ip_vs ip_vs_rr ip_vs_wrr ip_vs_sh nf_conntrack EOF for m in ip_vs ip_vs_rr ip_vs_wrr ip_vs_sh nf_conntrack; do modprobe $m; done 3.1.1 关闭 swap(含 zram)#Rocky 9 默认启用 zram,kubelet 需要禁用 swap: sudo swapoff -a # 永久:卸载 zram 生成器或禁用其单元 sudo dnf -y remove zram-generator-defaults || true # 如有 /etc/fstab 的 swap 条目,注释掉;并确认: lsblk | grep -E 'SWAP|zram' || true #RHEL9/基于 systemd 的发行版一般通过 zram-generator 提供 swap;禁用/移除是官方建议之一。 3.1.2 内核模块与 sysctl(bridge/overlay/IP 转发)# /etc/modules-load.d/k8s.conf echo -e "overlay\nbr_netfilter" | sudo tee /etc/modules-load.d/k8s.conf sudo modprobe overlay && sudo modprobe br_netfilter # /etc/sysctl.d/k8s.conf cat <<'EOF' | sudo tee /etc/sysctl.d/k8s.conf net.bridge.bridge-nf-call-iptables = 1 net.bridge.bridge-nf-call-ip6tables = 1 net.ipv4.ip_forward = 1 EOF sudo sysctl --system #(这些设置是 Kubernetes 官方与 Fedora/Rocky 指南里明确要求的) 3.1.3 SELinux 与防火墙1. 建议保留 SELinux Enforcing(若遇容器标记问题可先设为 Permissive 再排障)。 2. 防火墙可开放必要端口或临时停用;端口清单见官方“Ports and Protocols”。至少: 控制面:6443/TCP(API)、2379-2380/TCP(etcd)、10250/10257/10259/TCP 所有节点:10250/TCP;CNI 端口(如 Calico VXLAN 默认 4789/UDP)等按 CNI 文档配置。3.2 安装 RPM(离线目录直接安装)cd $OFF/rpms sudo dnf -y --disablerepo='*' install ./*.rpm sudo systemctl enable --now containerd #(--disablerepo='*' 可避免 dnf 去查线上元数据,离线时很有用)3.2.1 安装 CNI 与 crictlsudo mkdir -p /opt/cni/bin sudo tar -xzf $OFF/cni/cni-plugins-linux-amd64-v1.3.0.tgz -C /opt/cni/bin sudo tar -xzf $OFF/tools/crictl-v1.27.0-linux-amd64.tar.gz -C /usr/local/bin3.3配置 containerd(systemd cgroup & pause 镜像)# 生成默认配置后修改 mkdir -p /etc/containerd containerd config default > /etc/containerd/config.toml # 关键点:设置 SystemdCgroup=true,并确保 sandbox_image 使用我们已导入的 pause:3.9 sudo sed -i 's/SystemdCgroup = false/SystemdCgroup = true/' /etc/containerd/config.toml sudo sed -i 's@sandbox_image = .*@sandbox_image = "registry.k8s.io/pause:3.9"@' /etc/containerd/config.toml #打开 /etc/containerd/config.toml,确保这几处: disabled_plugins = [] #如果看到 io.containerd.grpc.v1.cri 出现在 disabled_plugins 里,删掉它。 #存在并启用 CRI 插件段落(一般默认就有): [plugins."io.containerd.grpc.v1.cri"] # 这里还有一堆子配置,保持默认即可 #kubelet 要求 systemd cgroup,改成: [plugins."io.containerd.grpc.v1.cri".containerd.runtimes.runc.options] SystemdCgroup = true #建议把 pause 镜像固定为 3.9(1.27.x 对应): [plugins."io.containerd.grpc.v1.cri"] sandbox_image = "registry.k8s.io/pause:3.9" # 离线或私有仓库环境就改成你的地址,比如: # sandbox_image = "192.168.30.150:5000/pause:3.9" #打开 /etc/containerd/config.toml,确认/修改以下几处(都在同一文件里): # 顶部:不要禁用 CRI disabled_plugins = [] # ← 把 ["cri"] 改成 [],或直接删掉此行 version = 2 # 如果模板没有这一行,建议加上 [plugins."io.containerd.grpc.v1.cri"] sandbox_image = "registry.k8s.io/pause:3.9" # 你已离线导入了这个镜像,正好保持一致 # 如用私有仓库,写成 "你的仓库/pause:3.9" [plugins."io.containerd.grpc.v1.cri".containerd.runtimes.runc] runtime_type = "io.containerd.runc.v2" [plugins."io.containerd.grpc.v1.cri".containerd.runtimes.runc.options] SystemdCgroup = true # kubelet 要求 systemd cgroup #重启并自检 systemctl daemon-reload systemctl enable --now containerd #kubectl暂时不用启动 等kubeadm启动 systemctl status containerd --no-pager -l #确认 CRI 插件已加载(任一条有结果即可): ctr plugins ls | grep cri # 期望看到 io.containerd.grpc.v1.cri <OK> # 或者 crictl --runtime-endpoint unix:///run/containerd/containerd.sock info # 能输出 runtimeName 等信息即 OK;若没装 crictl 可跳过 sudo systemctl restart containerd #(K8s 在 RHEL9/cgroup v2 上推荐 systemd cgroup 驱动;containerd 侧需显式开启3.4 预载镜像(离线导入)sudo ctr -n k8s.io images import $OFF/images/k8s-1.27.16-and-calico-v3.26.4.tar sudo ctr -n k8s.io images ls | grep -E 'kube-|coredns|etcd|pause|calico' 3.5 kubeadm 初始化(控制面节点)创建 kubeadm-config.yaml(按需改 advertiseAddress、Pod/Service 网段;Calico 习惯 192.168.0.0/16):# kubeadm-config.yaml [root@k8s-01 ~]# cat kubeadm.yaml # kubeadm-config.yaml apiVersion: kubeadm.k8s.io/v1beta3 kind: InitConfiguration localAPIEndpoint: advertiseAddress: 192.168.30.150 bindPort: 6443 nodeRegistration: criSocket: unix:///run/containerd/containerd.sock imagePullPolicy: IfNotPresent --- apiVersion: kubeadm.k8s.io/v1beta3 kind: ClusterConfiguration clusterName: kubernetes kubernetesVersion: v1.27.16 imageRepository: registry.k8s.io networking: serviceSubnet: 10.96.0.0/12 podSubnet: 172.20.0.0/16 --- apiVersion: kubeproxy.config.k8s.io/v1alpha1 kind: KubeProxyConfiguration mode: ipvs --- apiVersion: kubelet.config.k8s.io/v1beta1 kind: KubeletConfiguration cgroupDriver: systemd 下面是开启ipvs apiVersion: kubeadm.k8s.io/v1beta3 kind: InitConfiguration localAPIEndpoint: advertiseAddress: 192.168.30.151 # ← 改成本机控制面IP bindPort: 6443 nodeRegistration: criSocket: unix:///run/containerd/containerd.sock imagePullPolicy: IfNotPresent --- apiVersion: kubeadm.k8s.io/v1beta3 kind: ClusterConfiguration clusterName: kubernetes kubernetesVersion: v1.27.16 imageRepository: registry.k8s.io # 离线/内网镜像时改成你的私仓 networking: serviceSubnet: 10.96.0.0/12 podSubnet: 172.20.0.0/16 # 要与 Calico 使用的网段一致(你现在就是用这个) dns: type: CoreDNS --- apiVersion: kubeproxy.config.k8s.io/v1alpha1 kind: KubeProxyConfiguration mode: ipvs ipvs: scheduler: rr # 可选:rr / wrr / wlc / sh / mh 等 # strictARP: true # 以后用 MetalLB L2 时再打开 --- apiVersion: kubelet.config.k8s.io/v1beta1 kind: KubeletConfiguration cgroupDriver: systemd# 0) 主机名解析(避免之前的 hostname 警告) hostnamectl set-hostname k8s-01 grep -q '192.168.30.150 k8s-01' /etc/hosts || echo '192.168.30.150 k8s-01' >> /etc/hosts # 1) 关闭 swap(若未关) swapoff -a sed -ri 's/^\s*([^#].*\sswap\s)/#\1/' /etc/fstab # 2) 必要内核 & sysctl(kubelet 常见阻塞点) modprobe br_netfilter || true cat >/etc/modules-load.d/k8s.conf <<'EOF' br_netfilter EOF cat >/etc/sysctl.d/k8s.conf <<'EOF' net.bridge.bridge-nf-call-iptables=1 net.bridge.bridge-nf-call-ip6tables=1 net.ipv4.ip_forward=1 EOF sysctl --system # 3) (可选)避免策略阻塞:SELinux/防火墙(离线/内网先松) setenforce 0 2>/dev/null || true sed -i 's/^SELINUX=enforcing/SELINUX=permissive/' /etc/selinux/config 2>/dev/null || true systemctl disable --now firewalld 2>/dev/null || true # 4) 重启关键服务 systemctl restart containerd systemctl restart kubelet # 5) 再次观察 crictl --runtime-endpoint /run/containerd/containerd.sock ps -a | egrep 'kube-(apiserver|controller-manager|scheduler)|etcd' journalctl -u kubelet -e --no-pager | tail -n 200 #执行初始化: sudo kubeadm init --config kubeadm-config.yaml #初始化离线 不联网 kubeadm init --config kubeadm.yaml --upload-certs -v=5 # 成功后配置 kubectl mkdir -p $HOME/.kube sudo cp -i /etc/kubernetes/admin.conf $HOME/.kube/config sudo chown $(id -u):$(id -g) $HOME/.kube/configsudo systemctl disable --now firewalld || true # 立刻加载模块 sudo modprobe overlay && sudo modprobe br_netfilter # 持久化 echo -e "overlay\nbr_netfilter" | sudo tee /etc/modules-load.d/k8s.conf # 必要 sysctl sudo tee /etc/sysctl.d/k8s.conf >/dev/null <<'EOF' net.ipv4.ip_forward = 1 net.bridge.bridge-nf-call-iptables = 1 net.bridge.bridge-nf-call-ip6tables = 1 EOF sudo sysctl --system # 快速确认三项都为 1 sysctl net.ipv4.ip_forward sysctl net.bridge.bridge-nf-call-iptables sysctl net.bridge.bridge-nf-call-ip6tables 安装 Calico(离线文件): kubectl apply -f $OFF/calico/calico-v3.26.4.yaml kubectl -n kube-system get pods -w mkdir -p $HOME/.kube cp -i /etc/kubernetes/admin.conf $HOME/.kube/config chown $(id -u):$(id -g) $HOME/.kube/config kubectl get pods -n kube-system -o wide kubectl get nodes -o wide #kubelet 开机自启(kubeadm 已临时启动,设为自启更规范) systemctl enable --now kubelet #配好 kubectl,并验证控制面 # 生成过 admin.conf 的话(kubeadm 已经写过) [ -f /etc/kubernetes/admin.conf ] && { mkdir -p $HOME/.kube cp -i /etc/kubernetes/admin.conf $HOME/.kube/config chown $(id -u):$(id -g) $HOME/.kube/config } kubectl cluster-info kubectl get pods -n kube-system -o wide kubectl get nodes -o wide # 现在控制面起来了,但在装 CNI 前 Node 可能是 NotReady #如果意外没有 /etc/kubernetes/admin.conf(极少数情况),可补一条: kubeadm init phase kubeconfig admin #加载 IPVS 内核模块(你 kube-proxy 设了 ipvs) modprobe ip_vs ip_vs_rr ip_vs_wrr ip_vs_sh nf_conntrack cat >/etc/modules-load.d/ipvs.conf <<'EOF' ip_vs ip_vs_rr ip_vs_wrr ip_vs_sh nf_conntrack EOF #安装你的 CNI(Calico 离线) 确保清单里 CALICO_IPV4POOL_CIDR 与你 kubeadm 的 podSubnet: 172.20.0.0/16 一致。 你本地已导入镜像 calico/node|cni|kube-controllers:v3.26.4,直接套用离线 calico.yaml 即可: kubectl apply -f /path/to/calico.yaml kubectl -n kube-system get pods -w # 等 calico-*、coredns、kube-proxy 全部 Running kubectl get nodes # 状态应变为 Ready 3.6 加入工作节点#在每个工作节点重复 系统准备/安装 RPM/导入镜像 的步骤,然后在控制面上生成 join 命令: [root@k8s-01 ~]# kubeadm token create --print-join-command kubeadm join 192.168.30.150:6443 --token fnturx.ph8jg99zgdmze81w --discovery-token-ca-cert-hash sha256:1ef5e1f3558c8f9336dd4785c0207cb837cceb37c253179e9988f03dc0c00146 #把输出的 kubeadm join ... 在各工作节点执行即可。 #拿到的命令在每个 worker 上执行即可加入集群。 #若以后要加 额外控制面节点,再执行: kubeadm init phase upload-certs --skip-certificate-key-print kubeadm token create --print-join-command --certificate-key <上一步输出的key> #持久化服务 systemctl enable --now kubelet systemctl enable --now containerd
-
k8s镜像加速 一、安装配置nginx1.需要准备一个可以访问外网的服务器 2.安装nginx 3.准备域名解析到服务器,然后把证书配置到nginx里面 # /etc/nginx/sites-available/docker-mirror # DNS for variable proxy_pass resolver 1.1.1.1 8.8.8.8 valid=300s ipv6=off; # Cache (only used under /v2/) proxy_cache_path /var/cache/nginx/docker levels=1:2 keys_zone=docker_cache:50m max_size=300g inactive=7d use_temp_path=off; # Registry v2 header map $http_docker_distribution_api_version $docker_api_version { default "registry/2.0"; } # expose cache status map $upstream_cache_status $cache_status { default $upstream_cache_status; "" "BYPASS"; } server { listen 443 ssl http2; # listen 443 ssl http2 default_server; server_name xing.axzys.cn; ssl_certificate /etc/nginx/ssl/xing.axzys.cn.pem; ssl_certificate_key /etc/nginx/ssl/xing.axzys.cn.key; client_max_body_size 0; proxy_http_version 1.1; proxy_connect_timeout 60s; proxy_read_timeout 600s; proxy_send_timeout 600s; # 默认流式 proxy_buffering off; proxy_request_buffering off; proxy_set_header Connection ""; proxy_set_header X-Forwarded-Proto $scheme; proxy_set_header X-Forwarded-For $proxy_add_x_forwarded_for; proxy_set_header Docker-Distribution-Api-Version $docker_api_version; # 全局打开缓存(/_proxy、/token 会单独关闭) proxy_cache docker_cache; proxy_cache_lock on; proxy_cache_revalidate on; proxy_cache_min_uses 1; proxy_cache_use_stale error timeout updating http_500 http_502 http_503 http_504; proxy_cache_valid 200 206 302 10m; add_header X-Cache-Status $cache_status always; # 把上游 3xx Location 改写到 /_proxy/<host>/<path?query> proxy_redirect ~^https://(?<h>[^/]+)(?<p>/.*)$ https://$server_name/_proxy/$h$p; # ---------- token endpoint(Docker Hub 专用) ---------- location = /token { proxy_pass https://auth.docker.io/token$is_args$args; proxy_set_header Host auth.docker.io; proxy_set_header X-Real-IP $remote_addr; proxy_set_header X-Forwarded-For $proxy_add_x_forwarded_for; proxy_set_header X-Forwarded-Proto $scheme; proxy_set_header Authorization ""; proxy_cache off; proxy_buffering off; proxy_http_version 1.1; proxy_connect_timeout 30s; proxy_read_timeout 30s; proxy_send_timeout 30s; } # ---------- GHCR token 代领 ---------- location = /ghcr-token { proxy_pass https://ghcr.io/token$is_args$args; proxy_set_header Host ghcr.io; proxy_set_header X-Real-IP $remote_addr; proxy_set_header X-Forwarded-For $proxy_add_x_forwarded_for; proxy_set_header X-Forwarded-Proto $scheme; proxy_set_header Authorization ""; proxy_cache off; proxy_buffering off; proxy_http_version 1.1; proxy_connect_timeout 30s; proxy_read_timeout 30s; proxy_send_timeout 30s; } # ---------- /v2/ -> Docker Hub ---------- location ^~ /v2/ { set $upstream_host "registry-1.docker.io"; proxy_set_header Host $upstream_host; slice 1m; proxy_cache_key $scheme$upstream_host$request_uri$is_args$args$slice_range; proxy_set_header Range $slice_range; proxy_ssl_server_name on; proxy_ssl_name $upstream_host; # 引导客户端去我们的 /token proxy_hide_header WWW-Authenticate; add_header WWW-Authenticate 'Bearer realm="https://xing.axzys.cn/token",service="registry.docker.io"' always; proxy_buffering off; proxy_pass https://$upstream_host; access_log /var/log/nginx/docker_mirror_access.log; error_log /var/log/nginx/docker_mirror_error.log warn; } # ================= 其余注册中心(带前缀)================= # 先 set 再 rewrite;必要时仅对 GHCR 改写 WWW-Authenticate 到本地 /ghcr-token # ghcr.io location ^~ /ghcr/ { set $upstream_host "ghcr.io"; proxy_set_header Host $upstream_host; proxy_ssl_server_name on; proxy_ssl_name $upstream_host; # 去掉前缀 rewrite ^/ghcr(?<rest>/.*)$ $rest break; slice 1m; proxy_cache_key $scheme$upstream_host$request_uri$is_args$args$slice_range; proxy_set_header Range $slice_range; # 关键:把令牌下发到你自己的 /ghcr-token,避免客户端直连 ghcr.io/token 403/网络问题 proxy_hide_header WWW-Authenticate; add_header WWW-Authenticate 'Bearer realm="https://xing.axzys.cn/ghcr-token",service="ghcr.io"' always; proxy_pass https://$upstream_host; access_log /var/log/nginx/docker_mirror_access.log; error_log /var/log/nginx/docker_mirror_error.log warn; } # gcr.io location ^~ /gcr/ { set $upstream_host "gcr.io"; proxy_set_header Host $upstream_host; proxy_ssl_server_name on; proxy_ssl_name $upstream_host; rewrite ^/gcr(?<rest>/.*)$ $rest break; slice 1m; proxy_cache_key $scheme$upstream_host$request_uri$is_args$args$slice_range; proxy_set_header Range $slice_range; proxy_pass https://$upstream_host; access_log /var/log/nginx/docker_mirror_access.log; error_log /var/log/nginx/docker_mirror_error.log warn; } # registry.k8s.io location ^~ /rk8s/ { set $upstream_host "registry.k8s.io"; proxy_set_header Host $upstream_host; proxy_ssl_server_name on; proxy_ssl_name $upstream_host; rewrite ^/rk8s(?<rest>/.*)$ $rest break; slice 1m; proxy_cache_key $scheme$upstream_host$request_uri$is_args$args$slice_range; proxy_set_header Range $slice_range; proxy_pass https://$upstream_host; access_log /var/log/nginx/docker_mirror_access.log; error_log /var/log/nginx/docker_mirror_error.log warn; } # 兼容 k8s.gcr.io -> registry.k8s.io location ^~ /kgcr/ { set $upstream_host "registry.k8s.io"; proxy_set_header Host $upstream_host; proxy_ssl_server_name on; proxy_ssl_name $upstream_host; rewrite ^/kgcr(?<rest>/.*)$ $rest break; slice 1m; proxy_cache_key $scheme$upstream_host$request_uri$is_args$args$slice_range; proxy_set_header Range $slice_range; proxy_pass https://$upstream_host; access_log /var/log/nginx/docker_mirror_access.log; error_log /var/log/nginx/docker_mirror_error.log warn; } # mcr.microsoft.com location ^~ /mcr/ { set $upstream_host "mcr.microsoft.com"; proxy_set_header Host $upstream_host; proxy_ssl_server_name on; proxy_ssl_name $upstream_host; rewrite ^/mcr(?<rest>/.*)$ $rest break; slice 1m; proxy_cache_key $scheme$upstream_host$request_uri$is_args$args$slice_range; proxy_set_header Range $slice_range; proxy_pass https://$upstream_host; access_log /var/log/nginx/docker_mirror_access.log; error_log /var/log/nginx/docker_mirror_error.log warn; } # nvcr.io location ^~ /nvcr/ { set $upstream_host "nvcr.io"; proxy_set_header Host $upstream_host; proxy_ssl_server_name on; proxy_ssl_name $upstream_host; rewrite ^/nvcr(?<rest>/.*)$ $rest break; slice 1m; proxy_cache_key $scheme$upstream_host$request_uri$is_args$args$slice_range; proxy_set_header Range $slice_range; proxy_pass https://$upstream_host; access_log /var/log/nginx/docker_mirror_access.log; error_log /var/log/nginx/docker_mirror_error.log warn; } # quay.io location ^~ /quay/ { set $upstream_host "quay.io"; proxy_set_header Host $upstream_host; proxy_ssl_server_name on; proxy_ssl_name $upstream_host; rewrite ^/quay(?<rest>/.*)$ $rest break; slice 1m; proxy_cache_key $scheme$upstream_host$request_uri$is_args$args$slice_range; proxy_set_header Range $slice_range; proxy_pass https://$upstream_host; access_log /var/log/nginx/docker_mirror_access.log; error_log /var/log/nginx/docker_mirror_error.log warn; } # docker.elastic.co location ^~ /elastic/ { set $upstream_host "docker.elastic.co"; proxy_set_header Host $upstream_host; proxy_ssl_server_name on; proxy_ssl_name $upstream_host; rewrite ^/elastic(?<rest>/.*)$ $rest break; slice 1m; proxy_cache_key $scheme$upstream_host$request_uri$is_args$args$slice_range; proxy_set_header Range $slice_range; proxy_pass https://$upstream_host; access_log /var/log/nginx/docker_mirror_access.log; error_log /var/log/nginx/docker_mirror_error.log warn; } # ---------- /_proxy/<host>/<path?query> -> 对象存储/CDN ---------- location ~ ^/_proxy/(?<h>[^/]+)(?<p>/.*)$ { if ($h !~* ^(registry-1\.docker\.io|auth\.docker\.io|production\.cloudflare\.docker\.com|.*\.cloudflarestorage\.com|.*\.r2\.cloudflarestorage\.com|.*\.amazonaws\.com|storage\.googleapis\.com|.*\.googleapis\.com|.*\.pkg\.dev|ghcr\.io|github\.com|pkg-containers\.[^/]*githubusercontent\.com|objects\.githubusercontent\.com|.*\.blob\.core\.windows\.net|.*\.azureedge\.net|mcr\.microsoft\.com|.*\.microsoft\.com|quay\.io|cdn\.quay\.io|.*quay-cdn[^/]*\.redhat\.com|k8s\.gcr\.io|registry\.k8s\.io|gcr\.io|docker\.elastic\.co|.*\.elastic\.co|.*\.cloudfront\.net|.*\.fastly\.net)$) { return 403; } set $upstream_host $h; # 去掉 '/_proxy/<host>' 前缀 rewrite ^/_proxy/[^/]+(?<rest>/.*)$ $rest break; # 正确 Host 与 SNI proxy_set_header Host $upstream_host; proxy_ssl_server_name on; proxy_ssl_name $upstream_host; proxy_ssl_protocols TLSv1.2 TLSv1.3; proxy_ssl_trusted_certificate /etc/ssl/certs/ca-certificates.crt; proxy_ssl_verify on; proxy_ssl_verify_depth 2; # 只透传客户端 Range proxy_set_header Range $http_range; # 不缓存预签名 URL;不缓冲 proxy_redirect off; proxy_cache off; proxy_buffering off; proxy_request_buffering off; # 避免把任何 Authorization 透传 proxy_set_header Authorization ""; # 不带 URI 的 proxy_pass proxy_pass https://$upstream_host; access_log /var/log/nginx/docker_mirror_access.log; error_log /var/log/nginx/docker_mirror_error.log warn; } location = /healthz { return 200 'ok'; add_header Content-Type text/plain; } } # HTTP -> HTTPS server { listen 80; server_name xing.axzys.cn; return 301 https://$host$request_uri; } 二、配置k8s客户端vi /etc/containerd/config.toml[plugins."io.containerd.grpc.v1.cri".registry.mirrors] [plugins."io.containerd.grpc.v1.cri".registry.mirrors."registry.k8s.io"] endpoint = ["https://k8s-registry.local"]#完整配置 disabled_plugins = [] imports = [] oom_score = 0 plugin_dir = "" required_plugins = [] root = "/var/lib/containerd" state = "/run/containerd" temp = "" version = 2 [cgroup] path = "" [debug] address = "" format = "" gid = 0 level = "" uid = 0 [grpc] address = "/run/containerd/containerd.sock" gid = 0 max_recv_message_size = 16777216 max_send_message_size = 16777216 tcp_address = "" tcp_tls_ca = "" tcp_tls_cert = "" tcp_tls_key = "" uid = 0 [metrics] address = "" grpc_histogram = false [plugins] [plugins."io.containerd.gc.v1.scheduler"] deletion_threshold = 0 mutation_threshold = 100 pause_threshold = 0.02 schedule_delay = "0s" startup_delay = "100ms" [plugins."io.containerd.grpc.v1.cri"] cdi_spec_dirs = ["/etc/cdi", "/var/run/cdi"] device_ownership_from_security_context = false disable_apparmor = false disable_cgroup = false disable_hugetlb_controller = true disable_proc_mount = false disable_tcp_service = true drain_exec_sync_io_timeout = "0s" enable_cdi = false enable_selinux = false enable_tls_streaming = false enable_unprivileged_icmp = false enable_unprivileged_ports = false ignore_deprecation_warnings = [] ignore_image_defined_volumes = false image_pull_progress_timeout = "5m0s" image_pull_with_sync_fs = false max_concurrent_downloads = 3 max_container_log_line_size = 16384 netns_mounts_under_state_dir = false restrict_oom_score_adj = false sandbox_image = "registry.cn-guangzhou.aliyuncs.com/xingcangku/eeeee:3.8" selinux_category_range = 1024 stats_collect_period = 10 stream_idle_timeout = "4h0m0s" stream_server_address = "127.0.0.1" stream_server_port = "0" systemd_cgroup = false tolerate_missing_hugetlb_controller = true unset_seccomp_profile = "" [plugins."io.containerd.grpc.v1.cri".cni] bin_dir = "/opt/cni/bin" conf_dir = "/etc/cni/net.d" conf_template = "" ip_pref = "" max_conf_num = 1 setup_serially = false [plugins."io.containerd.grpc.v1.cri".containerd] default_runtime_name = "runc" disable_snapshot_annotations = true discard_unpacked_layers = false ignore_blockio_not_enabled_errors = false ignore_rdt_not_enabled_errors = false no_pivot = false snapshotter = "overlayfs" [plugins."io.containerd.grpc.v1.cri".containerd.default_runtime] base_runtime_spec = "" cni_conf_dir = "" cni_max_conf_num = 0 container_annotations = [] pod_annotations = [] privileged_without_host_devices = false privileged_without_host_devices_all_devices_allowed = false runtime_engine = "" runtime_path = "" runtime_root = "" runtime_type = "" sandbox_mode = "" snapshotter = "" [plugins."io.containerd.grpc.v1.cri".containerd.default_runtime.options] [plugins."io.containerd.grpc.v1.cri".containerd.runtimes] [plugins."io.containerd.grpc.v1.cri".containerd.runtimes.runc] base_runtime_spec = "" cni_conf_dir = "" cni_max_conf_num = 0 container_annotations = [] pod_annotations = [] privileged_without_host_devices = false privileged_without_host_devices_all_devices_allowed = false runtime_engine = "" runtime_path = "" runtime_root = "" runtime_type = "io.containerd.runc.v2" sandbox_mode = "podsandbox" snapshotter = "" [plugins."io.containerd.grpc.v1.cri".containerd.runtimes.runc.options] BinaryName = "" CriuImagePath = "" CriuPath = "" CriuWorkPath = "" IoGid = 0 IoUid = 0 NoNewKeyring = false NoPivotRoot = false Root = "" ShimCgroup = "" SystemdCgroup = true [plugins."io.containerd.grpc.v1.cri".containerd.untrusted_workload_runtime] base_runtime_spec = "" cni_conf_dir = "" cni_max_conf_num = 0 container_annotations = [] pod_annotations = [] privileged_without_host_devices = false privileged_without_host_devices_all_devices_allowed = false runtime_engine = "" runtime_path = "" runtime_root = "" runtime_type = "" sandbox_mode = "" snapshotter = "" [plugins."io.containerd.grpc.v1.cri".containerd.untrusted_workload_runtime.options] [plugins."io.containerd.grpc.v1.cri".image_decryption] key_model = "node" [plugins."io.containerd.grpc.v1.cri".registry] config_path = "/etc/containerd/certs.d" [plugins."io.containerd.grpc.v1.cri".registry.auths] [plugins."io.containerd.grpc.v1.cri".registry.configs] [plugins."io.containerd.grpc.v1.cri".registry.headers] #[plugins."io.containerd.grpc.v1.cri".registry.mirrors] [plugins."io.containerd.grpc.v1.cri".registry.mirrors] [plugins."io.containerd.grpc.v1.cri".registry.mirrors."registry.k8s.io"] endpoint = ["https://15.164.211.114"] [plugins."io.containerd.grpc.v1.cri".x509_key_pair_streaming] tls_cert_file = "" tls_key_file = "" [plugins."io.containerd.internal.v1.opt"] path = "/opt/containerd" [plugins."io.containerd.internal.v1.restart"] interval = "10s" [plugins."io.containerd.internal.v1.tracing"] [plugins."io.containerd.metadata.v1.bolt"] content_sharing_policy = "shared" [plugins."io.containerd.monitor.v1.cgroups"] no_prometheus = false [plugins."io.containerd.nri.v1.nri"] disable = true disable_connections = false plugin_config_path = "/etc/containerd/certs.d" plugin_path = "/opt/nri/plugins" plugin_registration_timeout = "5s" plugin_request_timeout = "2s" socket_path = "/var/run/nri/nri.sock" [plugins."io.containerd.runtime.v1.linux"] no_shim = false runtime = "runc" runtime_root = "" shim = "containerd-shim" shim_debug = false [plugins."io.containerd.runtime.v2.task"] platforms = ["linux/amd64"] sched_core = false [plugins."io.containerd.service.v1.diff-service"] default = ["walking"] sync_fs = false [plugins."io.containerd.service.v1.tasks-service"] blockio_config_file = "" rdt_config_file = "" [plugins."io.containerd.snapshotter.v1.aufs"] root_path = "" [plugins."io.containerd.snapshotter.v1.blockfile"] fs_type = "" mount_options = [] root_path = "" scratch_file = "" [plugins."io.containerd.snapshotter.v1.btrfs"] root_path = "" [plugins."io.containerd.snapshotter.v1.devmapper"] async_remove = false base_image_size = "" discard_blocks = false fs_options = "" fs_type = "" pool_name = "" root_path = "" [plugins."io.containerd.snapshotter.v1.native"] root_path = "" [plugins."io.containerd.snapshotter.v1.overlayfs"] mount_options = [] root_path = "" sync_remove = false upperdir_label = false [plugins."io.containerd.snapshotter.v1.zfs"] root_path = "" [plugins."io.containerd.tracing.processor.v1.otlp"] [plugins."io.containerd.transfer.v1.local"] config_path = "/etc/containerd/certs.d" max_concurrent_downloads = 3 max_concurrent_uploaded_layers = 3 [[plugins."io.containerd.transfer.v1.local".unpack_config]] differ = "" platform = "linux/amd64" snapshotter = "overlayfs" [proxy_plugins] [stream_processors] [stream_processors."io.containerd.ocicrypt.decoder.v1.tar"] accepts = ["application/vnd.oci.image.layer.v1.tar+encrypted"] args = ["--decryption-keys-path", "/etc/containerd/ocicrypt/keys"] env = ["OCICRYPT_KEYPROVIDER_CONFIG=/etc/containerd/ocicrypt/ocicrypt_keyprovider.conf"] path = "ctd-decoder" returns = "application/vnd.oci.image.layer.v1.tar" [stream_processors."io.containerd.ocicrypt.decoder.v1.tar.gzip"] accepts = ["application/vnd.oci.image.layer.v1.tar+gzip+encrypted"] args = ["--decryption-keys-path", "/etc/containerd/ocicrypt/keys"] env = ["OCICRYPT_KEYPROVIDER_CONFIG=/etc/containerd/ocicrypt/ocicrypt_keyprovider.conf"] path = "ctd-decoder" returns = "application/vnd.oci.image.layer.v1.tar+gzip" [timeouts] "io.containerd.timeout.bolt.open" = "0s" "io.containerd.timeout.metrics.shimstats" = "2s" "io.containerd.timeout.shim.cleanup" = "5s" "io.containerd.timeout.shim.load" = "5s" "io.containerd.timeout.shim.shutdown" = "3s" "io.containerd.timeout.task.state" = "2s" [ttrpc] address = "" gid = 0 uid = 0sudo mkdir -p /etc/containerd/certs.d/{docker.io,ghcr.io,gcr.io,registry.k8s.io,k8s.gcr.io,mcr.microsoft.com,nvcr.io,quay.io,docker.elastic.co}root@k8s-03:/etc/containerd/certs.d# cat /etc/containerd/certs.d/ghcr.io/hosts.toml server = "https://ghcr.io" [host."https://xing.axzys.cn/ghcr/v2"] capabilities = ["pull", "resolve"] override_path = true skip_verify = falseroot@k8s-03:~# cat /etc/containerd/certs.d/docker.io/hosts.toml server = "https://registry-1.docker.io" [host."https://xing.axzys.cn"] capabilities = ["pull", "resolve"] skip_verify = false root@k8s-03:~# cat /etc/containerd/certs.d/k8s.gcr.io/hosts.toml server = "https://k8s.gcr.io" [host."https://xing.axzys.cn/kgcr/2"] capabilities = ["pull", "resolve"] override_path = true skip_verify = false root@k8s-03:~# cat /etc/containerd/certs.d/registry.k8s.io/hosts.toml server = "https://registry.k8s.io" [host."https://xing.axzys.cn/rk8s/v2"] capabilities = ["pull", "resolve"] override_path = true skip_verify = false root@k8s-03:~# cat /etc/containerd/certs.d/registry-1.docker.io/hosts.toml server = "https://registry-1.docker.io" [host."https://xing.axzys.cn"] capabilities = ["pull", "resolve"] skip_verify = false root@k8s-03:~# cat /etc/containerd/certs.d/quay.io/hosts.toml server = "https://quay.io" [host."https://xing.axzys.cn/quay/v2"] capabilities = ["pull", "resolve"] override_path = true skip_verify = false root@k8s-03:~# cat /etc/containerd/certs.d/docker.elastic.co/hosts.toml server = "https://docker.elastic.co" [host."https://xing.axzys.cn/elastic/2"] capabilities = ["pull", "resolve"] override_path = true skip_verify = falseroot@k8s-03:~# cat /etc/containerd/certs.d/ghcr.io/hosts.toml server = "https://ghcr.io" [host."https://xing.axzys.cn/ghcr/v2"] capabilities = ["pull", "resolve"] override_path = true skip_verify = false #重启containerd生效 sudo systemctl restart containerd三、测试拉取#测试拉取镜像 root@k8s-03:/etc/containerd/certs.d# sudo nerdctl -n k8s.io --debug pull docker.io/library/alpine:3.15 DEBU[0000] verifying process skipped DEBU[0000] The image will be unpacked for platform {"amd64" "linux" "" [] ""}, snapshotter "overlayfs". DEBU[0000] fetching image="docker.io/library/alpine:3.15" DEBU[0000] loading host directory dir=/etc/containerd/certs.d/docker.io DEBU[0000] resolving host=xing.axzys.cn DEBU[0000] do request host=xing.axzys.cn request.header.accept="application/vnd.docker.distribution.manifest.v2+json, application/vnd.docker.distribution.manifest.list.v2+json, application/vnd.oci.image.manifest.v1+json, application/vnd.oci.image.index.v1+json, */*" request.header.user-agent=containerd/2.1.1+unknown request.method=HEAD url="https://xing.axzys.cn/v2/library/alpine/manifests/3.15?ns=docker.io" docker.io/library/alpine:3.15: resolving |--------------------------------------| elapsed: 0.9 s total: 0.0 B (0.0 B/s) DEBU[0001] fetch response received host=xing.axzys.cn response.header.connection=keep-alive response.header.content-length=157 response.header.content-type=application/json response.header.date="Sat, 23 Aug 2025 16:41:57 GMT" response.header.docker-distribution-api-version=registry/2.0 response.header.docker-ratelimit-source=15.164.211.114 response.header.server=nginx response.header.strict-transport-security="max-age=31536000" response.header.www-authenticate="Bearer realm=\"https://xing.axzys.cn/token\",service=\"registry.docker.io\"" response.status="401 Unauthorized" url="https://xing.axzys.cn/v2/library/alpine/manifests/3.15?ns=docker.io" DEBU[0001] Unauthorized header="Bearer realm=\"https://xing.axzys.cn/token\",service=\"registry.docker.io\"" host=xing.axzys.cn DEBU[0001] no scope specified for token auth challenge host=xing.axzys.cn DEBU[0001] do request host=xing.axzys.cn request.header.accept="application/vnd.docker.distribution.manifest.v2+json, application/vnd.docker.distribution.manifest.list.v2+json, application/vnd.oci.image.manifest.v1+json, applicatio docker.io/library/alpine:3.15: resolving |--------------------------------------| elapsed: 3.3 s total: 0.0 B (0.0 B/s) DEBU[0003] fetch response received host=xing.axzys.cn response.header.connection=keep-alive response.header.content-length=1638 response.header.content-type=application/vnd.docker.distribution.manifest.list.v2+json response.header.date="Sat, 23 Aug 2025 16:42:00 GMT" response.header.docker-content-digest="sha256:19b4bcc4f60e99dd5ebdca0cbce22c503bbcff197549d7e19dab4f22254dc864" response.header.docker-distribution-api-version=registry/2.0 response.header.docker-ratelimit-source=15.164.211.114 response.header.etag="\"sha256:19b4bcc4f60e99dd5ebdca0cbce22c503bbcff197549d7e19dab4f22254dc864\"" response.header.ratelimit-limit="100;w=21600" response.header.ratelimit-remaining="92;w=21600" response.header.server=nginx response.header.strict-transport-security="max-age=31536000" response.header.www-authenticate="Bearer realm=\"https://xing.axzys.cn/token\",service=\"registry.docker.io\"" response.status="200 OK" url="https://xing.axzys.cn/v2/library/alpine/manifests/3.15?ns=docker.io" DEBU[0003] resolved desc.digest="sha256:19b4bcc4f60e99dd5ebdca0cbce22c503bbcff197549d7e19dab4f22254dc864" host=xing.axzys.cn DEBU[0003] loading host directory dir=/etc/containerd/certs.d/docker.io docker.io/library/alpine:3.15: resolving |--------------------------------------| elapsed: 3.4 s total: 0.0 B (0.0 B/s) DEBU[0003] fetch digest="sha256:6a0657acfef760bd9e293361c9b558e98e7d740ed0dffca823d17098a4ffddf5" mediatype=application/vnd.docker.distribution.manifest.v2+json size=528 DEBU[0003] fetch digest="sha256:32b91e3161c8fc2e3baf2732a594305ca5093c82ff4e0c9f6ebbd2a879468e1d" mediatype=application/vnd.docker.container.image.v1+json size=1472 DEBU[0003] fetching layer chunk_size=0 digest="sha256:32b91e3161c8fc2e3baf2732a594305ca5093c82ff4e0c9f6ebbd2a879468e1d" initial_parallelism=0 mediatype=application/vnd.docker.container.image.v1+json offset=0 parallelism=1 size=1472 DEBU[0003] do request digest="sha256:32b91e3161c8fc2e3baf2732a594305ca5093c82ff4e0c9f6ebbd2a879468e1d" mediatype=application/vnd.docker.container.image.v1+json request.header.accept="application/vnd.docker.container.image.v1+json, */*" request.header.accept-encoding="zstd;q=1.0, gzip;q=0.8, deflate;q=0.5" request.header.range="bytes=0-" request.header.user-agent docker.io/library/alpine:3.15: resolved |++++++++++++++++++++++++++++++++++++++| index-sha256:19b4bcc4f60e99dd5ebdca0cbce22c503bbcff197549d7e19dab4f22254dc864: exists |++++++++++++++++++++++++++++++++++++++| manifest-sha256:6a0657acfef760bd9e293361c9b558e98e7d740ed0dffca823d17098a4ffddf5: exists |++++++++++++++++++++++++++++++++++++++| config-sha256:32b91e3161c8fc2e3baf2732a594305ca5093c82ff4e0c9f6ebbd2a879468e1d: downloading |--------------------------------------| 0.0 B/1.4 KiB elapsed: 4.4 s total: 0.0 B (0.0 B/s) DEBU[0004] fetch response received digest="sha256:32b91e3161c8fc2e3baf2732a594305ca5093c82ff4e0c9f6ebbd2a879468e1d" mediatype=application/vnd.docker.container.image.v1+json response.header.connection=keep-alive response.header.content-length=157 response.header.content-type=application/json response.header.date="Sat, 23 Aug 2025 16:42:01 GMT" response.header.docker-distribution-api-version=registry/2.0 response.header.server=nginx response.header.strict-transport-security="max-age=31536000" response.header.www-authenticate="Bearer realm=\"https://xing.axzys.cn/token\",service=\"registry.docker.io\"" response.status="401 Unauthorized" size=1472 url="https://xing.axzys.cn/v2/library/alpine/blobs/sha256:32b91e3161c8fc2e3baf2732a594305ca5093c82ff4e0c9f6ebbd2a879468e1d?ns=docker.io" docker.io/library/alpine:3.15: resolved |++++++++++++++++++++++++++++++++++++++| index-sha256:19b4bcc4f60e99dd5ebdca0cbce22c503bbcff197549d7e19dab4f22254dc864: exists |++++++++++++++++++++++++++++++++++++++| manifest-sha256:6a0657acfef760bd9e293361c9b558e98e7d740ed0dffca823d17098a4ffddf5: exists |++++++++++++++++++++++++++++++++++++++| config-sha256:32b91e3161c8fc2e3baf2732a594305ca5093c82ff4e0c9f6ebbd2a879468e1d: downloading |--------------------------------------| 0.0 B/1.4 KiB elapsed: 8.2 s total: 0.0 B (0.0 B/s) DEBU[0008] fetch response received digest="sha256:32b91e3161c8fc2e3baf2732a594305ca5093c82ff4e0c9f6ebbd2a879468e1d" mediatype=application/vnd.docker.container.image.v1+json response.header.accept-ranges=bytes response.header.cf-ray=973c0fa05a2930d3-ICN response.header.connection=keep-alive response.header.content-length=1472 response.header.content-range="bytes 0-1471/1472" response.header.content-type=application/octet-stream response.header.date="Sat, 23 Aug 2025 16:42:04 GMT" response.header.etag="\"aa36606459d6778a94123c7d6a33396b\"" response.header.last-modified="Fri, 13 Dec 2024 15:03:06 GMT" response.header.server=nginx response.header.vary=Accept-Encoding response.header.x-cache-status=BYPASS response.status="206 Partial Content" size=1472 url="https://xing.axzys.cn/v2/library/alpine/blobs/sha256:32b91e3161c8fc2e3baf2732a594305ca5093c82ff4e0c9f6ebbd2a879468e1d?ns=docker.io" docker.io/library/alpine:3.15: resolved |++++++++++++++++++++++++++++++++++++++| index-sha256:19b4bcc4f60e99dd5ebdca0cbce22c503bbcff197549d7e19dab4f22254dc864: exists |++++++++++++++++++++++++++++++++++++++| manifest-sha256:6a0657acfef760bd9e293361c9b558e98e7d740ed0dffca823d17098a4ffddf5: exists |++++++++++++++++++++++++++++++++++++++| config-sha256:32b91e3161c8fc2e3baf2732a594305ca5093c82ff4e0c9f6ebbd2a879468e1d: done |+++++++++++++++++++++++++++++++++++ docker.io/library/alpine:3.15: resolved |++++++++++++++++++++++++++++++++++++++| index-sha256:19b4bcc4f60e99dd5ebdca0cbce22c503bbcff197549d7e19dab4f22254dc864: exists |++++++++++++++++++++++++++++++++++++++| docker.io/library/alpine:3.15: resolved |++++++++++++++++++++++++++++++++++++++| index-sha256:19b4bcc4f60e99dd5ebdca0cbce22c503bbcff197549d7e19dab4f22254dc864: exists |++++++++++++++++++++++++++++++++++++++| manifest-sha256:6a0657acfef760bd9e293361c9b558e98e7d740ed0dffca823d17098a4ffddf5: exists |++++++++++++++++++++++++++++++++++++++| config-sha256:32b91e3161c8fc2e3baf2732a594305ca5093c82ff4e0c9f6ebbd2a879468e1d: done |++++++++++++++++++++++++++++++++++++++| layer-sha256:d078792c4f9122259f14b539315bd92cbd9490ed73e08255a08689122b143108: done |++++++++++++++++++++++++++++++++++++++| elapsed: 86.3s total: 2.7 Mi (32.0 KiB/s) #使用k8syaml文件拉取 Events: Type Reason Age From Message ---- ------ ---- ---- ------- Normal Pulled 7m2s (x6 over 5h7m) kubelet Container image "docker.io/library/alpine:3.9" already present on machine Normal Created 7m2s (x6 over 5h7m) kubelet Created container test-container Normal Started 7m1s (x6 over 5h7m) kubelet Started container test-container #nginx日志 223.74.152.108 - - [23/Aug/2025:16:41:57 +0000] "HEAD /v2/library/alpine/manifests/3.15?ns=docker.io HTTP/1.1" 401 0 "-" "containerd/2.1.1+unknown" 223.74.152.108 - - [23/Aug/2025:16:42:00 +0000] "HEAD /v2/library/alpine/manifests/3.15?ns=docker.io HTTP/1.1" 200 0 "-" "containerd/2.1.1+unknown" 223.74.152.108 - - [23/Aug/2025:16:42:01 +0000] "GET /v2/library/alpine/blobs/sha256:32b91e3161c8fc2e3baf2732a594305ca5093c82ff4e0c9f6ebbd2a879468e1d?ns=docker.io HTTP/1.1" 401 157 "-" "containerd/2.1.1+unknown" 223.74.152.108 - - [23/Aug/2025:16:42:04 +0000] "GET /v2/library/alpine/blobs/sha256:32b91e3161c8fc2e3baf2732a594305ca5093c82ff4e0c9f6ebbd2a879468e1d?ns=docker.io HTTP/1.1" 307 0 "-" "containerd/2.1.1+unknown" 223.74.152.108 - - [23/Aug/2025:16:42:04 +0000] "GET /_proxy/docker-images-prod.6aa30f8b08e16409b46e0173d6de2f56.r2.cloudflarestorage.com/registry-v2/docker/registry/v2/blobs/sha256/32/32b91e3161c8fc2e3baf2732a594305ca5093c82ff4e0c9f6ebbd2a879468e1d/data?X-Amz-Algorithm=AWS4-HMAC-SHA256&X-Amz-Credential=f1baa2dd9b876aeb89efebbfc9e5d5f4%2F20250823%2Fauto%2Fs3%2Faws4_request&X-Amz-Date=20250823T164203Z&X-Amz-Expires=1200&X-Amz-SignedHeaders=host&X-Amz-Signature=860ec74942b8c48e9922b561b9ef4cfd409dc4acf22daa9a31a45754aff6d32a HTTP/1.1" 206 1472 "https://xing.axzys.cn/v2/library/alpine/blobs/sha256:32b91e3161c8fc2e3baf2732a594305ca5093c82ff4e0c9f6ebbd2a879468e1d?ns=docker.io" "containerd/2.1.1+unknown" 223.74.152.108 - - [23/Aug/2025:16:42:05 +0000] "GET /v2/library/alpine/blobs/sha256:d078792c4f9122259f14b539315bd92cbd9490ed73e08255a08689122b143108?ns=docker.io HTTP/1.1" 307 0 "-" "containerd/2.1.1+unknown" 223.74.152.108 - - [23/Aug/2025:16:43:21 +0000] "GET /_proxy/docker-images-prod.6aa30f8b08e16409b46e0173d6de2f56.r2.cloudflarestorage.com/registry-v2/docker/registry/v2/blobs/sha256/d0/d078792c4f9122259f14b539315bd92cbd9490ed73e08255a08689122b143108/data?X-Amz-Algorithm=AWS4-HMAC-SHA256&X-Amz-Credential=f1baa2dd9b876aeb89efebbfc9e5d5f4%2F20250823%2Fauto%2Fs3%2Faws4_request&X-Amz-Date=20250823T164205Z&X-Amz-Expires=1200&X-Amz-SignedHeaders=host&X-Amz-Signature=118da1e073a4589f6a14cb751acfbfdb0c7431fa55703f24d5278e7ec26246a3 HTTP/1.1" 206 2826431 "https://xing.axzys.cn/v2/library/alpine/blobs/sha256:d078792c4f9122259f14b539315bd92cbd9490ed73e08255a08689122b143108?ns=docker.io" "containerd/2.1.1+unknown" 四、剖析过程和nginx配置 4.1参与者与目标- Client:nerdctl/containerd - Mirror:NGINX@ xing.axzys.cn(你这份配置) - Docker Hub:registry-1.docker.io(镜像 API) + auth.docker.io(发 token) - 对象存储/CDN(Docker Hub 背后):Cloudflare R2 等(这次命中 *.r2.cloudflarestorage.com) 目标:客户端的所有请求都打到你域名,由 NGINX 统一处理认证、改写 3xx、缓存 /v2/ 下可缓存内容;当上游把大文件重定向到对象存储时,继续保持同域(走你域名的 /_proxy/...),避免直连外网受限/不可达。4.2按时间线还原整条链路时间均来自你贴的两段日志(nginx access log 与 nerdctl --debug),相互印证。4.2.1准备(为什么需要 resolver/SNI 等)你在 http 块里: resolver 1.1.1.1 8.8.8.8 ...; 因为后面大量用到了变量形式的 upstream 主机名($upstream_host),Nginx 需要在运行时解 DNS。 在 /v2/ 和 /_proxy/ 中你都开启了: proxy_ssl_server_name on; proxy_ssl_name $upstream_host; 这样跟上游 TLS 握手时,SNI 会填真实目标域名,证书校验才会通过。4.2.2HEAD manifest 触发认证(16:41:57 → 401)HEAD /v2/library/alpine/manifests/3.15?ns=docker.io → 401 WWW-Authenticate: Bearer realm="https://xing.axzys.cn/token", service="registry.docker.io"谁返回 401? 你的 NGINX(并非 Docker Hub)。为什么? 你在 /v2/: proxy_hide_header WWW-Authenticate; add_header WWW-Authenticate 'Bearer realm="https://xing.axzys.cn/token",service="registry.docker.io"' always; 这会强制把认证引导到你自己的 /token 端点,从而把“领 token”的流量固定在你的域名下(便于出网与审计)。 client 行为:containerd 收到 401 + WWW-Authenticate 后,会去 GET https://xing.axzys.cn/token?... 领一个 Bearer Token(JWT)。 你的 access log 片段里没贴出 /token 的那行,但从后续现象可知它已成功。nerdctl debug 里出现 Unauthorized ... no scope specified for token auth challenge 这只是 containerd 发起 token 流程的常见提示——第一次 401 只提供了 realm/service,后续在请求具体资源时它会带上 scope=repository:library/alpine:pull 等参数去换真正可用的 token。4.2.3 拉取 config blob(16:42:01 → 401 → 307)GET /v2/.../blobs/sha256:32b91e... → 401 ...随后同 URL → 307 Location: https://...r2.cloudflarestorage.com/...- 第一次 401:常见于 token 刷新或 scope 切换;containerd 会透明地再换一次 token(或掉头再次请求),随即你就看到 307 了。 - 307 from Hub/CDN:Docker Hub 对于实际二进制层(包括 config 层)不会直接回源给你,而是下发一个预签名 URL(Cloudflare R2/S3/GCS 等)。你的 /v2/ 配置有: proxy_redirect ~^https://(?<h>[^/]+)(?<p>/.*)$ https://$server_name/_proxy/$h$p; #这会把上游 30x Location 改写成你域名下的 /_proxy/<原host>/<原path?query>,于是客户端继续请求你域名,而不会直连 R2。4.2.4 通过 /_proxy 去对象存储(16:42:04 → 206)GET /_proxy/docker-images-prod....r2.cloudflarestorage.com/... → 206 Partial Content Content-Range: bytes 0-1471/1472 X-Cache-Status: BYPASS命中你 location ~ ^/_proxy/... 域名白名单严格校验,非允许列表一律 403(你已经列了 R2/S3/GCS/Quay CDN/Azure/Microsoft/Elastic/Cloudfront/Fastly 等)。 SNI/证书校验对齐上游真实主机(proxy_ssl_name $upstream_host; proxy_ssl_verify on;)。 不缓存(proxy_cache off;),不缓冲(proxy_buffering off;),不透传 Authorization(安全起见,proxy_set_header Authorization "";)。 仅透传 Range:proxy_set_header Range $http_range; —— 客户端最常发 Range: bytes=0-,于是上游返回 206 Partial Content。这次的对象是 config(1472 字节),一口气就拿完了(Content-Range: 0-1471/1472)。 nerdctl debug 里还能看到: cf-ray=...-ICN —— 这是 Cloudflare 的 PoP 标识,ICN 通常表示仁川/首尔边缘节点,说明你离 R2 的边缘很近,但速率还是取决于上游限速与跨网络链路。4.2.5 拉取大层(layer blob)(16:42:05 → 307;16:43:21 → 206)GET /v2/.../blobs/sha256:d07879... → 307 Location: https://...r2.cloudflarestorage.com/... GET /_proxy/...r2.cloudflarestorage.com/... → 206 2,826,431 bytes过程与 Step 3/4 相同,只是这个 blob 是真正的大层。 你的 access log 里 206 2826431,等于 ~2.70 MiB;整个拉取最终统计 total 2.7 MiB,耗时 86.3s(~32 KiB/s),这正是你 debug 里最后那行4.3为什么这些 NGINX 指令至关重要4.3.1认证引导(把令牌流程“拉到你域名”)/v2/ 里:proxy_hide_header WWW-Authenticate; add_header WWW-Authenticate 'Bearer realm="https://xing.axzys.cn/token",service="registry.docker.io"' always; /token 里:proxy_pass https://auth.docker.io/token$is_args$args; proxy_set_header Host auth.docker.io; ...; proxy_cache off; proxy_buffering off; #这确保客户端永远找你要 token,你再转发给 auth.docker.io。这样即便直连外网不稳定,token 也能拿到。4.3.2重定向改写到同域的 /_proxy/v2/ 里:proxy_redirect 用正则把任何 https://<host>/<path> 改写为 https://xing.axzys.cn/_proxy/<host>/<path>。 #客户端永远与 你域名交互(包括下载层),不会直连 R2/S3/GCS —— 这就是加速器/出口统一的关键。4.3.3 /_proxy 的安全与直通策略允许名单:仅允许对象存储/官方域名;其他域一律 403(防 SSRF、钓鱼域)。 TLS/SNI 严格:与上游域名完全一致的 SNI 与证书验证。 禁缓存/禁缓冲/清理凭据:预签名 URL 是带时效与权限的,不能缓存;也不要带上任何敏感头。 只透传 Range:让上游直接按 Range 返回 206,最大化兼容客户端的断点续传与并行策略。4.3.4 缓存与切片(仅对 /v2/)slice 1m; proxy_cache docker_cache; proxy_cache_key ... $slice_range; proxy_cache_valid 200 206 302 10m; proxy_cache_use_stale error timeout updating http_5xx; proxy_cache_lock on; 这套优化对直接从 /v2/ 回 200/206 的上游特别有效(很多私有 registry 会这么回)。 但对 Docker Hub,由于大层都会 30x 到对象存储,真正的数据并不在 /v2/,而是在 /_proxy(你已禁缓存)。因此: /v2/ 的切片缓存主要惠及:manifest(200)和上游可能返回的 302/小对象; 大层数据不会进 cache(因为 /_proxy 禁缓存且 URL 是带过期时间的预签名)。这是刻意的正确选择,避免缓存过期签名导致 403。4.4 你日志里出现的关键头部含义Docker-RateLimit-Source: 15.164.211.114:Hub 把镜像拉取计数记到你服务器的出口 IP;所有内网客户端都会共享这个匿名配额。 RateLimit-Limit: 100;w=21600 / RateLimit-Remaining: 92;w=21600:匿名用户的典型限额(6 小时窗口 100 次)。 Content-Range: bytes 0-1471/1472、206 Partial Content:按 Range 断点下载,containerd/nerdctl 默认就会这么拉。 cf-ray=...-ICN:Cloudflare PoP(ICN=Incheon/Seoul),表明对象实际由边缘节点服务。 X-Cache-Status: BYPASS:这条来自 /_proxy,因为你明确 proxy_cache off,所以必然是 BYPASS(正常)。4.5 为什么整体耗时 86.3s(32 KiB/s)上游对匿名大层的限速(CDN 端的 Per-connection/Per-IP throttle)+ 公网出口质量 通常是最主要因素; 你的 /_proxy 正确地关闭了缓存,所以不会被“预签名 URL 过期/权限偏差”坑到,但也意味着无法靠本地缓存提升首拉速度; 第二次拉取(相同层/相同对象)也不会从 /_proxy 命中,因为 URL 带签名且时效变化;不过 manifest 与 302 在 /v2/ 有 10 分钟缓存,能节省“引导步骤”的往返。4.6超简时间轴(把两段日志合在一起看)16:41:57 HEAD manifests → 401(你的 /v2/ 故意引导去 /token) 16:42:00 HEAD manifests(带 token)→ 200(拿到 manifest list digest) 16:42:01 GET config blob → 401(token/scope 校验) 16:42:04 GET 同 config blob → 307(Hub 把数据放到 R2) 16:42:04 GET /_proxy 到 R2 → 206(1472B,config 完成) 16:42:05 GET layer blob → 307(重定向到 R2) 16:43:21 GET /_proxy 到 R2 → 206(2.7MiB,大层完成) 总计:2.7MiB / 86.3s ≈ 32KiB/s(主要瓶颈在上游/公网链路/限速)# /etc/nginx/sites-available/docker-mirror # DNS for variable proxy_pass resolver 1.1.1.1 8.8.8.8 valid=300s ipv6=off; # Cache (only used under /v2/) proxy_cache_path /var/cache/nginx/docker levels=1:2 keys_zone=docker_cache:50m max_size=300g inactive=7d use_temp_path=off; # Registry v2 header map $http_docker_distribution_api_version $docker_api_version { default "registry/2.0"; } # expose cache status map $upstream_cache_status $cache_status { default $upstream_cache_status; "" "BYPASS"; } server { listen 443 ssl http2; server_name xing.axzys.cn; ssl_certificate /etc/nginx/ssl/xing.axzys.cn.pem; ssl_certificate_key /etc/nginx/ssl/xing.axzys.cn.key; client_max_body_size 0; proxy_http_version 1.1; proxy_connect_timeout 60s; proxy_read_timeout 600s; proxy_send_timeout 600s; # 默认流式 proxy_buffering off; proxy_request_buffering off; proxy_set_header Connection ""; proxy_set_header X-Forwarded-Proto $scheme; proxy_set_header X-Forwarded-For $proxy_add_x_forwarded_for; proxy_set_header Docker-Distribution-Api-Version $docker_api_version; # 全局打开缓存(/_proxy、/token 会单独关闭) proxy_cache docker_cache; proxy_cache_lock on; proxy_cache_revalidate on; proxy_cache_min_uses 1; proxy_cache_use_stale error timeout updating http_500 http_502 http_503 http_504; proxy_cache_valid 200 206 302 10m; add_header X-Cache-Status $cache_status always; # 把上游 3xx Location 改写到 /_proxy/<host>/<path?query> proxy_redirect ~^https://(?<h>[^/]+)(?<p>/.*)$ https://$server_name/_proxy/$h$p; # ---------- token endpoint(Docker Hub 专用) ---------- location = /token { proxy_pass https://auth.docker.io/token$is_args$args; proxy_set_header Host auth.docker.io; proxy_set_header X-Real-IP $remote_addr; proxy_set_header X-Forwarded-For $proxy_add_x_forwarded_for; proxy_set_header X-Forwarded-Proto $scheme; proxy_set_header Authorization ""; proxy_cache off; proxy_buffering off; proxy_http_version 1.1; proxy_connect_timeout 30s; proxy_read_timeout 30s; proxy_send_timeout 30s; } # ---------- GHCR token 代领 ---------- location = /ghcr-token { proxy_pass https://ghcr.io/token$is_args$args; proxy_set_header Host ghcr.io; proxy_set_header X-Real-IP $remote_addr; proxy_set_header X-Forwarded-For $proxy_add_x_forwarded_for; proxy_set_header X-Forwarded-Proto $scheme; proxy_set_header Authorization ""; proxy_cache off; proxy_buffering off; proxy_http_version 1.1; proxy_connect_timeout 30s; proxy_read_timeout 30s; proxy_send_timeout 30s; } # ---------- /v2/ -> 本机 crproxy (Docker Hub) ---------- # 关键修正:把 /v2/... 重写为 **/v2/docker.io/...**(原来少了 /v2,导致 301 -> /_proxy/hub.docker.com -> 403) location ^~ /v2/ { set $upstream_host "127.0.0.1:6440"; proxy_set_header Host $upstream_host; # ✅ 正确:保持 /v2 前缀 rewrite ^/v2(?<rest>/.*)$ /v2/docker.io$rest break; # 分片 + 缓存键 slice 1m; proxy_cache_key $scheme$upstream_host$request_uri$is_args$args$slice_range; proxy_set_header Range $slice_range; # 引导客户端去我们的 /token proxy_hide_header WWW-Authenticate; add_header WWW-Authenticate 'Bearer realm="https://xing.axzys.cn/token",service="registry.docker.io"' always; proxy_buffering off; proxy_pass http://$upstream_host; access_log /var/log/nginx/docker_mirror_access.log; error_log /var/log/nginx/docker_mirror_error.log warn; } # ================= 其余注册中心(带前缀)================= # ghcr.io location ^~ /ghcr/ { set $upstream_host "ghcr.io"; proxy_set_header Host $upstream_host; proxy_ssl_server_name on; proxy_ssl_name $upstream_host; rewrite ^/ghcr(?<rest>/.*)$ $rest break; slice 1m; proxy_cache_key $scheme$upstream_host$request_uri$is_args$args$slice_range; proxy_set_header Range $slice_range; proxy_hide_header WWW-Authenticate; add_header WWW-Authenticate 'Bearer realm="https://xing.axzys.cn/ghcr-token",service="ghcr.io"' always; proxy_pass https://$upstream_host; access_log /var/log/nginx/docker_mirror_access.log; error_log /var/log/nginx/docker_mirror_error.log warn; } # gcr.io location ^~ /gcr/ { set $upstream_host "gcr.io"; proxy_set_header Host $upstream_host; proxy_ssl_server_name on; proxy_ssl_name $upstream_host; rewrite ^/gcr(?<rest>/.*)$ $rest break; slice 1m; proxy_cache_key $scheme$upstream_host$request_uri$is_args$args$slice_range; proxy_set_header Range $slice_range; proxy_pass https://$upstream_host; access_log /var/log/nginx/docker_mirror_access.log; error_log /var/log/nginx/docker_mirror_error.log warn; } # registry.k8s.io location ^~ /rk8s/ { set $upstream_host "registry.k8s.io"; proxy_set_header Host $upstream_host; proxy_ssl_server_name on; proxy_ssl_name $upstream_host; rewrite ^/rk8s(?<rest>/.*)$ $rest break; slice 1m; proxy_cache_key $scheme$upstream_host$request_uri$is_args$args$slice_range; proxy_set_header Range $slice_range; proxy_pass https://$upstream_host; access_log /var/log/nginx/docker_mirror_access.log; error_log /var/log/nginx/docker_mirror_error.log warn; } # 兼容 k8s.gcr.io -> registry.k8s.io location ^~ /kgcr/ { set $upstream_host "registry.k8s.io"; proxy_set_header Host $upstream_host; proxy_ssl_server_name on; proxy_ssl_name $upstream_host; rewrite ^/kgcr(?<rest>/.*)$ $rest break; slice 1m; proxy_cache_key $scheme$upstream_host$request_uri$is_args$args$slice_range; proxy_set_header Range $slice_range; proxy_pass https://$upstream_host; access_log /var/log/nginx/docker_mirror_access.log; error_log /var/log/nginx/docker_mirror_error.log warn; } # mcr.microsoft.com location ^~ /mcr/ { set $upstream_host "mcr.microsoft.com"; proxy_set_header Host $upstream_host; proxy_ssl_server_name on; proxy_ssl_name $upstream_host; rewrite ^/mcr(?<rest>/.*)$ $rest break; slice 1m; proxy_cache_key $scheme$upstream_host$request_uri$is_args$args$slice_range; proxy_set_header Range $slice_range; proxy_pass https://$upstream_host; access_log /var/log/nginx/docker_mirror_access.log; error_log /var/log/nginx/docker_mirror_error.log warn; } # nvcr.io location ^~ /nvcr/ { set $upstream_host "nvcr.io"; proxy_set_header Host $upstream_host; proxy_ssl_server_name on; proxy_ssl_name $upstream_host; rewrite ^/nvcr(?<rest>/.*)$ $rest break; slice 1m; proxy_cache_key $scheme$upstream_host$request_uri$is_args$args$slice_range; proxy_set_header Range $slice_range; proxy_pass https://$upstream_host; access_log /var/log/nginx/docker_mirror_access.log; error_log /var/log/nginx/docker_mirror_error.log warn; } # quay.io location ^~ /quay/ { set $upstream_host "quay.io"; proxy_set_header Host $upstream_host; proxy_ssl_server_name on; proxy_ssl_name $upstream_host; rewrite ^/quay(?<rest>/.*)$ $rest break; slice 1m; proxy_cache_key $scheme$upstream_host$request_uri$is_args$args$slice_range; proxy_set_header Range $slice_range; proxy_pass https://$upstream_host; access_log /var/log/nginx/docker_mirror_access.log; error_log /var/log/nginx/docker_mirror_error.log warn; } # docker.elastic.co location ^~ /elastic/ { set $upstream_host "docker.elastic.co"; proxy_set_header Host $upstream_host; proxy_ssl_server_name on; proxy_ssl_name $upstream_host; rewrite ^/elastic(?<rest>/.*)$ $rest break; slice 1m; proxy_cache_key $scheme$upstream_host$request_uri$is_args$args$slice_range; proxy_set_header Range $slice_range; proxy_pass https://$upstream_host; access_log /var/log/nginx/docker_mirror_access.log; error_log /var/log/nginx/docker_mirror_error.log warn; } # ---------- /_proxy/<host>/<path?query> -> 对象存储/CDN ---------- location ~ ^/_proxy/(?<h>[^/]+)(?<p>/.*)$ { if ($h !~* ^(registry-1\.docker\.io|auth\.docker\.io|production\.cloudflare\.docker\.com|.*\.cloudflarestorage\.com|.*\.r2\.cloudflarestorage\.com|.*\.amazonaws\.com|storage\.googleapis\.com|.*\.googleapis\.com|.*\.pkg\.dev|ghcr\.io|github\.com|pkg-containers\.[^/]*githubusercontent\.com|objects\.githubusercontent\.com|.*\.blob\.core\.windows\.net|.*\.azureedge\.net|mcr\.microsoft\.com|.*\.microsoft\.com|quay\.io|cdn\.quay\.io|.*quay-cdn[^/]*\.redhat\.com|k8s\.gcr\.io|registry\.k8s\.io|gcr\.io|docker\.elastic\.co|.*\.elastic\.co|.*\.cloudfront\.net|.*\.fastly\.net)$) { return 403; } set $upstream_host $h; rewrite ^/_proxy/[^/]+(?<rest>/.*)$ $rest break; proxy_set_header Host $upstream_host; proxy_ssl_server_name on; proxy_ssl_name $upstream_host; proxy_ssl_protocols TLSv1.2 TLSv1.3; proxy_ssl_trusted_certificate /etc/ssl/certs/ca-certificates.crt; proxy_ssl_verify on; proxy_ssl_verify_depth 2; proxy_set_header Range $http_range; proxy_redirect off; proxy_cache off; proxy_buffering off; proxy_request_buffering off; proxy_set_header Authorization ""; proxy_pass https://$upstream_host; access_log /var/log/nginx/docker_mirror_access.log; error_log /var/log/nginx/docker_mirror_error.log warn; } location = /healthz { return 200 'ok'; add_header Content-Type text/plain; } } # HTTP -> HTTPS server { listen 80; server_name xing.axzys.cn; return 301 https://$host$request_uri; }
-
Rocky Linux 9.3 安装k8s-docker安装 一、固定IP地址#配置 sudo nmcli connection modify ens160 \ ipv4.method manual \ ipv4.addresses 192.168.30.20/24 \ ipv4.gateway 192.168.30.2 \ ipv4.dns "8.8.8.8,8.8.4.4" #更新配置 sudo nmcli connection down ens160 && sudo nmcli connection up ens160二、配置yum源 2.1备份现有仓库配置文件#sudo mkdir /etc/yum.repos.d/backup #sudo mv /etc/yum.repos.d/*.repo /etc/yum.repos.d/backup/ 直接执行下面的2.2修改仓库配置文件# 使用阿里云推荐的配置方法 sudo sed -e 's!^mirrorlist=!#mirrorlist=!g' \ -e 's!^#baseurl=http://dl.rockylinux.org/$contentdir!baseurl=https://mirrors.aliyun.com/rockylinux!g' \ -i /etc/yum.repos.d/Rocky-*.repo2.3清理并重建缓存sudo dnf clean all sudo dnf makecache2.4测试更新sudo dnf update -y三、准备工作 3.1修改主机名hostnamectl set-hostname k8s-01 hostnamectl set-hostname k8s-02 hostnamectl set-hostname k8s-033.2关闭一些服务# 1、关闭selinux sed -i 's#enforcing#disabled#g' /etc/selinux/config setenforce 0 # 2、禁用防火墙,网络管理,邮箱 systemctl disable --now firewalld NetworkManager postfix # 3、关闭swap分区 swapoff -a # 注释swap分区 cp /etc/fstab /etc/fstab_bak sed -i '/swap/d' /etc/fstab3.3sshd服务优化(可以不做)# 1、加速访问 sed -ri 's@^#UseDNS yes@UseDNS no@g' /etc/ssh/sshd_config sed -ri 's#^GSSAPIAuthentication yes#GSSAPIAuthentication no#g' /etc/ssh/sshd_config grep ^UseDNS /etc/ssh/sshd_config grep ^GSSAPIAuthentication /etc/ssh/sshd_config systemctl restart sshd # 2、密钥登录(主机点做):为了让后续一些远程拷贝操作更方便 ssh-keygen ssh-copy-id -i root@k8s-01 ssh-copy-id -i root@k8s-02 ssh-copy-id -i root@k8s-03 #连接测试 [root@m01 ~]# ssh 172.16.1.7 Last login: Tue Nov 24 09:02:26 2020 from 10.0.0.1 [root@web01 ~]#3.4增大文件标识符数量(退出当前会话立即生效)cat > /etc/security/limits.d/k8s.conf <<EOF * soft nofile 65535 * hard nofile 131070 EOF ulimit -Sn ulimit -Hn3.5所有节点配置模块自动加载,此步骤不做的话(kubeadm init时会直接失败)modprobe br_netfilter modprobe ip_conntrack cat >>/etc/rc.sysinit<<EOF #!/bin/bash for file in /etc/sysconfig/modules/*.modules ; do [ -x $file ] && $file done EOF echo "modprobe br_netfilter" >/etc/sysconfig/modules/br_netfilter.modules echo "modprobe ip_conntrack" >/etc/sysconfig/modules/ip_conntrack.modules chmod 755 /etc/sysconfig/modules/br_netfilter.modules chmod 755 /etc/sysconfig/modules/ip_conntrack.modules lsmod | grep br_netfilter3.6同步集群时间# =====================》chrony服务端:服务端我们可以自己搭建,也可以直接用公网上的时间服务器,所以是否部署服务端看你自己 # 1、安装 dnf -y install chrony # 2、修改配置文件 mv /etc/chrony.conf /etc/chrony.conf.bak cat > /etc/chrony.conf << EOF server ntp1.aliyun.com iburst minpoll 4 maxpoll 10 server ntp2.aliyun.com iburst minpoll 4 maxpoll 10 server ntp3.aliyun.com iburst minpoll 4 maxpoll 10 server ntp4.aliyun.com iburst minpoll 4 maxpoll 10 server ntp5.aliyun.com iburst minpoll 4 maxpoll 10 server ntp6.aliyun.com iburst minpoll 4 maxpoll 10 server ntp7.aliyun.com iburst minpoll 4 maxpoll 10 driftfile /var/lib/chrony/drift makestep 10 3 rtcsync allow 0.0.0.0/0 local stratum 10 keyfile /etc/chrony.keys logdir /var/log/chrony stratumweight 0.05 noclientlog logchange 0.5 EOF # 4、启动chronyd服务 systemctl restart chronyd.service # 最好重启,这样无论原来是否启动都可以重新加载配置 systemctl enable chronyd.service systemctl status chronyd.service # =====================》chrony客户端:在需要与外部同步时间的机器上安装,启动后会自动与你指定的服务端同步时间 # 下述步骤一次性粘贴到每个客户端执行即可 # 1、安装chrony dnf -y install chrony # 2、需改客户端配置文件 mv /etc/chrony.conf /etc/chrony.conf.bak cat > /etc/chrony.conf << EOF server 192.168.30.20 iburst driftfile /var/lib/chrony/drift makestep 10 3 rtcsync local stratum 10 keyfile /etc/chrony.key logdir /var/log/chrony stratumweight 0.05 noclientlog logchange 0.5 EOF # 3、启动chronyd systemctl restart chronyd.service systemctl enable chronyd.service systemctl status chronyd.service # 4、验证 chronyc sources -v3.7安装常用软件dnf -y install expect wget jq psmisc vim net-tools telnet yum-utils device-mapper-persistent-data lvm2 git ntpdate chrony bind-utils rsync unzip git3.8查看内核版本要4.4+[root@localhost ~]# grubby --default-kernel /boot/vmlinuz-5.14.0-570.30.1.el9_6.x86_643.8节点安装IPVS# 1、安装ipvsadm等相关工具 dnf -y install ipvsadm ipset sysstat conntrack libseccomp # 2、配置加载 cat > /etc/sysconfig/modules/ipvs.modules <<"EOF" #!/bin/bash ipvs_modules="ip_vs ip_vs_lc ip_vs_wlc ip_vs_rr ip_vs_wrr ip_vs_lblc ip_vs_lblcr ip_vs_dh ip_vs_sh ip_vs_fo ip_vs_nq ip_vs_sed ip_vs_ftp nf_conntrack" for kernel_module in ${ipvs_modules}; do /sbin/modinfo -F filename ${kernel_module} > /dev/null 2>&1 if [ $? -eq 0 ]; then /sbin/modprobe ${kernel_module} fi done EOF chmod 755 /etc/sysconfig/modules/ipvs.modules && bash /etc/sysconfig/modules/ipvs.modules && lsmod | grep ip_vs3.9机器修改内核参数cat > /etc/sysctl.d/k8s.conf << EOF net.ipv4.ip_forward = 1 net.bridge.bridge-nf-call-iptables = 1 net.bridge.bridge-nf-call-ip6tables = 1 fs.may_detach_mounts = 1 vm.overcommit_memory=1 vm.panic_on_oom=0 fs.inotify.max_user_watches=89100 fs.file-max=52706963 fs.nr_open=52706963 net.ipv4.tcp_keepalive_time = 600 net.ipv4.tcp.keepaliv.probes = 3 net.ipv4.tcp_keepalive_intvl = 15 net.ipv4.tcp.max_tw_buckets = 36000 net.ipv4.tcp_tw_reuse = 1 net.ipv4.tcp.max_orphans = 327680 net.ipv4.tcp_orphan_retries = 3 net.ipv4.tcp_syncookies = 1 net.ipv4.tcp_max_syn_backlog = 16384 net.ipv4.ip_conntrack_max = 65536 net.ipv4.tcp_max_syn_backlog = 16384 net.ipv4.top_timestamps = 0 net.core.somaxconn = 16384 EOF # 立即生效 sysctl --system四、安装containerd(所有k8s节点都要做) 自Kubernetes1.24以后,K8S就不再原生支持docker了我们都知道containerd来自于docker,后被docker捐献给了云原生计算基金会(我们安装docker当然会一并安装上containerd)安装方法:centos的libseccomp的版本为2.3.1,不满足containerd的需求,需要下载2.4以上的版本即可,我这里部署2.5.1版本。 rpm -e libseccomp-2.5.1-1.el8.x86_64 --nodeps rpm -ivh libseccomp-2.5.1-1.e18.x8664.rpm #官网已经gg了,不更新了,请用阿里云 # wget http://rpmfind.net/linux/centos/8-stream/Base0s/x86 64/0s/Packages/libseccomp-2.5.1-1.el8.x86_64.rpm wget https://mirrors.aliyun.com/centos/8/BaseOS/x86_64/os/Packages/libseccomp-2.5.1-1.el8.x86_64.rpm cd /root/rpms sudo yum localinstall libseccomp-2.5.1-1.el8.x86_64.rpm -y #rocky 默认版本就是2.5.2 无需执行上面的命令 直接执行下面的命令查看版本 [root@k8s-01 ~]# rpm -qa | grep libseccomp libseccomp-2.5.2-2.el9.x86_64 安装方式一:(基于阿里云的源)推荐用这种方式,安装的是4sudo dnf config-manager --set-enabled powertools # Rocky Linux 8/9需启用PowerTools仓库 sudo dnf install -y yum-utils device-mapper-persistent-data lvm2 #1、卸载之前的 dnf remove docker docker-ce containerd docker-common docker-selinux docker-engine -y #2、准备repo sudo tee /etc/yum.repos.d/docker-ce.repo <<-'EOF' [docker-ce-stable] name=Docker CE Stable - AliOS baseurl=https://mirrors.aliyun.com/docker-ce/linux/centos/$releasever/$basearch/stable enabled=1 gpgcheck=1 gpgkey=https://mirrors.aliyun.com/docker-ce/linux/centos/gpg EOF # 3、安装 sudo dnf install -y containerd.io sudo dnf install containerd* -y配置# 1、配置 mkdir -pv /etc/containerd containerd config default > /etc/containerd/config.toml #为containerd生成配置文件 #2、替换默认pause镜像地址:这一步非常非常非常非常重要 grep sandbox_image /etc/containerd/config.toml sed -i 's/registry.k8s.io/registry.cn-hangzhou.aliyuncs.com\/google_containers/' /etc/containerd/config.toml grep sandbox_image /etc/containerd/config.toml #请务必确认新地址是可用的: sandbox_image="registry.cn-hangzhou.aliyuncs.com/google_containers/pause:3.6" #3、配置systemd作为容器的cgroup driver grep SystemdCgroup /etc/containerd/config.toml sed -i 's/SystemdCgroup \= false/SystemdCgroup \= true/' /etc/containerd/config.toml grep SystemdCgroup /etc/containerd/config.toml # 4、配置加速器(必须配置,否则后续安装cni网络插件时无法从docker.io里下载镜像) #参考:https://github.com/containerd/containerd/blob/main/docs/cri/config.md#registry-configuration #添加 config_path="/etc/containerd/certs.d" sed -i 's/config_path\ =.*/config_path = \"\/etc\/containerd\/certs.d\"/g' /etc/containerd/config.tomlmkdir -p /etc/containerd/certs.d/docker.io cat>/etc/containerd/certs.d/docker.io/hosts.toml << EOF server ="https://docker.io" [host."https ://dockerproxy.com"] capabilities = ["pull","resolve"] [host."https://docker.m.daocloud.io"] capabilities = ["pull","resolve"] [host."https://docker.chenby.cn"] capabilities = ["pull","resolve"] [host."https://registry.docker-cn.com"] capabilities = ["pull","resolve" ] [host."http://hub-mirror.c.163.com"] capabilities = ["pull","resolve" ] EOF#5、配置containerd开机自启动 #5.1 启动containerd服务并配置开机自启动 systemctl daemon-reload && systemctl restart containerd systemctl enable --now containerd #5.2 查看containerd状态 systemctl status containerd #5.3查看containerd的版本 ctr version五、安装k8s 5.1准备k8s源# 创建repo文件 cat <<EOF | sudo tee /etc/yum.repos.d/kubernetes.repo [kubernetes] name=Kubernetes baseurl=https://mirrors.aliyun.com/kubernetes/yum/repos/kubernetes-el7-x86_64/ enabled=1 gpgcheck=1 repo_gpgcheck=1 gpgkey=https://mirrors.aliyun.com/kubernetes/yum/doc/yum-key.gpg https://mirrors.aliyun.com/kubernetes/yum/doc/rpm-package-key.gpg EOF sudo dnf makecache #参考:https://developer.aliyun.com/mirror/kubernetes/setenforce dnf install -y kubelet-1.27* kubeadm-1.27* kubectl-1.27* systemctl enable kubelet && systemctl start kubelet && systemctl status kubelet 安装锁定版本的插件 sudo dnf install -y dnf-plugin-versionlock 锁定版本不让后续更新sudo dnf versionlock add kubelet-1.27* kubeadm-1.27* kubectl-1.27* containerd.io [root@k8s-01 ~]# sudo dnf versionlock list Last metadata expiration check: 0:35:21 ago on Fri Aug 8 10:40:25 2025. kubelet-0:1.27.6-0.* kubeadm-0:1.27.6-0.* kubectl-0:1.27.6-0.* containerd.io-0:1.7.27-3.1.el9.* #sudo dnf update就会排除锁定的应用5.2加载内核# 加载 br_netfilter 模块 sudo modprobe br_netfilter # 启用内核参数 cat <<EOF | sudo tee /etc/sysctl.d/k8s.conf net.bridge.bridge-nf-call-iptables = 1 net.bridge.bridge-nf-call-ip6tables = 1 net.ipv4.ip_forward = 1 EOF # 应用配置 sudo sysctl --system #临时关闭防火墙 sudo systemctl stop firewalld #永久关闭防火墙 sudo systemctl disable firewalld sudo modprobe br_netfilter cat <<EOF | sudo tee /etc/sysctl.d/k8s.conf net.bridge.bridge-nf-call-iptables = 1 net.bridge.bridge-nf-call-ip6tables = 1 net.ipv4.ip_forward = 1 EOF sudo sysctl --system sudo systemctl stop firewalld sudo systemctl disable firewalld 5.3主节点操作(node节点不执行)初始化master节点(仅在master节点上执行) #可以kubeadm config images list查看 [root@k8s-master-01 ~]# kubeadm config images list registry.k8s.io/kube-apiserver:v1.30.0 registry.k8s.io/kube-controller-manager:v1.30.0 registry.k8s.io/kube-scheduler:v1.30.0 registry.k8s.io/kube-proxy:v1.30.0 registry.k8s.io/coredns/coredns:v1.11.1 registry.k8s.io/pause:3.9 registry.k8s.io/etcd:3.5.12-0kubeadm config print init-defaults > kubeadm.yamlvi kubeadm.yaml apiVersion: kubeadm.k8s.io/v1beta3 bootstrapTokens: - groups: - system:bootstrappers:kubeadm:default-node-token token: abcdef.0123456789abcdef ttl: 24h0m0s apiVersion: kubeadm.k8s.io/v1beta3 bootstrapTokens: - groups: - system:bootstrappers:kubeadm:default-node-token token: abcdef.0123456789abcdef ttl: 24h0m0s usages: - signing - authentication kind: InitConfiguration localAPIEndpoint: advertiseAddress: 192.168.110.97 #这里要改为控制节点 bindPort: 6443 nodeRegistration: criSocket: unix:///var/run/containerd/containerd.sock imagePullPolicy: IfNotPresent name: k8s-master-01 #这里要修改 taints: null --- apiServer: timeoutForControlPlane: 4m0s apiVersion: kubeadm.k8s.io/v1beta3 certificatesDir: /etc/kubernetes/pki clusterName: kubernetes controllerManager: {} dns: {} etcd: local: dataDir: /var/lib/etcd imageRepository: registry.cn-hangzhou.aliyuncs.com/google_containers #要去阿里云创建仓库 kind: ClusterConfiguration kubernetesVersion: 1.30.3 networking: dnsDomain: cluster.local serviceSubnet: 10.96.0.0/12 podSubnet: 10.244.0.0/16 #添加这行 scheduler: {} #在最后插入以下内容 --- apiVersion: kubeproxy.config.k8s.io/v1alpha1 kind: KubeProxyConfiguration mode: ipvs --- apiVersion: kubelet.config.k8s.io/v1beta1 kind: KubeletConfiguration cgroupDriver: systemd部署K8Skubeadm init --config=kubeadm.yaml --ignore-preflight-errors=SystemVerification --ignore-preflight-errors=Swap部署网络插件下载网络插件wget https://github.com/flannel-io/flannel/releases/latest/download/kube-flannel.yml[root@k8s-01 ~]# cat kube-flannel.yml apiVersion: v1 kind: Namespace metadata: labels: k8s-app: flannel pod-security.kubernetes.io/enforce: privileged name: kube-flannel --- apiVersion: v1 kind: ServiceAccount metadata: labels: k8s-app: flannel name: flannel namespace: kube-flannel --- apiVersion: rbac.authorization.k8s.io/v1 kind: ClusterRole metadata: labels: k8s-app: flannel name: flannel rules: - apiGroups: - "" resources: - pods verbs: - get - apiGroups: - "" resources: - nodes verbs: - get - list - watch - apiGroups: - "" resources: - nodes/status verbs: - patch --- apiVersion: rbac.authorization.k8s.io/v1 kind: ClusterRoleBinding metadata: labels: k8s-app: flannel name: flannel roleRef: apiGroup: rbac.authorization.k8s.io kind: ClusterRole name: flannel subjects: - kind: ServiceAccount name: flannel namespace: kube-flannel --- apiVersion: v1 data: cni-conf.json: | { "name": "cbr0", "cniVersion": "0.3.1", "plugins": [ { "type": "flannel", "delegate": { "hairpinMode": true, "isDefaultGateway": true } }, { "type": "portmap", "capabilities": { "portMappings": true } } ] } net-conf.json: | { "Network": "10.244.0.0/16", "EnableNFTables": false, "Backend": { "Type": "vxlan" } } kind: ConfigMap metadata: labels: app: flannel k8s-app: flannel tier: node name: kube-flannel-cfg namespace: kube-flannel --- apiVersion: apps/v1 kind: DaemonSet metadata: labels: app: flannel k8s-app: flannel tier: node name: kube-flannel-ds namespace: kube-flannel spec: selector: matchLabels: app: flannel k8s-app: flannel template: metadata: labels: app: flannel k8s-app: flannel tier: node spec: affinity: nodeAffinity: requiredDuringSchedulingIgnoredDuringExecution: nodeSelectorTerms: - matchExpressions: - key: kubernetes.io/os operator: In values: - linux containers: - args: - --ip-masq - --kube-subnet-mgr command: - /opt/bin/flanneld env: - name: POD_NAME valueFrom: fieldRef: fieldPath: metadata.name - name: POD_NAMESPACE valueFrom: fieldRef: fieldPath: metadata.namespace - name: EVENT_QUEUE_DEPTH value: "5000" image: registry.cn-guangzhou.aliyuncs.com/xingcangku/cccc:0.25.5 name: kube-flannel resources: requests: cpu: 100m memory: 50Mi securityContext: capabilities: add: - NET_ADMIN - NET_RAW privileged: false volumeMounts: - mountPath: /run/flannel name: run - mountPath: /etc/kube-flannel/ name: flannel-cfg - mountPath: /run/xtables.lock name: xtables-lock hostNetwork: true initContainers: - args: - -f - /flannel - /opt/cni/bin/flannel command: - cp image: registry.cn-guangzhou.aliyuncs.com/xingcangku/ddd:1.5.1 name: install-cni-plugin volumeMounts: - mountPath: /opt/cni/bin name: cni-plugin - args: - -f - /etc/kube-flannel/cni-conf.json - /etc/cni/net.d/10-flannel.conflist command: - cp image: registry.cn-guangzhou.aliyuncs.com/xingcangku/cccc:0.25.5 name: install-cni volumeMounts: - mountPath: /etc/cni/net.d name: cni - mountPath: /etc/kube-flannel/ name: flannel-cfg priorityClassName: system-node-critical serviceAccountName: flannel tolerations: - effect: NoSchedule operator: Exists volumes: - hostPath: path: /run/flannel name: run - hostPath: path: /opt/cni/bin name: cni-plugin - hostPath: path: /etc/cni/net.d name: cni - configMap: name: kube-flannel-cfg name: flannel-cfg - hostPath: path: /run/xtables.lock type: FileOrCreate name: xtables-lock[root@k8s-01 ~]# grep -i image kube-flannel.yml image: registry.cn-guangzhou.aliyuncs.com/xingcangku/cccc:0.25.5 image: registry.cn-guangzhou.aliyuncs.com/xingcangku/ddd:1.5.1 image: registry.cn-guangzhou.aliyuncs.com/xingcangku/cccc:0.25.5 #在node节点执行下面命令修改ip地址 mkdir -p $HOME/.kube scp root@192.168.30.135:/etc/kubernetes/admin.conf $HOME/.kube/config chown $(id -u):$(id -g) $HOME/.kube/configdocker安装1.卸载旧版本(如有) sudo dnf remove docker \ docker-client \ docker-client-latest \ docker-common \ docker-latest \ docker-latest-logrotate \ docker-logrotate \ docker-engine 2.安装依赖包 sudo dnf install -y dnf-plugins-core 3.添加 Docker 官方仓库 sudo dnf config-manager --add-repo https://download.docker.com/linux/centos/docker-ce.repo 或者安装阿里云的 sudo dnf config-manager --add-repo https://mirrors.aliyun.com/docker-ce/linux/centos/docker-ce.repo 4.安装 Docker 引擎 sudo dnf install -y docker-ce docker-ce-cli containerd.io 5.启动并设置开机自启 sudo systemctl start docker sudo systemctl enable docker安装docker-compose1、要先给chmod +x 执行权限 2、/usr/local/bin/docker-compose 自己传docker-compose 过去 [root@k8s-03 harbor]# sudo ./install.sh [Step 0]: checking if docker is installed ... Note: docker version: 20.10.24 [Step 1]: checking docker-compose is installed ... Note: docker-compose version: 2.24.5 [Step 2]: preparing environment ... [Step 3]: preparing harbor configs ... prepare base dir is set to /root/harbor Clearing the configuration file: /config/portal/nginx.conf Clearing the configuration file: /config/log/logrotate.conf Clearing the configuration file: /config/log/rsyslog_docker.conf Clearing the configuration file: /config/nginx/nginx.conf Clearing the configuration file: /config/core/env Clearing the configuration file: /config/core/app.conf Clearing the configuration file: /config/registry/passwd Clearing the configuration file: /config/registry/config.yml Clearing the configuration file: /config/registryctl/env Clearing the configuration file: /config/registryctl/config.yml Clearing the configuration file: /config/db/env Clearing the configuration file: /config/jobservice/env Clearing the configuration file: /config/jobservice/config.yml Generated configuration file: /config/portal/nginx.conf Generated configuration file: /config/log/logrotate.conf Generated configuration file: /config/log/rsyslog_docker.conf Generated configuration file: /config/nginx/nginx.conf Generated configuration file: /config/core/env Generated configuration file: /config/core/app.conf Generated configuration file: /config/registry/config.yml Generated configuration file: /config/registryctl/env Generated configuration file: /config/registryctl/config.yml Generated configuration file: /config/db/env Generated configuration file: /config/jobservice/env Generated configuration file: /config/jobservice/config.yml loaded secret from file: /data/secret/keys/secretkey Generated configuration file: /compose_location/docker-compose.yml Clean up the input dir [Step 4]: starting Harbor ... [+] Running 9/10 ⠸ Network harbor_harbor Created 2.3s ✔ Container harbor-log Started 0.4s ✔ Container harbor-db Started 1.3s ✔ Container harbor-portal Started 1.3s ✔ Container redis Started 1.2s ✔ Container registry Started 1.2s ✔ Container registryctl Started 1.3s ✔ Container harbor-core Started 1.6s ✔ Container nginx Started 2.1s ✔ Container harbor-jobservice Started 2.2s ✔ ----Harbor has been installed and started successfully.---- [root@k8s-03 harbor]# dockeer ps -bash: dockeer: command not found [root@k8s-03 harbor]# docker p docker: 'p' is not a docker command. See 'docker --help' [root@k8s-03 harbor]# docker ps CONTAINER ID IMAGE COMMAND CREATED STATUS PORTS NAMES 49d3c2bd157f goharbor/nginx-photon:v2.5.0 "nginx -g 'daemon of…" 11 seconds ago Up 8 seconds (health: starting) 0.0.0.0:80->8080/tcp, :::80->8080/tcp, 0.0.0.0:443->8443/tcp, :::443->8443/tcp nginx 60a868e50223 goharbor/harbor-jobservice:v2.5.0 "/harbor/entrypoint.…" 11 seconds ago Up 8 seconds (health: starting) harbor-jobservice abf5e1d382b1 goharbor/harbor-core:v2.5.0 "/harbor/entrypoint.…" 11 seconds ago Up 8 seconds (health: starting) harbor-core 9f5415aa4086 goharbor/harbor-portal:v2.5.0 "nginx -g 'daemon of…" 11 seconds ago Up 9 seconds (health: starting) harbor-portal f4c2c38abe04 goharbor/harbor-db:v2.5.0 "/docker-entrypoint.…" 11 seconds ago Up 9 seconds (health: starting) harbor-db 74b6a076b5b2 goharbor/harbor-registryctl:v2.5.0 "/home/harbor/start.…" 11 seconds ago Up 8 seconds (health: starting) registryctl 8c3bead9c56e goharbor/redis-photon:v2.5.0 "redis-server /etc/r…" 11 seconds ago Up 9 seconds (health: starting) redis d09c4161d411 goharbor/registry-photon:v2.5.0 "/home/harbor/entryp…" 11 seconds ago Up 9 seconds (health: starting) registry 90f8c13f0490 goharbor/harbor-log:v2.5.0 "/bin/sh -c /usr/loc…" 11 seconds ago Up 9 seconds (health: starting) 127.0.0.1:1514->10514/tcp harbor-log [root@k8s-03 harbor]# sudo wget "https://github.com/docker/compose/releases/download/v2.24.5/docker-compose-$(uname -s)-$(uname -m)" -O /usr/local/bin/docker-compose --2025-08-11 16:12:21-- https://github.com/docker/compose/releases/download/v2.24.5/docker-compose-Linux-x86_64 Resolving github.com (github.com)... 20.200.245.247 Connecting to github.com (github.com)|20.200.245.247|:443... connected. HTTP request sent, awaiting response... 302 Found Location: https://release-assets.githubusercontent.com/github-production-release-asset/15045751/aef9c31b-3422-45af-b239-516f7a79cca1?sp=r&sv=2018-11-09&sr=b&spr=https&se=2025-08-11T08%3A49%3A34Z&rscd=attachment%3B+filename%3Ddocker-compose-linux-x86_64&rsct=application%2Foctet-stream&skoid=96c2d410-5711-43a1-aedd-ab1947aa7ab0&sktid=398a6654-997b-47e9-b12b-9515b896b4de&skt=2025-08-11T07%3A49%3A31Z&ske=2025-08-11T08%3A49%3A34Z&sks=b&skv=2018-11-09&sig=k%2BvfmI39lbdCBNCQDwuQiB5UfH%2F8S9PNPOgAFydaPJs%3D&jwt=eyJ0eXAiOiJKV1QiLCJhbGciOiJIUzI1NiJ9.eyJpc3MiOiJnaXRodWIuY29tIiwiYXVkIjoicmVsZWFzZS1hc3NldHMuZ2l0aHVidXNlcmNvbnRlbnQuY29tIiwia2V5Ijoia2V5MSIsImV4cCI6MTc1NDkwMDI0MiwibmJmIjoxNzU0ODk5OTQyLCJwYXRoIjoicmVsZWFzZWFzc2V0cHJvZHVjdGlvbi5ibG9iLmNvcmUud2luZG93cy5uZXQifQ.x2Izppyvpu0u8fDdEvN9JVDiEOk70qV6l1OyQSg1woI&response-content-disposition=attachment%3B%20filename%3Ddocker-compose-linux-x86_64&response-content-type=application%2Foctet-stream [following] --2025-08-11 16:12:22-- https://release-assets.githubusercontent.com/github-production-release-asset/15045751/aef9c31b-3422-45af-b239-516f7a79cca1?sp=r&sv=2018-11-09&sr=b&spr=https&se=2025-08-11T08%3A49%3A34Z&rscd=attachment%3B+filename%3Ddocker-compose-linux-x86_64&rsct=application%2Foctet-stream&skoid=96c2d410-5711-43a1-aedd-ab1947aa7ab0&sktid=398a6654-997b-47e9-b12b-9515b896b4de&skt=2025-08-11T07%3A49%3A31Z&ske=2025-08-11T08%3A49%3A34Z&sks=b&skv=2018-11-09&sig=k%2BvfmI39lbdCBNCQDwuQiB5UfH%2F8S9PNPOgAFydaPJs%3D&jwt=eyJ0eXAiOiJKV1QiLCJhbGciOiJIUzI1NiJ9.eyJpc3MiOiJnaXRodWIuY29tIiwiYXVkIjoicmVsZWFzZS1hc3NldHMuZ2l0aHVidXNlcmNvbnRlbnQuY29tIiwia2V5Ijoia2V5MSIsImV4cCI6MTc1NDkwMDI0MiwibmJmIjoxNzU0ODk5OTQyLCJwYXRoIjoicmVsZWFzZWFzc2V0cHJvZHVjdGlvbi5ibG9iLmNvcmUud2luZG93cy5uZXQifQ.x2Izppyvpu0u8fDdEvN9JVDiEOk70qV6l1OyQSg1woI&response-content-disposition=attachment%3B%20filename%3Ddocker-compose-linux-x86_64&response-content-type=application%2Foctet-stream Resolving release-assets.githubusercontent.com (release-assets.githubusercontent.com)... 185.199.110.133, 185.199.111.133, 185.199.109.133, ... Connecting to release-assets.githubusercontent.com (release-assets.githubusercontent.com)|185.199.110.133|:443... connected. HTTP request sent, awaiting response... 200 OK Length: 61389086 (59M) [application/octet-stream] Saving to: ‘/usr/local/bin/docker-compose’ /usr/local/bin/docker-compose 100%[=================================================================================================================================================================>] 58.54M 164KB/s in 2m 49s 2025-08-11 16:15:11 (355 KB/s) - ‘/usr/local/bin/docker-compose’ saved [61389086/61389086] [root@k8s-03 harbor]# sudo chmod +x /usr/local/bin/docker-compose [root@k8s-03 harbor]# sudo rm -f /usr/bin/docker-compose [root@k8s-03 harbor]# sudo ln -s /usr/local/bin/docker-compose /usr/bin/docker-compose [root@k8s-03 harbor]# echo $PATH /root/.local/bin:/root/bin:/usr/local/sbin:/usr/local/bin:/usr/sbin:/usr/bin:/root/.local/bin [root@k8s-03 harbor]# docker-compose version -bash: /root/.local/bin/docker-compose: No such file or directory [root@k8s-03 harbor]# export PATH=/usr/local/bin:/usr/bin:/root/.local/bin:$PATH [root@k8s-03 harbor]# echo 'export PATH=/usr/local/bin:$PATH' | sudo tee -a /root/.bashrc export PATH=/usr/local/bin:$PATH [root@k8s-03 harbor]# source /root/.bashrc [root@k8s-03 harbor]# docker-compose version Docker Compose version v2.24.5 [root@k8s-03 harbor]# 获取证书[root@k8s-03 harbor]# sudo ./t.sh Certificate request self-signature ok subject=C=CN, ST=Beijing, L=Beijing, O=example, OU=Personal, CN=harbor.telewave.tech [root@k8s-03 harbor]# ls LICENSE common common.sh data docker-compose.yml harbor.v2.5.0.tar harbor.yml harbor.yml.bak harbor.yml.tmpl install.sh prepare t.sh [root@k8s-03 harbor]# pwd /root/harbor [root@k8s-03 harbor]# ls /work/harbor/cert/ ca.crt ca.key ca.srl harbor.telewave.tech.cert harbor.telewave.tech.crt harbor.telewave.tech.csr harbor.telewave.tech.key v3.ext
-
k8s观测平台dashboard 一、部署Dashboardkubectl apply -f https://raw.githubusercontent.com/kubernetes/dashboard/v2.7.0/aio/deploy/recommended.yaml二、创建访问凭证 cat > dashboard-admin.yaml << EOF apiVersion: v1 kind: ServiceAccount metadata: name: admin-user namespace: kubernetes-dashboard --- apiVersion: rbac.authorization.k8s.io/v1 kind: ClusterRoleBinding metadata: name: admin-user roleRef: apiGroup: rbac.authorization.k8s.io kind: ClusterRole name: cluster-admin subjects: - kind: ServiceAccount name: admin-user namespace: kubernetes-dashboard EOF kubectl create ns kubernetes-dashboard kubectl apply -n kubernetes-dashboard -f dashboard-admin.yaml三、创建 dashboard# Copyright 2017 The Kubernetes Authors. # # Licensed under the Apache License, Version 2.0 (the "License"); # you may not use this file except in compliance with the License. # You may obtain a copy of the License at # # http://www.apache.org/licenses/LICENSE-2.0 # # Unless required by applicable law or agreed to in writing, software # distributed under the License is distributed on an "AS IS" BASIS, # WITHOUT WARRANTIES OR CONDITIONS OF ANY KIND, either express or implied. # See the License for the specific language governing permissions and # limitations under the License. apiVersion: v1 kind: Namespace metadata: name: kubernetes-dashboard --- apiVersion: v1 kind: ServiceAccount metadata: labels: k8s-app: kubernetes-dashboard name: kubernetes-dashboard namespace: kubernetes-dashboard --- kind: Service apiVersion: v1 metadata: labels: k8s-app: kubernetes-dashboard name: kubernetes-dashboard namespace: kubernetes-dashboard spec: type: NodePort # 添加这行,将服务类型改为NodePort ports: - port: 443 targetPort: 8443 nodePort: 32000 # 添加这行,指定NodePort端口(可选) selector: k8s-app: kubernetes-dashboard --- apiVersion: v1 kind: Secret metadata: labels: k8s-app: kubernetes-dashboard name: kubernetes-dashboard-certs namespace: kubernetes-dashboard type: Opaque --- apiVersion: v1 kind: Secret metadata: labels: k8s-app: kubernetes-dashboard name: kubernetes-dashboard-csrf namespace: kubernetes-dashboard type: Opaque data: csrf: "" --- apiVersion: v1 kind: Secret metadata: labels: k8s-app: kubernetes-dashboard name: kubernetes-dashboard-key-holder namespace: kubernetes-dashboard type: Opaque --- kind: ConfigMap apiVersion: v1 metadata: labels: k8s-app: kubernetes-dashboard name: kubernetes-dashboard-settings namespace: kubernetes-dashboard --- kind: Role apiVersion: rbac.authorization.k8s.io/v1 metadata: labels: k8s-app: kubernetes-dashboard name: kubernetes-dashboard namespace: kubernetes-dashboard rules: # Allow Dashboard to get, update and delete Dashboard exclusive secrets. - apiGroups: [""] resources: ["secrets"] resourceNames: ["kubernetes-dashboard-key-holder", "kubernetes-dashboard-certs", "kubernetes-dashboard-csrf"] verbs: ["get", "update", "delete"] # Allow Dashboard to get and update 'kubernetes-dashboard-settings' config map. - apiGroups: [""] resources: ["configmaps"] resourceNames: ["kubernetes-dashboard-settings"] verbs: ["get", "update"] # Allow Dashboard to get metrics. - apiGroups: [""] resources: ["services"] resourceNames: ["heapster", "dashboard-metrics-scraper"] verbs: ["proxy"] - apiGroups: [""] resources: ["services/proxy"] resourceNames: ["heapster", "http:heapster:", "https:heapster:", "dashboard-metrics-scraper", "http:dashboard-metrics-scraper"] verbs: ["get"] --- kind: ClusterRole apiVersion: rbac.authorization.k8s.io/v1 metadata: labels: k8s-app: kubernetes-dashboard name: kubernetes-dashboard rules: # Allow Metrics Scraper to get metrics from the Metrics server - apiGroups: ["metrics.k8s.io"] resources: ["pods", "nodes"] verbs: ["get", "list", "watch"] --- apiVersion: rbac.authorization.k8s.io/v1 kind: RoleBinding metadata: labels: k8s-app: kubernetes-dashboard name: kubernetes-dashboard namespace: kubernetes-dashboard roleRef: apiGroup: rbac.authorization.k8s.io kind: Role name: kubernetes-dashboard subjects: - kind: ServiceAccount name: kubernetes-dashboard namespace: kubernetes-dashboard --- apiVersion: rbac.authorization.k8s.io/v1 kind: ClusterRoleBinding metadata: name: kubernetes-dashboard roleRef: apiGroup: rbac.authorization.k8s.io kind: ClusterRole name: kubernetes-dashboard subjects: - kind: ServiceAccount name: kubernetes-dashboard namespace: kubernetes-dashboard --- kind: Deployment apiVersion: apps/v1 metadata: labels: k8s-app: kubernetes-dashboard name: kubernetes-dashboard namespace: kubernetes-dashboard spec: replicas: 1 revisionHistoryLimit: 10 selector: matchLabels: k8s-app: kubernetes-dashboard template: metadata: labels: k8s-app: kubernetes-dashboard spec: securityContext: seccompProfile: type: RuntimeDefault containers: - name: kubernetes-dashboard image: registry.cn-guangzhou.aliyuncs.com/xingcangku/kubernetesui-dashboard:v2.7.0 imagePullPolicy: Always ports: - containerPort: 8443 protocol: TCP args: - --auto-generate-certificates - --namespace=kubernetes-dashboard # Uncomment the following line to manually specify Kubernetes API server Host # If not specified, Dashboard will attempt to auto discover the API server and connect # to it. Uncomment only if the default does not work. # - --apiserver-host=http://my-address:port volumeMounts: - name: kubernetes-dashboard-certs mountPath: /certs # Create on-disk volume to store exec logs - mountPath: /tmp name: tmp-volume livenessProbe: httpGet: scheme: HTTPS path: / port: 8443 initialDelaySeconds: 30 timeoutSeconds: 30 securityContext: allowPrivilegeEscalation: false readOnlyRootFilesystem: true runAsUser: 1001 runAsGroup: 2001 volumes: - name: kubernetes-dashboard-certs secret: secretName: kubernetes-dashboard-certs - name: tmp-volume emptyDir: {} serviceAccountName: kubernetes-dashboard nodeSelector: "kubernetes.io/os": linux # Comment the following tolerations if Dashboard must not be deployed on master tolerations: - key: node-role.kubernetes.io/master effect: NoSchedule --- kind: Service apiVersion: v1 metadata: labels: k8s-app: dashboard-metrics-scraper name: dashboard-metrics-scraper namespace: kubernetes-dashboard spec: ports: - port: 8000 targetPort: 8000 selector: k8s-app: dashboard-metrics-scraper --- kind: Deployment apiVersion: apps/v1 metadata: labels: k8s-app: dashboard-metrics-scraper name: dashboard-metrics-scraper namespace: kubernetes-dashboard spec: replicas: 1 revisionHistoryLimit: 10 selector: matchLabels: k8s-app: dashboard-metrics-scraper template: metadata: labels: k8s-app: dashboard-metrics-scraper spec: securityContext: seccompProfile: type: RuntimeDefault containers: - name: dashboard-metrics-scraper image: registry.cn-guangzhou.aliyuncs.com/xingcangku/kubernetesui-metrics-scraper:v1.0.8 ports: - containerPort: 8000 protocol: TCP livenessProbe: httpGet: scheme: HTTP path: / port: 8000 initialDelaySeconds: 30 timeoutSeconds: 30 volumeMounts: - mountPath: /tmp name: tmp-volume securityContext: allowPrivilegeEscalation: false readOnlyRootFilesystem: true runAsUser: 1001 runAsGroup: 2001 serviceAccountName: kubernetes-dashboard nodeSelector: "kubernetes.io/os": linux # Comment the following tolerations if Dashboard must not be deployed on master tolerations: - key: node-role.kubernetes.io/master effect: NoSchedule volumes: - name: tmp-volume emptyDir: {}四、访问root@k8s-01:~/Dashboard# kubectl -n kubernetes-dashboard create token admin-user eyJhbGciOiJSUzI1NiIsImtpZCI6IjJ0MTFFdDhfdnFBYkNuTnBSSXlyOFIzN1B0MW13cVVJNlFwZDV1VzR1WXcifQ.eyJhdWQiOlsiaHR0cHM6Ly9rdWJlcm5ldGVzLmRlZmF1bHQuc3ZjLmNsdXN0ZXIubG9jYWwiXSwiZXhwIjoxNzUzODkyMDg4LCJpYXQiOjE3NTM4ODg0ODgsImlzcyI6Imh0dHBzOi8va3ViZXJuZXRlcy5kZWZhdWx0LnN2Yy5jbHVzdGVyLmxvY2FsIiwia3ViZXJuZXRlcy5pbyI6eyJuYW1lc3BhY2UiOiJrdWJlcm5ldGVzLWRhc2hib2FyZCIsInNlcnZpY2VhY2NvdW50Ijp7Im5hbWUiOiJhZG1pbi11c2VyIiwidWlkIjoiMDg2MzU3ZDEtNjc2Mi00MTM3LWJmMzgtMTMzNTVjNTZmNzQ3In19LCJuYmYiOjE3NTM4ODg0ODgsInN1YiI6InN5c3RlbTpzZXJ2aWNlYWNjb3VudDprdWJlcm5ldGVzLWRhc2hib2FyZDphZG1pbi11c2VyIn0.mdsAyRFPnjJGRm2CWXkAIaAXhPzXX1KmREK9GmDxjfKV6chjEpf4UCRiVtTaYwy8u21UgUXHsStxWlXMSjBBG3ETnh7qzGjom78A0JtmWQZMWcucgtOiOJximT6cScKHXLpjg34-ynsACIjlBYE0iw4D3l61KGhXeUOCSP06nKMdfrxOmii6I0FHd2MTP1vlo1rXHWJeepc5skYB5NKtoFpq234zRRg2JWcp0V1ZQ-cO1I3P4qLFoHPmVnjENVOepm6FQKdJE_dCRgx49zGFGdUVIqJs1hSnNAUprmUO4Vh7UFmprnyjoAX5inVMblXCGMbDFqmY80VaOWTY4b1IaQ#老版本需要用下面这个命令获取 [root@k8s-node-38 ~]# kubectl -n kubernetes-dashboard get secret $(kubectl -n kubernetes-dashboard get sa admin-user -o jsonpath="{.secrets[0].name}") -o go-template="{{.data.token | base64decode}}" eyJhbGciOiJSUzI1NiIsImtpZCI6ImtFbUctZ2xkTUxtZFA1NkxJNm9sbjlhY284cnNRVXVnXzRlN3BrZktoRWsifQ.eyJpc3MiOiJrdWJlcm5ldGVzL3NlcnZpY2VhY2NvdW50Iiwia3ViZXJuZXRlcy5pby9zZXJ2aWNlYWNjb3VudC9uYW1lc3BhY2UiOiJrdWJlcm5ldGVzLWRhc2hib2FyZCIsImt1YmVybmV0ZXMuaW8vc2VydmljZWFjY291bnQvc2VjcmV0Lm5hbWUiOiJhZG1pbi11c2VyLXRva2VuLWdraGRmIiwia3ViZXJuZXRlcy5pby9zZXJ2aWNlYWNjb3VudC9zZXJ2aWNlLWFjY291bnQubmFtZSI6ImFkbWluLXVzZXIiLCJrdWJlcm5ldGVzLmlvL3NlcnZpY2VhY2NvdW50L3NlcnZpY2UtYWNjb3VudC51aWQiOiJjYmJlZjg4Mi0yOTJjLTRmNzEtYWIxNi1iMzEyNGVhMTc3NjgiLCJzdWIiOiJzeXN0ZW06c2VydmljZWFjY291bnQ6a3ViZXJuZXRlcy1kYXNoYm9hcmQ6YWRtaW4tdXNlciJ9.CdYDoIgAaUwjqaKF8Qvt6PXCXEdpf6Kfq3I3wHwu3B4faD56Ma9BHEpXfrv4haVPQoFQSs1t5FA35peFCyWdJax44RHfkbyo05VI_GulimKDYoalgIuD-vb7IbPbhXjgmYiCYVLqUtjAxnLSvf8xA1SuUNHytdJgDMYt7dnwLcwK8hJ6OcPaFRKdqGCxPh68THoYajXTFMmaRlq9glz6lh56Z4Q-8VJKSyFYzDua583pLiffn8qhT108qJx3rG8Z2S3zjHz0It1KBiGPYQGzBCXZfLFYHOnYj7K7_HVaWYQHshgYgwAFpgPZcG7cS9j9xBt61bPqbHzvrJsP2RiG6w[root@k8s-node-38 ~]#