搜索到
97
篇与
的结果
-
 Jenkins邮箱配置 一、安装插件在jenkins的插件管理中安装Email Extension插件二、配置邮件相关参数依次点击manage jenkins——>system,找到jenkins Location项,填写系统管理员邮件地址。配置邮件服务器相关参数,然后点击通过发送测试邮件测试配置,填写收件人邮箱号。配置Extended E-mail Notification配置,内容如下登录收件人邮件,看到有测试邮件。三、自动风格任务配置 3.1修改任务配置构建后操作内容3.2构建测试3.2.1点击立即构建,查看收件人邮箱四、流水线任务配置 4.1修改pipeline添加邮件发送在项目根目录编写email.html,并推送至项目仓库。邮件模板如下所示:<!DOCTYPE html> <html> <head> <meta charset="UTF-8"> <title>${ENV, var="JOB_NAME"}-第${BUILD_NUMBER}次构建日志</title> </head> <body leftmargin="8" marginwidth="0" topmargin="8" marginheight="4" offset="0"> <table width="95%" cellpadding="0" cellspacing="0" style="font-size: 11pt; font-family: Tahoma, Arial, Helvetica, sans-serif"> <tr> 本邮件由系统自动发出,无需回复!<br/> 各位同事,大家好,以下为${PROJECT_NAME }项目构建信息</br> <td><font color="#CC0000">构建结果 - ${BUILD_STATUS}</font></td> </tr> <tr> <td><br /> <b><font color="#0B610B">构建信息</font></b> <hr size="2" width="100%" align="center" /></td> </tr> <tr> <td> <ul> <li>项目名称 : ${PROJECT_NAME}</li> <li>构建编号 : 第${BUILD_NUMBER}次构建</li> <li>触发原因: ${CAUSE}</li> <li>构建状态: ${BUILD_STATUS}</li> <li>构建日志: <a href="${BUILD_URL}console">${BUILD_URL}console</a></li> <li>构建Url : <a href="${BUILD_URL}">${BUILD_URL}</a></li> <li>工作目录 : <a href="${PROJECT_URL}ws">${PROJECT_URL}ws</a></li> <li>项目Url : <a href="${PROJECT_URL}">${PROJECT_URL}</a></li> </ul> <h4><font color="#0B610B">失败用例</font></h4> <hr size="2" width="100%" /> $FAILED_TESTS<br/> <h4><font color="#0B610B">最近提交(#$SVN_REVISION)</font></h4> <hr size="2" width="100%" /> <ul> ${CHANGES_SINCE_LAST_SUCCESS, reverse=true, format="%c", changesFormat="<li>%d [%a] %m</li>"} </ul> 详细提交: <a href="${PROJECT_URL}changes">${PROJECT_URL}changes</a><br/> </td> </tr> </table> </body> </html> 4.2修改pipeline添加邮件发送pipeline { agent any stages { stage('拉取代码') { steps { checkout scmGit(branches: [[name: '*/${branch}']], extensions: [], userRemoteConfigs: [[credentialsId: 'gitee-cuiliang0302', url: 'https://gitee.com/cuiliang0302/sprint_boot_demo.git']]) } } stage('编译构建') { steps { sh 'mvn clean package' } } stage('部署运行') { steps { sh 'nohup java -jar target/SpringBootDemo-0.0.1-SNAPSHOT.jar &' sh 'sleep 10' } } } post { always { emailext( subject: '构建通知:${PROJECT_NAME} - Build # ${BUILD_NUMBER} - ${BUILD_STATUS}!', body: '${FILE,path="email.html"}', to: 'cuiliang0302@qq.com' ) } } }4.3构建测试
 -
Gitlab安装 一、gpg.key-----BEGIN PGP PUBLIC KEY BLOCK----- mQINBF5dI2sBEACyGx5isuXqEV2zJGIx8rlJFCGw6A9g5Zk/9Hj50UpXNuOXlvQl 7vq91m2CAh88Jad7OiMHIJJhX3ZJEOf/pUx/16QKumsaEyBk9CegxUG9jAQXsjL3 WLyP0/l27UzNrOAFB+IUGjsoP+32gsSPiF5P485mirIJNojIAFzDQl3Uo4FbvqYU 9AIRk5kV4nEYz1aKXAovIUsyqrztMtwlAG2xqdwVpGD2A4/w8I143qPGjjhEQmf4 /EeS4CP9ztyLAx+01t2Acwa7Bygsb5KQPuT25UlevuxdDy/Rd5Zn/Lzwr2GQqjUs 6GbM0t1HYjh57e4V+p0qMf6jxXfrDCbehgzFvGS0cx/d7hWHm5sXZIt3gxpjBQU2 8MQWtrR8Y3nTBkCHwOKsXdsdD+YHxTq/yuvxl1Bcyshp29cGWv1es3wn2Z6i9tWe asGfVewJZiXFSEqSBGguEmLyCAZcWgXvHOV2kc66wG4d4TGIxmoo9GBqEtBftCVH MGDHt7zeg2hg6EIsx8/nj1duO5nBnbnik5iG8Xv46e/aw2p4DfTdfxHpjvyJudyN +UI5eSuuuXhyTZWedd5K1Q3+0CmACJ39t/NA6g7cZaw3boFKw3fTWIgOVTvC3y5v d7wsuyGUk9xNhHLcu6HjB4VPGzcTwQWMFf6+I4qGAUykU5mjTJchQeqmQwARAQAB tEJHaXRMYWIgQi5WLiAocGFja2FnZSByZXBvc2l0b3J5IHNpZ25pbmcga2V5KSA8 cGFja2FnZXNAZ2l0bGFiLmNvbT6JAlQEEwEKAD4CGwMFCwkIBwIGFQoJCAsCBBYC AwECHgECF4AWIQT2QD9lRKOIY9qgtuA/AWGKUTEvPwUCZd+UbQUJC0TYAgAKCRA/ AWGKUTEvPzeVEACDxFTCWdSe6S6sWhRTRCx4c/NF1WGHx2IUnCxMJqam5ij+xE+E 4dRAuBO3gD3bO4MAZJzvnAOC8RE9uMgAW7CS9+kpwdnXtS7/30P2sl0Lb3sXw57t ZtoYdZXr2H2/5E67k1SiEIpLeGyx5nnS1Irb3+b5DYwovAQQMgGF0jhJqjvaHulp nKlFegYBw1tVYPx+WKDqTcDu+57hVNuH2TSDXAjX7xL02PpmWkBQdfW1DMYiUkDy vrgrjVIggYCxyNEK+by8kuJ0EndB5n1VO98IAFrb321Ze8PTiRcgEi7wvZqMZCKw TkV4lNGpQs8AE6eXcCsaucWIz/Mm1Qu7t/uCfVbJ8k6R1VrngsPL+xl/4+zNxtI2 DHITvlkOgIMLaa+7JWiW6bQ+tXpLpMkKvgUWneLTwzjGWCl9p3byTg/pBNAc8qzJ XR2CRviNgV4xGVRreBDGPzaOKalVicSNcEu6nGNpe1Np1WtXMBf5Ed4Je4P1v6wL CjSIvxe6S68koIOwdX73a7d+yQA+bEegsN/su3Tp/jp/aDSOR+93UCPjXHLd0q3Y 6C/dvh3wyEC5topIc8XJFfP1mCtGV5WG1rY87AwALhc+2c+AEtShX7rKw/5rHUCY WeDt5skjByqaFtr4JSjEwQSY7G1a0IaISFkP+qhV+CkN12orAjpvZKxmwbkCDQRe XSNrARAApHc0R4tfPntr5bhTuXU/iVLyxlAlzdEv1XsdDC8YBYehT72Jpvpphtq7 sKVsuC59l8szojgO/gW//yKSuc3Gm5h58+HpIthjviGcvZXf/JcN7Pps0UGkLeQN 2+IRZgbA6CAAPh2njE60v5iXgS91bxlSJi8GVHq1h28kbKQeqUYthu9yA2+8J4Fz ivYV2VImKLSxbQlc86tl6rMKKIIOph+N4WujJgd5HZ80n2qp1608X3+9CXvtBasX VCI2ZqCuWjffVCOQzsqRbJ6LQyMbgti/23F4Yqjqp+8eyiDNL6MyWJCBbtkW3Imi FHfR0sQIM6I7fk0hvt9ljx9SG6az/s3qWK5ceQ7XbJgCAVS4yVixfgIjWvNE5ggE QNOmeF9r76t0+0xsdMYJR6lxdaQI8AAYaoMXTkCXX2DrASOjjEP65Oq/d42xpSf9 tG6XIq+xtRQyFWSMc+HfTlEHbfGReAEBlJBZhNoAwpuDckOC08vw7v2ybS5PYjJ4 5Kzdwej0ga03Wg9hrAFd/lVa5eO4pzMLuexLplhpIbJjYwCUGS4cc/LQ2jq4fue5 oxDpWPN+JrBH8oyqy91b10e70ohHppN8dQoCa79ySgMxDim92oHCkGnaVyULYDqJ zy0zqbi3tJu639c4pbcggxtAAr0I3ot8HPhKiNJRA6u8HTm//xEAEQEAAYkCPAQY AQoAJgIbDBYhBPZAP2VEo4hj2qC24D8BYYpRMS8/BQJl35S0BQkLRNhJAAoJED8B YYpRMS8/QHwP/3g6Mcdn47OK55Dx5YD5zI1DuuqhSFP0xak59jT7pVJm5Yu55Bai XS4+59IYrqaZ+CvbAr1TJzDMnwP3U2fBOyRIFpypURw+Q1efAnzKtP8aF2YIpd06 NhHEr1EZZMQytI5NcDaDly1Idwj5FX0m23AzvgVg7QbTcNOH2bOcXal++WWQ10TT b1gsnATz+Tw84EBugjk3vML5yoAWc77L3SA8KxMTcUEGhDkhm1kuct4PGIuHXmp+ qUKVh9XwvmcQIcu2fr3qmm0Bw3khwYNhGczSDjGDrnLmE5u/5R/AHgod/d0+SkHW 2uI8gPbunkLZPHc2Xaf1EUiZq/8n91FONusykZX+CizleS8AvMQmstuUcf48V2rv v7rsUtRflxf5IGH1P/X/tQ+WewD2VIHDQu+dyXvkos6LHFnxz6irNM90QqmcihYd vBvvrdeW6t5HoT2Lfhv/Xj7fzjKF5ye21WJpWFSK9PFrGb/tqPypUQspnE5cUtAa A9fP5AurEmjpDDZPaoPGG27N3m/95Dak0Q+BEx3r7VeRu4ZFX31Df/tocM5ADsXR eADwVh1H+R9vhOrc1EVPPYPWHzdjXlLZKVTiRd7uLLRXzhCp4yFfOmq1FFewlqH0 2AcgVTGaAOT65penu7y+sQJyCMHISsV15vIQXcHwL94As5MvV+mD0pGR =0Y9y -----END PGP PUBLIC KEY BLOCK-----二、执行命令sudo cat /tmp/gpg.key | sudo gpg --dearmor -o /usr/share/keyrings/gitlab-archive-keyring.gpg sudo apt update sudo apt install -y gitlab-ce三、修改配置 外部访问URLvi /etc/gitlab/gitlab.rb external_url 'http://192.168.1.100' # 替换为实际IP或域名 unicorn['listen_port'] = 8080 # 可选:调整默认端口四、关闭防火墙sudo ufw allow http sudo ufw allow https sudo ufw allow ssh sudo ufw enable五、启动sudo gitlab-ctl reconfigure sudo gitlab-ctl restart六、查看密码sudo cat /etc/gitlab/initial_root_password zlh2xR7fA814Z2TG0gx+QmHBZSFLrZJ1v6Lk2NEYk4w= 登录192.168.3.201 账号root 密码zlh2xR7fA814Z2TG0gx+QmHBZSFLrZJ1v6Lk2NEYk4w=七、添加ssh秘钥root@k8s02:~# ssh-keygen -t ed25519 -C "jenkins@your-server" Generating public/private ed25519 key pair. Enter file in which to save the key (/root/.ssh/id_ed25519): Enter passphrase (empty for no passphrase): Enter same passphrase again: Your identification has been saved in /root/.ssh/id_ed25519 Your public key has been saved in /root/.ssh/id_ed25519.pub The key fingerprint is: SHA256:9ddgsERNTkCNMf0mG9LOXtVamYkuewg1xnj+NUlaCUw jenkins@your-server The key's randomart image is: +--[ED25519 256]--+ | o@Eo | | ..O+ | | + ..*.*| | o B.o+X*| | S = ++=B+| | . o +=+.| | . =....| | o o. | | . | +----[SHA256]-----+ root@k8s02:~# cat ~/.ssh/id_ed25519.pub ssh-ed25519 AAAAC3NzaC1lZDI1NTE5AAAAILncgKrxDBMvO8zW0WaBymGLbKIRjUo2ZBsdacdayP03 jenkins@your-server关闭开机自启root@k8s02:~# sudo systemctl is-enabled gitlab-runsvdirenabledroot@k8s02:~# sudo systemctl disable gitlab-runsvdirRemoved /etc/systemd/system/multi-user.target.wants/gitlab-runsvdir.service.root@k8s02:~#
-
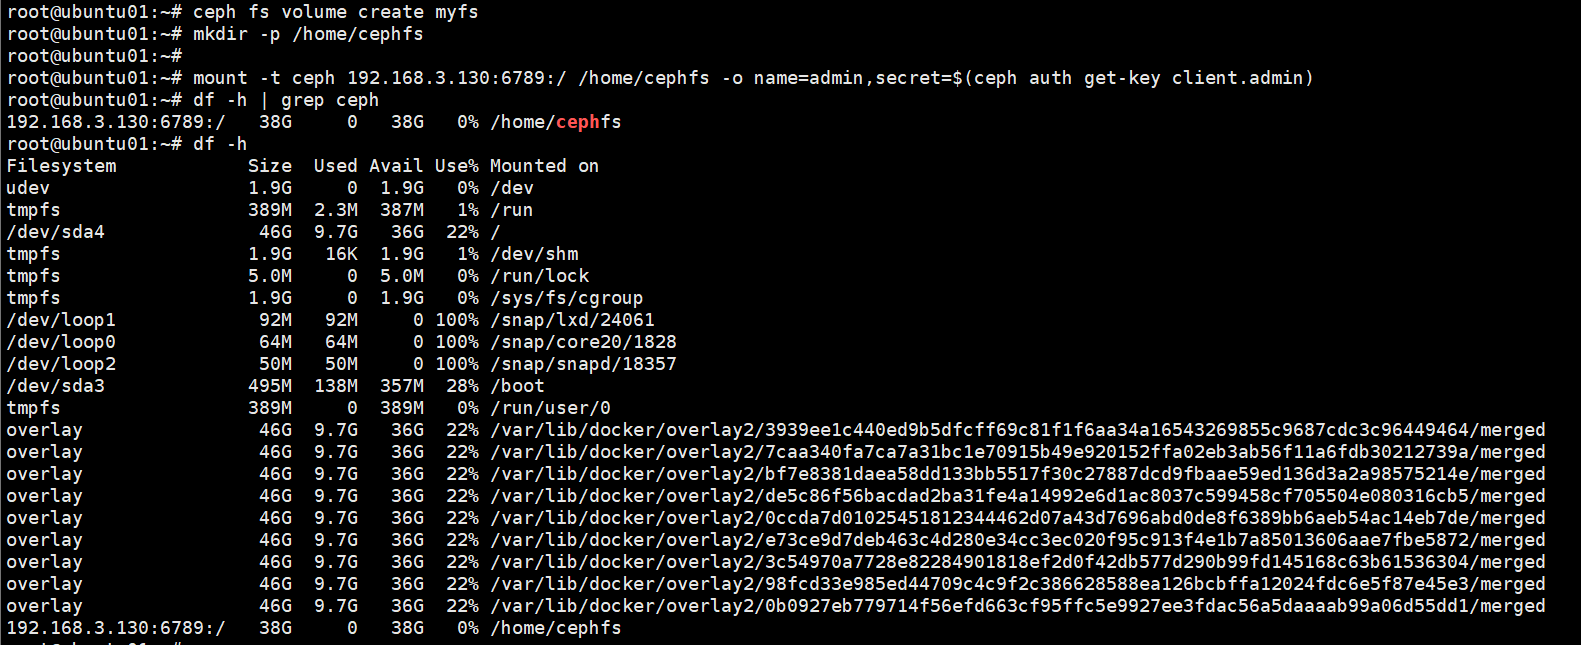
ceph ubuntu系统改网络配置/etc/netplan/..network: version: 2 ethernets: ens33: dhcp4: no addresses: - 192.168.3.131/24 gateway4: 192.168.3.1 nameservers: addresses: - 8.8.8.8 - 114.114.114.114 - 8.8.4.4账号:admin密码123456Abc@用https访问添加路由目录sudo ip route add default via 192.168.3.1root@ubuntu01:~# sudo resolvectl dns ens33 8.8.8.8 8.8.4.4
-
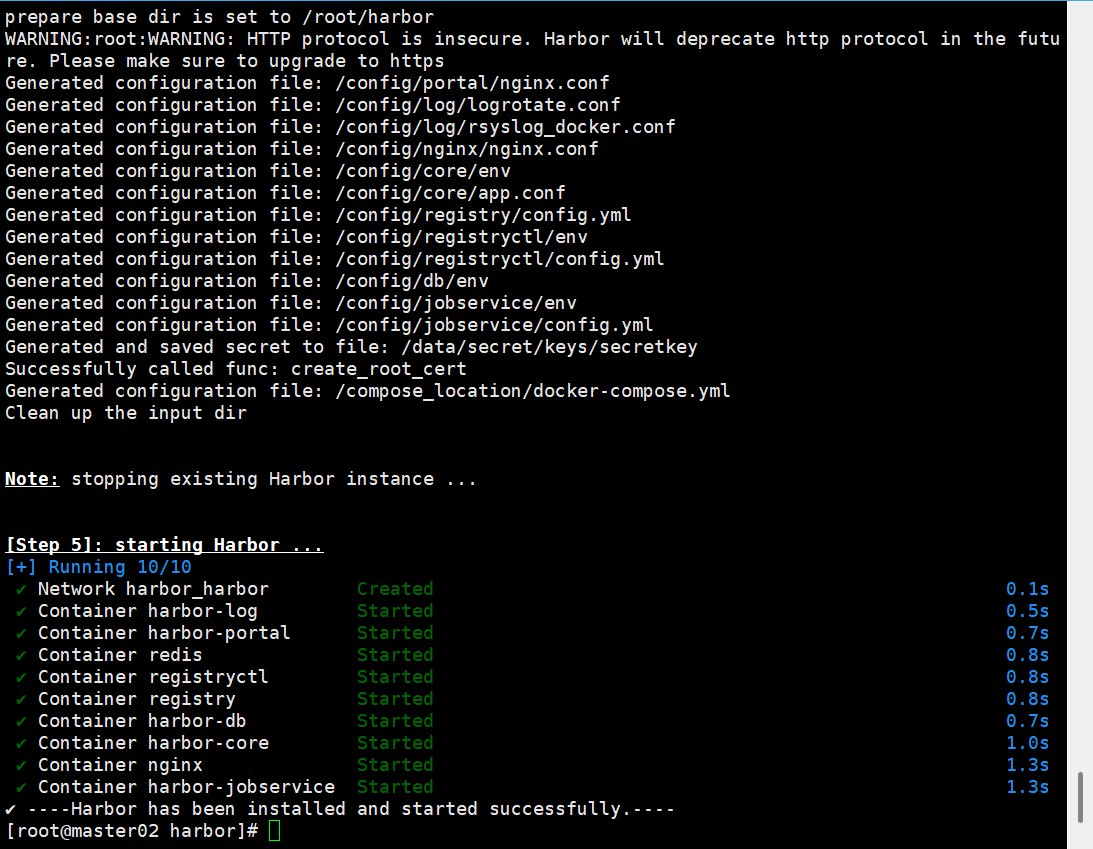
Harbor仓库安装 一、安装harborhttps://github.com/docker/compose/releases/download/v2.32.2/docker-compose-linux-x86_64 #docker-compose-linux-x86_64改docker-compose 放到/usr/local/bin/二、安装dockersudo yum update -y sudo yum install -y yum-utils device-mapper-persistent-data lvm2 #添加docker仓库 sudo yum-config-manager --add-repo https://download.docker.com/linux/centos/docker-ce.repo #安装docker CE社区版 # 列出可用版本 yum list docker-ce --showduplicates | sort -r # 安装指定版本,例如 20.10.10 sudo yum install -y docker-ce-20.10.10 docker-ce-cli-20.10.10 containerd.io #安装最新版 sudo yum install -y docker-ce docker-ce-cli containerd.io #启动 sudo systemctl start docker sudo systemctl enable docker直接运行sudo ./install.sh支持http 默认拉取、推送到镜像仓库要使用https , 由于我们这里没有https,需要用http , 所以我们要在deploy-server.com服务器上执行如下 $ echo '{"insecure-registries":["192.168.3.20:8077"] }' >> /etc/docker/daemon.json三、秘钥mkdir /opt/cert && cd /opt/cert#创建admin-csr.json(kubernetes) cat > admin-csr.json << EOF { "CN":"admin", "key":{ "algo":"rsa", "size":2048 }, "names":[ { "C":"CN", "L":"BeiJing", "ST":"BeiJing", "O":"system:masters", "OU":"System" } ] } EOF#下载工具和添加执行权限 wget https://pkg.cfssl.org/R1.2/cfssl_linux-amd64 wget https://pkg.cfssl.org/R1.2/cfssljson_linux-amd64 chmod +x cfssljson_linux-amd64 chmod +x cfssl_linux-amd64 #移动到/usr/local/bin mv cfssljson_linux-amd64 cfssljson mv cfssl_linux-amd64 cfssl mv cfssljson cfssl /usr/local/bin#创建证书私钥 cfssl gencert -ca=/etc/kubernetes/pki/ca.crt -ca-key=/etc/kubernetes/pki/ca.key --profile=kubernetes admin-csr.json | cfssljson -bare admin#配置证书(kubernetes) openssl pkcs12 -export -out ./jenkins-admin.pfx -inkey ./admin-key.pem -in ./admin.pem -passout pass:123456[root@master01 cert]# kubectl create secret generic kubeconfig --from-file=/root/.kube/config secret/kubeconfig created
-
jenkins部署tomcat jenkins部署tomcatmaven编译环境(jenkins服务器) 运行环境(web服务器)一、部署maven编译环境(jenkins)Maven是一个Java项目管理和构建工具,它可以定义项目结构、项目依赖,并使用统一的方式进行自动化构建,是Java项目不可缺少的工具。1.jenkins部署maven软件1.1下载安装包cd /opt wget https://mirrors.aliyun.com/apache/maven/maven-3/3.9.9/binaries/apache-maven-3.9.9-bin.tar.gz1.2解压tar -xf apache-maven-3.9.9-bin.tar.gz -C /usr/local/1.3配置环境变量[root@master01 opt]# vim /etc/profile.d/maven.sh [root@master01 opt]# cat /etc/profile.d/maven.sh export MAVEN_HOME=/usr/local/apache-maven-3.9.9 export PATH=$MAVEN_HOME/bin:$PATH [root@master01 opt]# source /etc/profile [root@master01 opt]# #刷新1.4安装JDK#jenkins安装的时候部署过 [root@master01 opt]# mvn --version Apache Maven 3.9.9 (8e8579a9e76f7d015ee5ec7bfcdc97d260186937) Maven home: /usr/local/apache-maven-3.9.9 Java version: 17.0.0.1, vendor: Oracle Corporation, runtime: /opt/jdk-17.0.0.1 Default locale: zh_CN, platform encoding: UTF-8 OS name: "linux", version: "3.10.0-1160.el7.x86_64", arch: "amd64", family: "unix"2.配置jenkins+maven2.1配置JDK2.2配置maven环境变量2.3安装maven插件3.创建代码仓库4.模拟代码上传4.1拉取新仓库[root@master01 opt]# cd /root [root@master01 ~]# git clone git@192.168.3.100:root/tomcat.git 正克隆到 'tomcat'... remote: Enumerating objects: 3, done. remote: Counting objects: 100% (3/3), done. remote: Compressing objects: 100% (2/2), done. remote: Total 3 (delta 0), reused 0 (delta 0), pack-reused 0 (from 0) 接收对象中: 100% (3/3), done. [root@master01 ~]# cd /tmp/ [root@master01 tmp]# cd /root/tomcat/ [root@master01 tomcat]# ls README.md4.2配置个人信息[root@master01 tomcat]# git config --global user.email "123@qq.com" [root@master01 tomcat]# git config --global user.name "axingkf"4.3模拟代码上传vi javatest.java public class JavaVersion { public static void main(String[] args) { // 打印当前 Java 版本信息 System.out.println("Java Version: " + System.getProperty("java.version")); System.out.println("Java Vendor: " + System.getProperty("java.vendor")); System.out.println("Java Vendor URL: " + System.getProperty("java.vendor.url")); System.out.println("Java Home: " + System.getProperty("java.home")); } }#添加所有文件到暂存区 [root@master01 tomcat]# git add . #提交暂存区的制定文件到仓库区 [root@master01 tomcat]# git commit -m "第一次java开发" [main 51687a7] 第一次java开发 1 file changed, 9 insertions(+) create mode 100644 javatest.java #没有master这个分区 [root@master01 tomcat]# git push -u origin master error: src refspec master does not match any. error: 无法推送一些引用到 'git@192.168.3.100:root/tomcat.git' # 上传到远程 [root@master01 tomcat]# git push -u origin main Counting objects: 4, done. Delta compression using up to 8 threads. Compressing objects: 100% (3/3), done. Writing objects: 100% (3/3), 488 bytes | 0 bytes/s, done. Total 3 (delta 0), reused 0 (delta 0) To git@192.168.3.100:root/tomcat.git c086be9..51687a7 main -> main 分支 main 设置为跟踪来自 origin 的远程分支 main。 [root@master01 tomcat]# 5、创建maven仓库mkdir -pv /data/software/repository chown jenkins.jenkins /data/software/repository/vim /usr/local/apache-maven-3.6.3/conf/settings.xml #添加本地仓库路径和阿里云镜像 <?xml version="1.0" encoding="UTF-8"?> <!-- Licensed to the Apache Software Foundation (ASF) under one or more contributor license agreements. See the NOTICE file distributed with this work for additional information regarding copyright ownership. The ASF licenses this file to you under the Apache License, Version 2.0 (the "License"); you may not use this file except in compliance with the License. You may obtain a copy of the License at http://www.apache.org/licenses/LICENSE-2.0 Unless required by applicable law or agreed to in writing, software distributed under the License is distributed on an "AS IS" BASIS, WITHOUT WARRANTIES OR CONDITIONS OF ANY KIND, either express or implied. See the License for the specific language governing permissions and limitations under the License. --> <!-- | This is the configuration file for Maven. It can be specified at two levels: | | 1. User Level. This settings.xml file provides configuration for a single user, | and is normally provided in ${user.home}/.m2/settings.xml. | | NOTE: This location can be overridden with the CLI option: | | -s /path/to/user/settings.xml | | 2. Global Level. This settings.xml file provides configuration for all Maven | users on a machine (assuming they're all using the same Maven | installation). It's normally provided in | ${maven.conf}/settings.xml. | | NOTE: This location can be overridden with the CLI option: | | -gs /path/to/global/settings.xml | | The sections in this sample file are intended to give you a running start at | getting the most out of your Maven installation. Where appropriate, the default | values (values used when the setting is not specified) are provided. | |--> <settings xmlns="http://maven.apache.org/SETTINGS/1.2.0" xmlns:xsi="http://www.w3.org/2001/XMLSchema-instance" xsi:schemaLocation="http://maven.apache.org/SETTINGS/1.2.0 https://maven.apache.org/xsd/settings-1.2.0.xsd"> <!-- localRepository --> <localRepository>/data/software/repository</localRepository> <!-- Mirrors --> <mirrors> <!-- Add Aliyun Maven Mirror --> <mirror> <id>aliyun</id> <mirrorOf>central</mirrorOf> <name>Aliyun Maven Mirror</name> <url>https://maven.aliyun.com/repository/public</url> <blocked>false</blocked> </mirror> <mirror> <id>maven-default-http-blocker</id> <mirrorOf>external:http:*</mirrorOf> <name>Pseudo repository to mirror external repositories initially using HTTP.</name> <url>http://0.0.0.0/</url> <blocked>true</blocked> </mirror> </mirrors> <!-- interactiveMode --> <!-- This will determine whether maven prompts you when it needs input. If set to false, maven will use a sensible default value, perhaps based on some other setting, for the parameter in question. --> <!-- <interactiveMode>true</interactiveMode> --> <!-- offline --> <!-- Determines whether maven should attempt to connect to the network when executing a build. This will have an effect on artifact downloads, artifact deployment, and others. --> <!-- <offline>false</offline> --> <!-- pluginGroups --> <pluginGroups> <!-- pluginGroup | Specifies a further group identifier to use for plugin lookup. <pluginGroup>com.your.plugins</pluginGroup> --> </pluginGroups> <!-- proxies --> <!-- This is a list of proxies which can be used on this machine to connect to the network. Unless otherwise specified (by system property or command-line switch), the first proxy specification in this list marked as active will be used. --> <proxies> <!-- proxy | Specification for one proxy, to be used in connecting to the network. | <proxy> <id>optional</id> <active>true</active> <protocol>http</protocol> <username>proxyuser</username> <password>proxypass</password> <host>proxy.host.net</host> <port>80</port> <nonProxyHosts>local.net|some.host.com</nonProxyHosts> </proxy> --> </proxies> <!-- servers --> <!-- This is a list of authentication profiles, keyed by the server-id used within the system. Authentication profiles can be used whenever maven must make a connection to a remote server. --> <servers> <!-- server | Specifies the authentication information to use when connecting to a particular server, identified by | a unique name within the system (referred to by the 'id' attribute below). | | NOTE: You should either specify username/password OR privateKey/passphrase, since these pairings are | used together. | <server> <id>deploymentRepo</id> <username>repouser</username> <password>repopwd</password> </server> --> <!-- Another sample, using keys to authenticate. <server> <id>siteServer</id> <privateKey>/path/to/private/key</privateKey> <passphrase>optional; leave empty if not used.</passphrase> </server> --> </servers> <!-- profiles --> <!-- This is a list of profiles which can be activated in a variety of ways, and which can modify the build process. Profiles provided in the settings.xml are intended to provide local machine- specific paths and repository locations which allow the build to work in the local environment. --> <profiles> <!-- profile | Specifies a set of introductions to the build process, to be activated using one or more of the | mechanisms described above. For inheritance purposes, and to activate profiles via <activatedProfiles/> | or the command line, profiles have to have an ID that is unique. | | An encouraged best practice for profile identification is to use a consistent naming convention | for profiles, such as 'env-dev', 'env-test', 'env-production', 'user-jdcasey', 'user-brett', etc. | This will make it more intuitive to understand what the set of introduced profiles is attempting | to accomplish, particularly when you only have a list of profile id's for debug. | | This profile --> </profiles> </settings>6、测试maven测试二、部署运行环境1、安装tomcat略2、配置方便启动[Unit] Description=Tomcat 9 After=network.target [Service] Type=forking User=tomcat Group=tomcat Environment=JAVA_HOME=/usr/local/java/jdk-17.0.0.1 Environment=CATALINA_PID=/opt/apache-tomcat-9.0.98/temp/tomcat.pid Environment=CATALINA_HOME=/opt/apache-tomcat-9.0.98 Environment=CATALINA_BASE=/opt/apache-tomcat-9.0.98 Environment='CATALINA_OPTS=-Xms512M -Xmx1024M' ExecStart=/opt/apache-tomcat-9.0.98/bin/startup.sh ExecStop=/opt/apache-tomcat-9.0.98/bin/shutdown.sh [Install] WantedBy=multi-user.target访问测试2、修改tomcat监控权限vim /opt/apache-tomcat-9.0.98/conf/tomcat-users.xml<?xml version="1.0" encoding="UTF-8"?> <!-- Licensed to the Apache Software Foundation (ASF) under one or more contributor license agreements. See the NOTICE file distributed with this work for additional information regarding copyright ownership. The ASF licenses this file to You under the Apache License, Version 2.0 (the "License"); you may not use this file except in compliance with the License. You may obtain a copy of the License at http://www.apache.org/licenses/LICENSE-2.0 Unless required by applicable law or agreed to in writing, software distributed under the License is distributed on an "AS IS" BASIS, WITHOUT WARRANTIES OR CONDITIONS OF ANY KIND, either express or implied. See the License for the specific language governing permissions and limitations under the License. --> <tomcat-users xmlns="http://tomcat.apache.org/xml" xmlns:xsi="http://www.w3.org/2001/XMLSchema-instance" xsi:schemaLocation="http://tomcat.apache.org/xml tomcat-users.xsd" version="1.0"> <!-- By default, no user is included in the "manager-gui" role required to operate the "/manager/html" web application. If you wish to use this app, you must define such a user - the username and password are arbitrary. Built-in Tomcat manager roles: - manager-gui - allows access to the HTML GUI and the status pages - manager-script - allows access to the HTTP API and the status pages - manager-jmx - allows access to the JMX proxy and the status pages - manager-status - allows access to the status pages only --> <role rolename="tomcat"/> <role rolename="role1"/> <role rolename="manager-script"/> <role rolename="manager-gui"/> <role rolename="manager-status"/> <role rolename="admin-gui"/> <role rolename="admin-script"/> <user username="tomcat" password="tomcat" roles="manager-gui,manager-script,tomcat,admin-gui,admin-script"/> </tomcat-users> /opt/apache-tomcat-9.0.98/webapps/manager/META-INF/context.xml <?xml version="1.0" encoding="UTF-8"?> <!-- Licensed to the Apache Software Foundation (ASF) under one or more contributor license agreements. See the NOTICE file distributed with this work for additional information regarding copyright ownership. The ASF licenses this file to You under the Apache License, Version 2.0 (the "License"); you may not use this file except in compliance with the License. You may obtain a copy of the License at http://www.apache.org/licenses/LICENSE-2.0 Unless required by applicable law or agreed to in writing, software distributed under the License is distributed on an "AS IS" BASIS, WITHOUT WARRANTIES OR CONDITIONS OF ANY KIND, either express or implied. See the License for the specific language governing permissions and limitations under the License. --> <Context antiResourceLocking="false" privileged="true" > <CookieProcessor className="org.apache.tomcat.util.http.Rfc6265CookieProcessor" sameSiteCookies="strict" /> <Valve className="org.apache.catalina.valves.RemoteAddrValve" allow=".*" /> <Manager sessionAttributeValueClassNameFilter="java\.lang\.(?:Boolean|Integer|Long|Number|String)|org\.apache\.catalina\.filters\.CsrfPreventionFilter\$LruCache(?:\$1)?|java\.util\.(?:Linked)?HashMap"/> </Context> systemctl restart tomcat #重启3、配置jenkisn操作tomcat3.1下载部署插件3.2添加凭证3.3部署创建后操作3.4检查3.5jenkins构建记录