搜索到
97
篇与
的结果
-
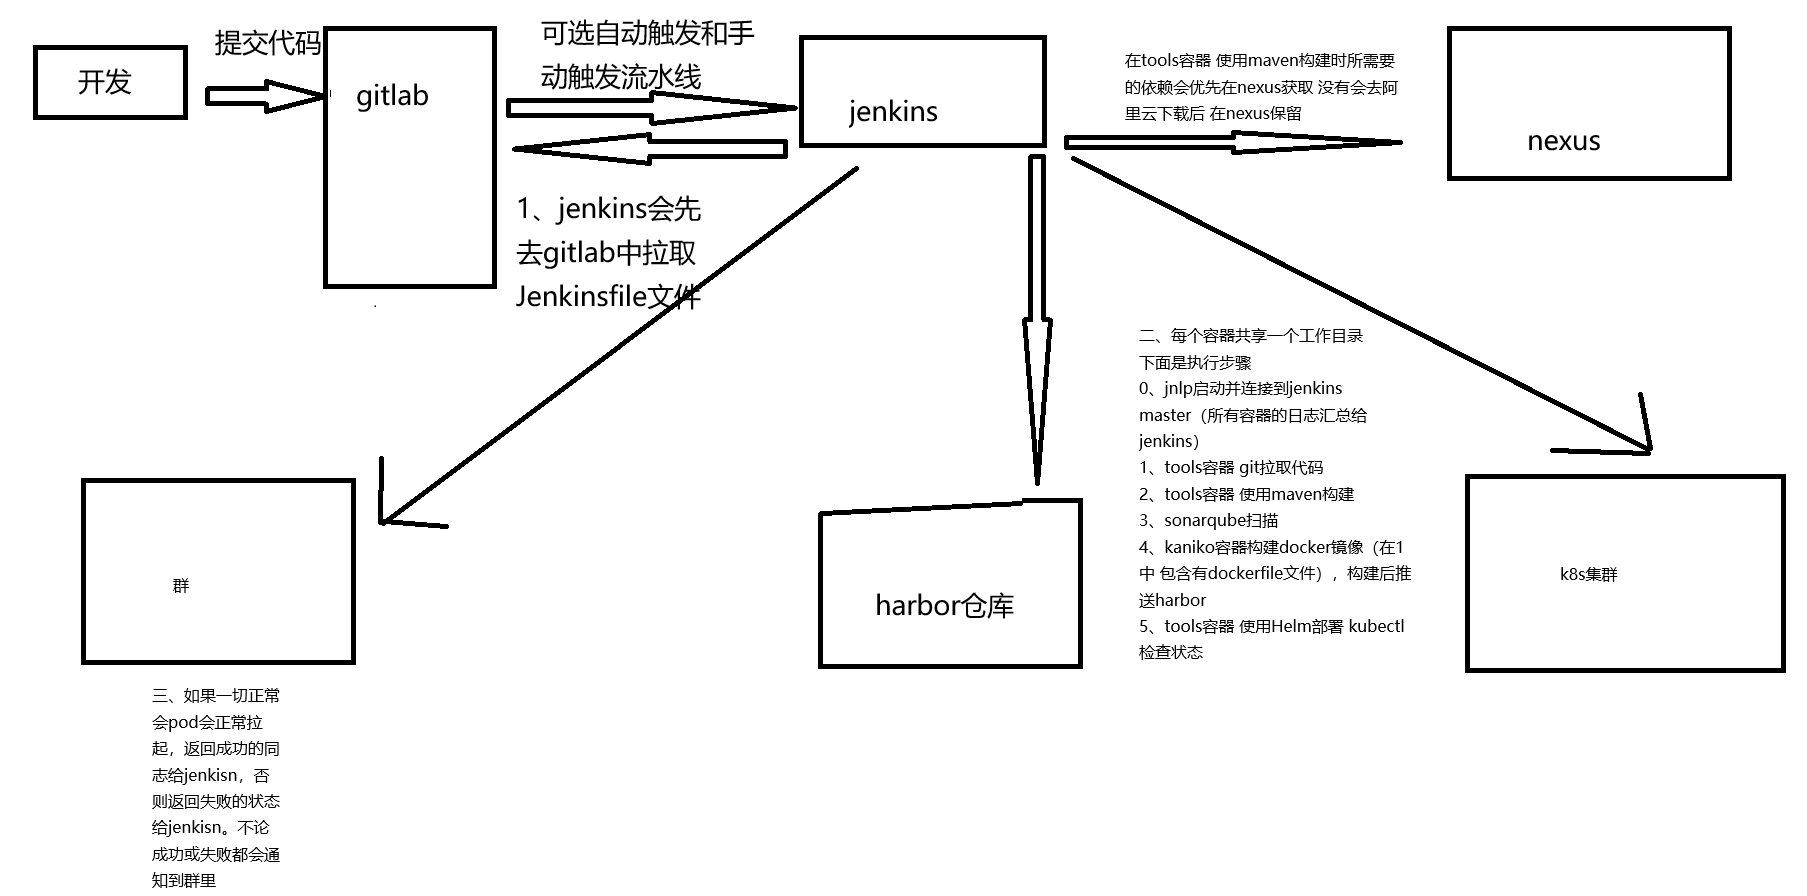
 Ansible ubuntu 22.04 双主 这个文件一共 两个 play: Play 1(localhost):只在控制机(你现在跑 ansible 的那台)做准备工作:生成/读取 SSH 公钥、写 ssh config、准备离线目录、尝试下载 k8s apt keyring(可选、失败不报错)。 Play 2(k8s_cluster):对所有 k8s 节点做“真正的装机 + Kubernetes 初始化/加入”流程:系统基础配置、离线 apt repo 挂载、安装 containerd/k8s 组件、VIP 负载均衡(haproxy+keepalived,仅 master)、kubeadm init(首个 master)、其余 master join、worker join。Play 1:Prepare controller SSH key (localhost) 目标:让控制机具备 SSH key,并把公钥内容作为 fact 传给后续 play 使用。 关键点: 1.确保 ~/.ssh 存在 file 创建目录、权限 0700。 2.若缺失则生成 SSH key ssh-keygen -t rsa -b 4096 -N "" -f "{{ controller_ssh_key }}" creates: 保证幂等:文件存在则不再执行。 3.读取控制机公钥并 set_fact slurp 会把文件内容 base64 读回来;再 b64decode 变成文本。 存到 controller_pubkey,供后续节点写入 authorized_keys。 4.可选:写入控制机的 ~/.ssh/config 对 192.168.30.* 统一指定: 用户 root IdentityFile 使用 controller 生成的 key StrictHostKeyChecking no / UserKnownHostsFile /dev/null(方便自动化,但安全性降低) 这一步不影响节点配置,只是让你控制机 ssh 更省事。 5.确保 files/offline 目录存在 后续用到离线包、keyring 都放在 files/offline。 6.尝试下载 kubernetes apt keyring(最佳努力,不失败) failed_when: false + changed_when: false 有网就生成 kubernetes-apt-keyring.gpg,没网也继续往下跑。 随后 stat 检测是否存在,并设置 controller_has_k8s_keyring。 注意:你这里的离线 repo list 使用了 trusted=yes,所以 即使没有 keyring 也能装。但保留 keyring 逻辑可以让你以后切回在线源/或者取消 trusted=yes 更安全。Play 2:Bootstrap all k8s nodes(核心) 2.1 vars:整套集群“参数中心” ssh_user / ssh_user_home:依据 ansible_user 判断是 /root 还是 /home/<user>,用来给该用户写 authorized_keys。 VIP / keepalived / haproxy: apiserver_vip=192.168.30.58 apiserver_vip_port=16443(VIP 对外暴露端口) apiserver_bind_port=6443(kube-apiserver 实际监听端口) apiserver_vip_iface:用默认网卡名(拿 facts) keepalived_virtual_router_id/auth_pass:VRRP 参数 离线 repo: offline_tools_repo_tar、offline_containerd_repo_tar、offline_k8s_repo_tar、offline_lb_repo_tar 以及对应解压目录、apt list 文件路径 k8s 版本: k8s_pkg_version: 1.30.14-1.1 kubeadm_kubernetes_version: v1.30.14 kubeadm_image_repository:你用阿里镜像仓库,适合国内/离线镜像同步场景 containerd: containerd_sandbox_image 指定 pause 镜像 SystemdCgroup=true 内核模块:overlay、br_netfilter、ipvs 一套 + nf_conntrack 集群网络:pod/service 子网、domain、cri socket LB 节点选择逻辑(很关键): lb_masters: "{{ (groups['k8s_cluster'] | select('search','master') | list | sort)[:2] }}" 从 inventory 里挑主机名含 master 的,排序后取前两个作为“做 VIP LB 的两台 master” init_master: "{{ lb_masters[0] }}":第一台 master 作为 kubeadm init 节点 is_lb_master/is_init_master:根据当前 host 判断分支执行 注意:这个选择逻辑 强依赖你的 inventory 主机名里包含 master,且至少有 2 台;否则 haproxy 配置那里引用 lb_masters[1] 会出问题。 2.2 apt 源清理:避免离线环境 apt 卡死 注释 /etc/apt/sources.list 和 /etc/apt/sources.list.d/*.list 里 deb cdrom: 行 离线环境最常见问题就是 apt update 时尝试访问 cdrom 或不可达源导致报错/卡住,这里算是“保险丝”。 2.3 主机基础:hostname、/etc/hosts、SSH 信任 hostname 设置为 inventory_hostname 生成 k8s_hosts_block:把所有节点 IP + 主机名写进 blockinfile 写入 /etc/hosts(保证节点互相能用主机名解析) 写 authorized_keys: 给 ansible_user 和 root 都写入控制机公钥(让控制机免密登录节点) 给 root 再写入“所有节点之间互信”的 key(node<->node) 配 sshd drop-in: PermitRootLogin prohibit-password(允许 root 使用公钥登录) PasswordAuthentication no(禁用密码登录) 并触发 handler restart ssh 风险提示:如果你原本靠密码/其他方式登录,禁用密码可能把你锁在门外。好在你的流程先把公钥塞进去再禁用密码,逻辑上是对的,但仍建议谨慎在生产环境使用。 2.4 swap & 内核参数:Kubernetes 前置条件 swapoff -a + 注释 /etc/fstab 里 swap 行(避免重启恢复) 写 /etc/modules-load.d/k8s.conf 并 modprobe 写 /etc/sysctl.d/99-kubernetes-cri.conf 并 sysctl --system 包括桥接流量、ip_forward、nonlocal_bind(VIP 常用) 2.5 离线 apt repo:解压、自动定位 Packages.gz、写 file: 源 流程对每个 repo 都类似: 确保 /opt/offline-repos 存在 解压 tar.gz 到对应目录 find Packages.gz,取其所在目录当“repo root” 写 deb [trusted=yes] file:<repo_root> ./ apt update 刷缓存 安装 packages trusted=yes 让 apt 不校验签名,离线很好用,但安全性降低;如果你已经有 keyring/签名,也可以改为不 trusted 并正确配 key。 2.6 containerd:配置 CRI、启动服务 安装 containerd/runc(来自离线 repo) 写 /etc/containerd/config.toml sandbox_image 指定 pause snapshotter=overlayfs SystemdCgroup=true registry mirrors 里 docker.io 指向 registry-1(若离线环境不出网,拉 docker.io 仍会失败——通常你会提前把镜像导入,或搭私有 registry) systemd 启动并 enable 写 /etc/crictl.yaml 让 crictl 默认连 containerd 2.7 kubeadm/kubelet/kubectl:离线安装 + hold 可选复制 kubernetes apt keyring 到节点 /etc/apt/keyrings 安装固定版本 kubeadm/kubelet/kubectl + 依赖(kubernetes-cni、cri-tools…) apt-mark hold 锁版本 启动 kubelet(此时可能还会报错是正常的,直到 kubeadm init/join 完成) 2.8 VIP LB(仅两台 master):haproxy + keepalived 两台 master 安装 haproxy、keepalived haproxy: 监听 *:16443 后端转发到两台 master 的 :6443 keepalived: check_haproxy.sh:只检查 haproxy 进程是否存在 两台都用 state BACKUP,用优先级决定谁抢到 VIP virtual_ipaddress 配 VIP/24 track_script 绑定健康检查 启动并 enable;等待本地 16443 端口起来 这套结构就是:VIP(16443) -> haproxy -> master(6443) kubeadm 的 controlPlaneEndpoint 指向 VIP:16443,所以集群内外都走 VIP。 2.9 kubeadm init(仅 init master) 先检查 /etc/kubernetes/admin.conf 是否存在,存在说明已经初始化过,避免重复 init 写 /root/kubeadm.yaml apiVersion: kubeadm.k8s.io/v1beta3(你已经标注了“修复2:v1beta4 -> v1beta3”) controlPlaneEndpoint: VIP:16443 imageRepository 指向阿里 apiServer.certSANs 包含 VIP、两台 master IP/hostname、localhost InitConfiguration 里: advertiseAddress 用本机 IP bindPort 用 6443 nodeRegistration 设置 cri socket 和 node-ip 执行 kubeadm init(带 --upload-certs,并忽略 SystemVerification、Swap) 把 admin.conf 拷贝到 /root/.kube/config 方便 kubectl 生成 join 命令: worker join command:kubeadm token create --print-join-command 控制面 join 需要 --control-plane --certificate-key <key> kubeadm init phase upload-certs --upload-certs 输出里抓 64 位 hex key 把 join 命令写成脚本 /root/join-worker.sh、/root/join-controlplane.sh 最关键的一步:把 join 命令通过 delegate_to: localhost + delegate_facts: true 变成“全局事实”,让后续其他节点能引用: hostvars['localhost'].global_join_worker hostvars['localhost'].global_join_cp 2.10 其余节点 join 先看 /etc/kubernetes/kubelet.conf 是否存在(存在说明已 join) 第二台 master(is_lb_master 且 not is_init_master): 运行 global_join_cp 加入控制面 worker: 运行 global_join_worker handlers:服务重启 containerd、haproxy、keepalived、ssh 的 restart 都集中在 handlers 由上面 tasks 的 notify 触发,符合 ansible 最佳实践--- ############################################################################### # Play 1: 仅在控制机(localhost)执行 # 目的: # 1) 生成/准备控制机 SSH key(用于免密登录所有节点) # 2) 读取控制机公钥,保存为 fact,供后续 play 写入各节点 authorized_keys # 3) 准备离线目录与(可选)kubernetes apt keyring 文件 ############################################################################### - name: Prepare controller SSH key (localhost) hosts: localhost gather_facts: false tasks: # 确保控制机 ~/.ssh 目录存在 - name: Ensure ~/.ssh exists on controller ansible.builtin.file: path: "{{ lookup('env','HOME') + '/.ssh' }}" state: directory mode: "0700" # 若 controller_ssh_key 不存在则生成(幂等:creates 控制) - name: Generate SSH key on controller if missing ansible.builtin.command: > ssh-keygen -t rsa -b 4096 -N "" -f "{{ controller_ssh_key }}" args: creates: "{{ controller_ssh_key }}" # 读取控制机公钥(slurp 返回 base64) - name: Read controller public key ansible.builtin.slurp: src: "{{ controller_ssh_pub }}" register: controller_pubkey_raw # 将 base64 解码成文本形式的公钥,保存为 controller_pubkey(供后续 hostvars['localhost'] 引用) - name: Set controller_pubkey fact ansible.builtin.set_fact: controller_pubkey: "{{ controller_pubkey_raw.content | b64decode }}" # 可选:写入控制机 ~/.ssh/config,方便你从控制机 ssh 到 192.168.30.* 网段 # 注意:StrictHostKeyChecking no 会降低安全性,但便于自动化环境 - name: Ensure controller ssh config includes cluster rule (optional but recommended) ansible.builtin.blockinfile: path: "{{ lookup('env','HOME') + '/.ssh/config' }}" create: true mode: "0600" marker: "# {mark} ANSIBLE K8S CLUSTER SSH" block: | Host 192.168.30.* User root IdentityFile {{ controller_ssh_key }} IdentitiesOnly yes StrictHostKeyChecking no UserKnownHostsFile /dev/null # 确保项目的离线文件目录存在(tar.gz、keyring 等都在这里) - name: Ensure files/offline exists on controller ansible.builtin.file: path: "{{ playbook_dir }}/../files/offline" state: directory mode: "0755" # 尝试在线下载 kubernetes apt keyring(最佳努力:失败不报错) # 离线环境没网也没关系,你目录里已有 kubernetes-apt-keyring.gpg 的话同样可用 - name: Try to generate kubernetes apt keyring on controller if missing (best effort, no-fail) ansible.builtin.shell: | set -e curl -fsSL --connect-timeout 5 --max-time 20 https://pkgs.k8s.io/core:/stable:/v1.30/deb/Release.key \ | gpg --dearmor -o "{{ playbook_dir }}/../files/offline/kubernetes-apt-keyring.gpg" args: creates: "{{ playbook_dir }}/../files/offline/kubernetes-apt-keyring.gpg" changed_when: false failed_when: false # 检测 keyring 是否存在 - name: Check kubernetes apt keyring exists on controller ansible.builtin.stat: path: "{{ playbook_dir }}/../files/offline/kubernetes-apt-keyring.gpg" register: controller_k8s_keyring_stat # 设置一个布尔 fact,供后续 play 决定要不要复制 keyring 到节点 - name: Set controller_has_k8s_keyring fact ansible.builtin.set_fact: controller_has_k8s_keyring: "{{ controller_k8s_keyring_stat.stat.exists | default(false) }}" ############################################################################### # Play 2: 对所有 k8s 节点执行(hosts: k8s_cluster) # 目的(大而全): # - 系统基础:hostname、/etc/hosts、关闭 swap、内核模块与 sysctl # - SSH:控制机 -> 节点免密;节点之间 root 互信(node<->node) # - 离线安装:解压离线 repo,写 file: apt 源,apt 安装工具/容器运行时/k8s 组件 # - master VIP:haproxy + keepalived 提供 apiserver VIP 入口 # - kubeadm:init 首个 master;其余 master/worker join ############################################################################### - name: Bootstrap all k8s nodes (hostname, /etc/hosts, SSH trust, offline tools, kernel modules, containerd, k8s pkgs, swapoff, apiserver VIP LB, kubeadm init/join) hosts: k8s_cluster become: true gather_facts: true vars: # 当前 ansible 连接用户及其 home(用于写 authorized_keys) ssh_user: "{{ ansible_user }}" ssh_user_home: "{{ '/root' if ssh_user == 'root' else '/home/' ~ ssh_user }}" # apiserver VIP(对外入口),以及 VIP 对外端口与 apiserver 实际 bind 端口 apiserver_vip: "192.168.30.58" apiserver_vip_port: 16443 apiserver_bind_port: 6443 # keepalived 使用的网卡(默认取 facts 的默认网卡,否则 ens33) apiserver_vip_iface: "{{ ansible_default_ipv4.interface | default('ens33') }}" keepalived_virtual_router_id: 51 keepalived_auth_pass: "k8sVIP@2025" # ------------------------- # 离线 repo:系统工具 # ------------------------- offline_tools_repo_tar: "{{ playbook_dir }}/../files/offline/os-tools-repo-ipvs.tar.gz" offline_tools_repo_dir: "/opt/offline-repos/os-tools-ipvs" offline_tools_repo_list: "/etc/apt/sources.list.d/offline-os-tools-ipvs.list" offline_tools_packages: - expect - wget - jq - psmisc - vim - net-tools - telnet - lvm2 - git - ntpdate - chrony - bind9-utils - rsync - unzip - ipvsadm - ipset - sysstat - conntrack # ------------------------- # 离线 repo:containerd # ------------------------- offline_containerd_repo_tar: "{{ playbook_dir }}/../files/offline/containerd-repo.tar.gz" offline_containerd_repo_dir: "/opt/offline-repos/containerd" offline_containerd_repo_list: "/etc/apt/sources.list.d/offline-containerd.list" offline_containerd_packages: - containerd - runc # ------------------------- # 离线 repo:haproxy/keepalived(仅 master 用) # ------------------------- offline_lb_repo_tar: "{{ playbook_dir }}/../files/offline/nginx-keepalived-repo.tar.gz" offline_lb_repo_dir: "/opt/offline-repos/nginx-keepalived" offline_lb_repo_list: "/etc/apt/sources.list.d/offline-nginx-keepalived.list" # ------------------------- # Kubernetes 版本与镜像仓库 # ------------------------- k8s_pkg_version: "1.30.14-1.1" kubeadm_kubernetes_version: "v1.30.14" kubeadm_image_repository: "registry.cn-hangzhou.aliyuncs.com/google_containers" # containerd pause 镜像(pod sandbox) containerd_sandbox_image: "registry.cn-hangzhou.aliyuncs.com/google_containers/pause:3.9" containerd_config: "/etc/containerd/config.toml" # ------------------------- # 离线 repo:Kubernetes apt 仓库 # ------------------------- offline_k8s_repo_tar: "{{ playbook_dir }}/../files/offline/k8s-repo-v1.30.14-1.1.tar.gz" offline_k8s_repo_dir: "/opt/offline-repos/k8s-v1.30.14-1.1" offline_k8s_repo_list: "/etc/apt/sources.list.d/offline-k8s-v1.30.14-1.1.list" # Kubernetes keyring(如果控制机存在,就复制到节点) offline_k8s_keyring_src: "{{ playbook_dir }}/../files/offline/kubernetes-apt-keyring.gpg" offline_k8s_keyring_dest: "/etc/apt/keyrings/kubernetes-apt-keyring.gpg" # k8s 组件及依赖(kubeadm/kubelet/kubectl 固定版本安装) offline_k8s_packages: - "kubeadm={{ k8s_pkg_version }}" - "kubelet={{ k8s_pkg_version }}" - "kubectl={{ k8s_pkg_version }}" - kubernetes-cni - cri-tools - socat - ebtables - ethtool - apt-transport-https # ipvs 与 k8s 常用模块 ipvs_modules: - ip_vs - ip_vs_rr - ip_vs_wrr - ip_vs_sh - nf_conntrack k8s_modules: - overlay - br_netfilter # 集群网络参数 pod_subnet: "10.244.0.0/16" service_subnet: "10.96.0.0/12" cluster_domain: "cluster.local" cri_socket: "unix:///run/containerd/containerd.sock" # 从 inventory 中挑选主机名包含 master 的节点,排序取前两台作为 LB master # 第 1 台同时作为 kubeadm init 节点 lb_masters: "{{ (groups['k8s_cluster'] | select('search','master') | list | sort)[:2] }}" is_lb_master: "{{ inventory_hostname in lb_masters }}" init_master: "{{ lb_masters[0] }}" is_init_master: "{{ inventory_hostname == init_master }}" tasks: # ------------------------- # apt 源清理:禁用 cdrom 源(离线环境常见坑) # ------------------------- - name: Disable CDROM apt source in /etc/apt/sources.list (comment deb cdrom:) ansible.builtin.replace: path: /etc/apt/sources.list regexp: '^deb\s+cdrom:' replace: '# deb cdrom:' failed_when: false - name: Find .list files under /etc/apt/sources.list.d ansible.builtin.find: paths: /etc/apt/sources.list.d patterns: "*.list" file_type: file register: apt_list_files failed_when: false - name: Disable CDROM apt source in sources.list.d files (comment deb cdrom:) ansible.builtin.replace: path: "{{ item.path }}" regexp: '^deb\s+cdrom:' replace: '# deb cdrom:' loop: "{{ apt_list_files.files | default([]) }}" failed_when: false # ------------------------- # 主机名与 hosts 解析:确保节点互相能解析主机名 # ------------------------- - name: Set hostname ansible.builtin.hostname: name: "{{ inventory_hostname }}" - name: Build hosts block for all cluster nodes ansible.builtin.set_fact: k8s_hosts_block: | {% for h in groups['k8s_cluster'] | sort %} {{ hostvars[h].ansible_default_ipv4.address }} {{ h }} {% endfor %} - name: Ensure /etc/hosts contains cluster nodes mapping ansible.builtin.blockinfile: path: /etc/hosts marker: "# {mark} ANSIBLE K8S CLUSTER HOSTS" block: "{{ k8s_hosts_block }}" # ------------------------- # SSH 免密:控制机 -> 节点(ansible_user 与 root) # ------------------------- - name: Ensure ansible user .ssh dir exists ansible.builtin.file: path: "{{ ssh_user_home }}/.ssh" state: directory mode: "0700" owner: "{{ ssh_user }}" group: "{{ ssh_user }}" - name: Add controller pubkey to ansible user authorized_keys ansible.builtin.lineinfile: path: "{{ ssh_user_home }}/.ssh/authorized_keys" create: true mode: "0600" owner: "{{ ssh_user }}" group: "{{ ssh_user }}" line: "{{ hostvars['localhost'].controller_pubkey | default('') }}" when: (hostvars['localhost'].controller_pubkey | default('')) | length > 0 - name: Ensure root .ssh dir exists ansible.builtin.file: path: /root/.ssh state: directory mode: "0700" - name: Add controller pubkey to root authorized_keys ansible.builtin.lineinfile: path: /root/.ssh/authorized_keys create: true mode: "0600" line: "{{ hostvars['localhost'].controller_pubkey | default('') }}" when: (hostvars['localhost'].controller_pubkey | default('')) | length > 0 # ------------------------- # SSHD 策略:允许 root 公钥登录,但不禁用密码登录 # ------------------------- - name: Ensure sshd drop-in dir exists ansible.builtin.file: path: /etc/ssh/sshd_config.d state: directory mode: "0755" - name: Allow root login with publickey (drop-in) and keep password login enabled ansible.builtin.copy: dest: /etc/ssh/sshd_config.d/99-ansible-rootlogin.conf mode: "0644" content: | PermitRootLogin prohibit-password PubkeyAuthentication yes PasswordAuthentication yes notify: Restart ssh # ------------------------- # 节点之间 root 互信:node <-> node # 思路:每个节点生成自己的 /root/.ssh/id_rsa,然后把所有节点的公钥汇总写到每台的 authorized_keys # ------------------------- - name: Generate node SSH key if missing ansible.builtin.command: ssh-keygen -t rsa -b 4096 -N "" -f /root/.ssh/id_rsa args: creates: /root/.ssh/id_rsa - name: Read node public key ansible.builtin.slurp: src: /root/.ssh/id_rsa.pub register: node_pubkey_raw - name: Set node_pubkey_text fact ansible.builtin.set_fact: node_pubkey_text: "{{ node_pubkey_raw.content | b64decode | trim }}" - name: Add all nodes keys to every node authorized_keys (node <-> node) ansible.builtin.lineinfile: path: /root/.ssh/authorized_keys create: true mode: "0600" line: "{{ hostvars[item].node_pubkey_text }}" loop: "{{ groups['k8s_cluster'] | sort }}" when: hostvars[item].node_pubkey_text is defined # ------------------------- # swap:k8s 要求关闭 swap # ------------------------- - name: Disable swap immediately ansible.builtin.command: swapoff -a changed_when: false failed_when: false - name: Comment swap in /etc/fstab ansible.builtin.replace: path: /etc/fstab regexp: '^(\s*[^#\n]+\s+[^ \n]+\s+swap\s+[^ \n]+.*)$' replace: '# \1' failed_when: false # ------------------------- # 内核模块与 sysctl:k8s + ipvs 常规前置 # ------------------------- - name: Ensure k8s modules-load file ansible.builtin.copy: dest: /etc/modules-load.d/k8s.conf mode: "0644" content: | overlay br_netfilter ip_vs ip_vs_rr ip_vs_wrr ip_vs_sh nf_conntrack - name: Modprobe required modules ansible.builtin.command: "modprobe {{ item }}" loop: "{{ k8s_modules + ipvs_modules }}" changed_when: false failed_when: false - name: Ensure sysctl for Kubernetes ansible.builtin.copy: dest: /etc/sysctl.d/99-kubernetes-cri.conf mode: "0644" content: | net.bridge.bridge-nf-call-iptables = 1 net.bridge.bridge-nf-call-ip6tables = 1 net.ipv4.ip_forward = 1 net.ipv4.ip_nonlocal_bind = 1 - name: Apply sysctl ansible.builtin.command: sysctl --system changed_when: false # ------------------------- # 离线 repo:目录准备 # ------------------------- - name: Ensure offline repos base dir exists ansible.builtin.file: path: /opt/offline-repos state: directory mode: "0755" - name: Ensure offline repo dirs exist ansible.builtin.file: path: "{{ item }}" state: directory mode: "0755" loop: - "{{ offline_tools_repo_dir }}" - "{{ offline_containerd_repo_dir }}" - "{{ offline_k8s_repo_dir }}" - "{{ offline_lb_repo_dir }}" # ------------------------- # 离线 repo:系统工具 repo(解压 -> 自动定位 Packages.gz -> 写 file: 源) # ------------------------- - name: Unpack offline tools repo ansible.builtin.unarchive: src: "{{ offline_tools_repo_tar }}" dest: "{{ offline_tools_repo_dir }}" - name: Find Packages.gz for offline tools repo (auto-detect repo root) ansible.builtin.find: paths: "{{ offline_tools_repo_dir }}" patterns: "Packages.gz" recurse: true register: tools_pkg_index - name: Set offline tools repo root ansible.builtin.set_fact: offline_tools_repo_root: "{{ (tools_pkg_index.files | first).path | dirname }}" when: (tools_pkg_index.matched | int) > 0 - name: Write offline tools apt source list ansible.builtin.copy: dest: "{{ offline_tools_repo_list }}" mode: "0644" content: | deb [trusted=yes] file:{{ offline_tools_repo_root | default(offline_tools_repo_dir) }} ./ # ------------------------- # 离线 repo:containerd repo(解压 -> 自动定位 Packages.gz -> 写 file: 源) # ------------------------- - name: Unpack offline containerd repo ansible.builtin.unarchive: src: "{{ offline_containerd_repo_tar }}" dest: "{{ offline_containerd_repo_dir }}" - name: Find Packages.gz for offline containerd repo (auto-detect repo root) ansible.builtin.find: paths: "{{ offline_containerd_repo_dir }}" patterns: "Packages.gz" recurse: true register: containerd_pkg_index - name: Set offline containerd repo root ansible.builtin.set_fact: offline_containerd_repo_root: "{{ (containerd_pkg_index.files | first).path | dirname }}" when: (containerd_pkg_index.matched | int) > 0 - name: Write offline containerd apt source list ansible.builtin.copy: dest: "{{ offline_containerd_repo_list }}" mode: "0644" content: | deb [trusted=yes] file:{{ offline_containerd_repo_root | default(offline_containerd_repo_dir) }} ./ # ------------------------- # 离线 repo:k8s repo(解压 -> 自动定位 Packages.gz -> 写 file: 源) # ------------------------- - name: Unpack offline kubernetes repo ansible.builtin.unarchive: src: "{{ offline_k8s_repo_tar }}" dest: "{{ offline_k8s_repo_dir }}" - name: Find Packages.gz for offline kubernetes repo (auto-detect repo root) ansible.builtin.find: paths: "{{ offline_k8s_repo_dir }}" patterns: "Packages.gz" recurse: true register: k8s_pkg_index - name: Set offline kubernetes repo root ansible.builtin.set_fact: offline_k8s_repo_root: "{{ (k8s_pkg_index.files | first).path | dirname }}" when: (k8s_pkg_index.matched | int) > 0 - name: Write offline kubernetes apt source list ansible.builtin.copy: dest: "{{ offline_k8s_repo_list }}" mode: "0644" content: | deb [trusted=yes] file:{{ offline_k8s_repo_root | default(offline_k8s_repo_dir) }} ./ # ------------------------- # 离线 repo:LB repo(仅 master,且 best effort) # ------------------------- - name: Unpack offline LB repo (masters only, best effort) ansible.builtin.unarchive: src: "{{ offline_lb_repo_tar }}" dest: "{{ offline_lb_repo_dir }}" when: is_lb_master failed_when: false - name: Find Packages.gz for offline LB repo (auto-detect repo root) ansible.builtin.find: paths: "{{ offline_lb_repo_dir }}" patterns: "Packages.gz" recurse: true register: lb_pkg_index when: is_lb_master failed_when: false - name: Set offline LB repo root ansible.builtin.set_fact: offline_lb_repo_root: "{{ (lb_pkg_index.files | first).path | dirname }}" when: - is_lb_master - lb_pkg_index is defined - (lb_pkg_index.matched | default(0) | int) > 0 - name: Write offline LB apt source list (masters only, best effort) ansible.builtin.copy: dest: "{{ offline_lb_repo_list }}" mode: "0644" content: | deb [trusted=yes] file:{{ offline_lb_repo_root | default(offline_lb_repo_dir) }} ./ when: is_lb_master failed_when: false # 配置完离线源后刷新 apt cache - name: Update apt cache after configuring offline repos ansible.builtin.apt: update_cache: true cache_valid_time: 3600 # 安装常用工具(失败不致命:可能某些包不在 repo 里) - name: Install common offline tools packages ansible.builtin.apt: name: "{{ offline_tools_packages }}" state: present update_cache: false failed_when: false # ------------------------- # containerd 安装与配置 # ------------------------- - name: Ensure containerd is installed ansible.builtin.apt: name: "{{ offline_containerd_packages }}" state: present update_cache: false # 写入 containerd 配置(包含 SystemdCgroup=true 等) - name: Write containerd config.toml ansible.builtin.copy: dest: "{{ containerd_config }}" mode: "0644" content: | version = 2 root = "/var/lib/containerd" state = "/run/containerd" [grpc] address = "/run/containerd/containerd.sock" [plugins."io.containerd.grpc.v1.cri"] sandbox_image = "{{ containerd_sandbox_image }}" [plugins."io.containerd.grpc.v1.cri".containerd] snapshotter = "overlayfs" default_runtime_name = "runc" [plugins."io.containerd.grpc.v1.cri".containerd.runtimes.runc] runtime_type = "io.containerd.runc.v2" [plugins."io.containerd.grpc.v1.cri".containerd.runtimes.runc.options] SystemdCgroup = true [plugins."io.containerd.grpc.v1.cri".registry.mirrors] [plugins."io.containerd.grpc.v1.cri".registry.mirrors."docker.io"] endpoint = ["https://registry-1.docker.io"] notify: Restart containerd - name: Enable & start containerd ansible.builtin.systemd: name: containerd enabled: true state: started # 配置 crictl 默认连接 containerd socket - name: Configure crictl ansible.builtin.copy: dest: /etc/crictl.yaml mode: "0644" content: | runtime-endpoint: unix:///run/containerd/containerd.sock image-endpoint: unix:///run/containerd/containerd.sock timeout: 10 debug: false # ------------------------- # k8s keyring(可选)与 k8s 组件安装 # ------------------------- - name: Ensure /etc/apt/keyrings exists ansible.builtin.file: path: /etc/apt/keyrings state: directory mode: "0755" - name: Copy kubernetes apt keyring if exists on controller ansible.builtin.copy: src: "{{ offline_k8s_keyring_src }}" dest: "{{ offline_k8s_keyring_dest }}" mode: "0644" when: hostvars['localhost'].controller_has_k8s_keyring | default(false) - name: Install kubeadm/kubelet/kubectl and deps ansible.builtin.apt: name: "{{ offline_k8s_packages }}" state: present update_cache: false # 锁定版本,避免被 apt upgrade 意外升级 - name: Hold kubeadm/kubelet/kubectl ansible.builtin.command: "apt-mark hold kubeadm kubelet kubectl" changed_when: false failed_when: false - name: Enable kubelet ansible.builtin.systemd: name: kubelet enabled: true state: started # ------------------------- # VIP LB:haproxy + keepalived(仅两台 master) # ------------------------- - name: Install haproxy and keepalived on masters ansible.builtin.apt: name: - haproxy - keepalived state: present update_cache: false when: is_lb_master # haproxy 将 VIP:16443 转发到 两台 master 的 6443 - name: Write haproxy config for apiserver VIP ansible.builtin.copy: dest: /etc/haproxy/haproxy.cfg mode: "0644" content: | global log /dev/log local0 log /dev/log local1 notice daemon maxconn 20000 defaults log global mode tcp option tcplog timeout connect 5s timeout client 1m timeout server 1m frontend kube-apiserver bind *:{{ apiserver_vip_port }} default_backend kube-apiserver backend kube-apiserver option tcp-check balance roundrobin server {{ lb_masters[0] }} {{ hostvars[lb_masters[0]].ansible_default_ipv4.address }}:{{ apiserver_bind_port }} check server {{ lb_masters[1] }} {{ hostvars[lb_masters[1]].ansible_default_ipv4.address }}:{{ apiserver_bind_port }} check when: is_lb_master notify: Restart haproxy # 修复点:只在 master 写 keepalived 脚本,并确保目录存在 - name: Ensure /etc/keepalived exists (masters only) ansible.builtin.file: path: /etc/keepalived state: directory mode: "0755" when: is_lb_master # keepalived 健康检查脚本:haproxy 进程存在即认为健康 - name: Write keepalived health check script (masters only) ansible.builtin.copy: dest: /etc/keepalived/check_haproxy.sh mode: "0755" content: | #!/usr/bin/env bash pgrep haproxy >/dev/null 2>&1 when: is_lb_master # keepalived VRRP:两台都 BACKUP,用 priority 决定谁持有 VIP - name: Write keepalived config ansible.builtin.copy: dest: /etc/keepalived/keepalived.conf mode: "0644" content: | global_defs { router_id {{ inventory_hostname }} } vrrp_script chk_haproxy { script "/etc/keepalived/check_haproxy.sh" interval 2 fall 2 rise 2 } vrrp_instance VI_1 { state BACKUP interface {{ apiserver_vip_iface }} virtual_router_id {{ keepalived_virtual_router_id }} priority {{ 150 if inventory_hostname == lb_masters[0] else 100 }} advert_int 1 authentication { auth_type PASS auth_pass {{ keepalived_auth_pass }} } virtual_ipaddress { {{ apiserver_vip }}/24 } track_script { chk_haproxy } } when: is_lb_master notify: Restart keepalived - name: Enable & start haproxy/keepalived ansible.builtin.systemd: name: "{{ item }}" enabled: true state: started loop: - haproxy - keepalived when: is_lb_master # 确认 haproxy 已经监听 VIP 端口(本地 127.0.0.1:16443) - name: Wait haproxy port listening on masters ansible.builtin.wait_for: host: "127.0.0.1" port: "{{ apiserver_vip_port }}" timeout: 30 when: is_lb_master # ------------------------- # kubeadm init(仅 init master) # ------------------------- - name: Check if cluster already initialized ansible.builtin.stat: path: /etc/kubernetes/admin.conf register: adminconf_stat when: is_init_master # 修复点:apiVersion 使用 v1beta3(与你的 kubeadm 版本匹配) - name: Write kubeadm config ansible.builtin.copy: dest: /root/kubeadm.yaml mode: "0644" content: | apiVersion: kubeadm.k8s.io/v1beta3 kind: ClusterConfiguration kubernetesVersion: "{{ kubeadm_kubernetes_version }}" imageRepository: "{{ kubeadm_image_repository }}" controlPlaneEndpoint: "{{ apiserver_vip }}:{{ apiserver_vip_port }}" networking: podSubnet: "{{ pod_subnet }}" serviceSubnet: "{{ service_subnet }}" dnsDomain: "{{ cluster_domain }}" apiServer: certSANs: - "{{ apiserver_vip }}" - "{{ hostvars[lb_masters[0]].ansible_default_ipv4.address }}" - "{{ hostvars[lb_masters[1]].ansible_default_ipv4.address }}" - "{{ lb_masters[0] }}" - "{{ lb_masters[1] }}" - "localhost" --- apiVersion: kubeadm.k8s.io/v1beta3 kind: InitConfiguration localAPIEndpoint: advertiseAddress: "{{ ansible_default_ipv4.address }}" bindPort: {{ apiserver_bind_port }} nodeRegistration: criSocket: "{{ cri_socket }}" kubeletExtraArgs: node-ip: "{{ ansible_default_ipv4.address }}" when: is_init_master and not adminconf_stat.stat.exists - name: Run kubeadm init ansible.builtin.command: argv: - kubeadm - init - "--config=/root/kubeadm.yaml" - "--upload-certs" - "--ignore-preflight-errors=SystemVerification" - "--ignore-preflight-errors=Swap" register: kubeadm_init_out when: is_init_master and not adminconf_stat.stat.exists failed_when: kubeadm_init_out.rc != 0 - name: Re-check admin.conf after kubeadm init ansible.builtin.stat: path: /etc/kubernetes/admin.conf register: adminconf_stat_after when: is_init_master - name: Ensure /root/.kube exists on init master ansible.builtin.file: path: /root/.kube state: directory mode: "0700" when: is_init_master # 让 init master 上 root 可直接 kubectl - name: Copy admin.conf to /root/.kube/config on init master ansible.builtin.copy: remote_src: true src: /etc/kubernetes/admin.conf dest: /root/.kube/config mode: "0600" when: is_init_master and (adminconf_stat_after.stat.exists | default(false)) # 生成 worker join 命令 - name: Generate worker join command (init master) ansible.builtin.command: argv: - kubeadm - token - create - "--print-join-command" register: join_worker_cmd_raw when: is_init_master and (adminconf_stat_after.stat.exists | default(false)) # 获取 control-plane join 需要的 certificate-key - name: Upload-certs and get certificate key (init master) ansible.builtin.command: argv: - kubeadm - init - phase - upload-certs - "--upload-certs" register: upload_certs_out when: is_init_master and (adminconf_stat_after.stat.exists | default(false)) - name: Extract certificate key ansible.builtin.set_fact: cert_key: "{{ (upload_certs_out.stdout_lines | select('match','^[0-9a-f]{64}$') | list | first) | default('') }}" when: is_init_master and (adminconf_stat_after.stat.exists | default(false)) # 拼出控制面 join 命令:在 worker join 命令基础上增加 --control-plane 与 --certificate-key - name: Build control-plane join command (init master) ansible.builtin.set_fact: join_cp_cmd: "{{ join_worker_cmd_raw.stdout | trim }} --control-plane --certificate-key {{ cert_key }}" when: is_init_master and (adminconf_stat_after.stat.exists | default(false)) # 把 join 命令保存成脚本文件(便于人工排障/复用) - name: Save join commands to files (init master) ansible.builtin.copy: dest: "{{ item.path }}" mode: "0700" content: | #!/usr/bin/env bash set -e {{ item.cmd }} loop: - { path: "/root/join-worker.sh", cmd: "{{ join_worker_cmd_raw.stdout | trim }}" } - { path: "/root/join-controlplane.sh", cmd: "{{ join_cp_cmd | trim }}" } when: is_init_master and (adminconf_stat_after.stat.exists | default(false)) # 关键:把 join 命令存成 localhost 的 delegate_facts,方便其它节点通过 hostvars['localhost'] 读取 - name: Set join commands as global facts on localhost ansible.builtin.set_fact: global_join_worker: "{{ join_worker_cmd_raw.stdout | trim }}" global_join_cp: "{{ join_cp_cmd | trim }}" delegate_to: localhost delegate_facts: true run_once: true when: is_init_master and (adminconf_stat_after.stat.exists | default(false)) # ------------------------- # join(其余 master / worker) # ------------------------- - name: Check if node already joined ansible.builtin.stat: path: /etc/kubernetes/kubelet.conf register: kubeletconf_stat # 第二台 master 加入 control-plane(仅 lb master,且不是 init master) - name: Join second master as control-plane ansible.builtin.command: "{{ hostvars['localhost'].global_join_cp }}" when: - is_lb_master - not is_init_master - not kubeletconf_stat.stat.exists - hostvars['localhost'].global_join_cp is defined - (hostvars['localhost'].global_join_cp | length) > 0 # worker 加入集群(非 lb master 视为 worker) - name: Join workers ansible.builtin.command: "{{ hostvars['localhost'].global_join_worker }}" when: - (not is_lb_master) - not kubeletconf_stat.stat.exists - hostvars['localhost'].global_join_worker is defined - (hostvars['localhost'].global_join_worker | length) > 0 handlers: # containerd 配置变更后重启 - name: Restart containerd ansible.builtin.systemd: name: containerd state: restarted # haproxy 配置变更后重启 - name: Restart haproxy ansible.builtin.systemd: name: haproxy state: restarted # keepalived 配置变更后重启 - name: Restart keepalived ansible.builtin.systemd: name: keepalived state: restarted # sshd 配置变更后重启 - name: Restart ssh ansible.builtin.systemd: name: ssh state: restarted
 -
-
traefik-gatway 测试yamlroot@k8s-01:~# cat traefik-gateway-nginx.yaml --- apiVersion: gateway.networking.k8s.io/v1 kind: GatewayClass metadata: name: traefik spec: controllerName: traefik.io/gateway-controller --- apiVersion: gateway.networking.k8s.io/v1 kind: Gateway metadata: name: traefik-gw namespace: default spec: gatewayClassName: traefik listeners: - name: http protocol: HTTP port: 8000 # ? 这里从 80 改成 8000,匹配 Traefik 的 entryPoints.web allowedRoutes: namespaces: from: Same --- apiVersion: apps/v1 kind: Deployment metadata: name: nginx namespace: default spec: replicas: 1 selector: matchLabels: app: nginx template: metadata: labels: app: nginx spec: containers: - name: nginx image: nginx:latest ports: - containerPort: 80 --- apiVersion: v1 kind: Service metadata: name: nginx namespace: default spec: selector: app: nginx ports: - port: 80 targetPort: 80 --- apiVersion: gateway.networking.k8s.io/v1 kind: HTTPRoute metadata: name: nginx namespace: default spec: parentRefs: - name: traefik-gw namespace: default sectionName: http # ? 明确绑定到上面 listener 名称 http(可选,但更清晰) hostnames: - "nginx.example.com" rules: - matches: - path: type: PathPrefix value: / backendRefs: - name: nginx port: 80 traefik 启用 Gateway API Providerroot@k8s-01:/woke/traefik# ls Changelog.md Chart.yaml crds EXAMPLES.md Guidelines.md LICENSE README.md templates traefik-values.yaml VALUES.md values.schema.json values.yaml root@k8s-01:/woke/traefik# cat traefik-values.yaml # 1. Dashboard / API 配置 api: dashboard: true # ⚠️ 这里是顶层的 ingressRoute,不在 api 下面 ingressRoute: dashboard: enabled: false # 关键:改成 web,让它走 80 端口(NodePort 30080) entryPoints: - web matchRule: PathPrefix(`/dashboard`) || PathPrefix(`/api`) annotations: {} labels: {} middlewares: [] tls: {} # 2. 入口点配置(保持你原来的) ports: traefik: port: 8080 expose: default: false exposedPort: 8080 protocol: TCP web: port: 8000 expose: default: true exposedPort: 80 protocol: TCP nodePort: 30080 websecure: port: 8443 hostPort: containerPort: expose: default: true exposedPort: 443 protocol: TCP nodePort: 30443 # 3. Service 配置:NodePort service: enabled: true type: NodePort single: true spec: externalTrafficPolicy: Cluster annotations: {} labels: {} # 4. RBAC rbac: enabled: true # 5. metrics(你这里开 prometheus 也没问题) metrics: prometheus: enabled: true logs: general: level: INFO access: enabled: true format: common # 6. 启用 Gateway API Provider providers: kubernetesGateway: enabled: true
-
-
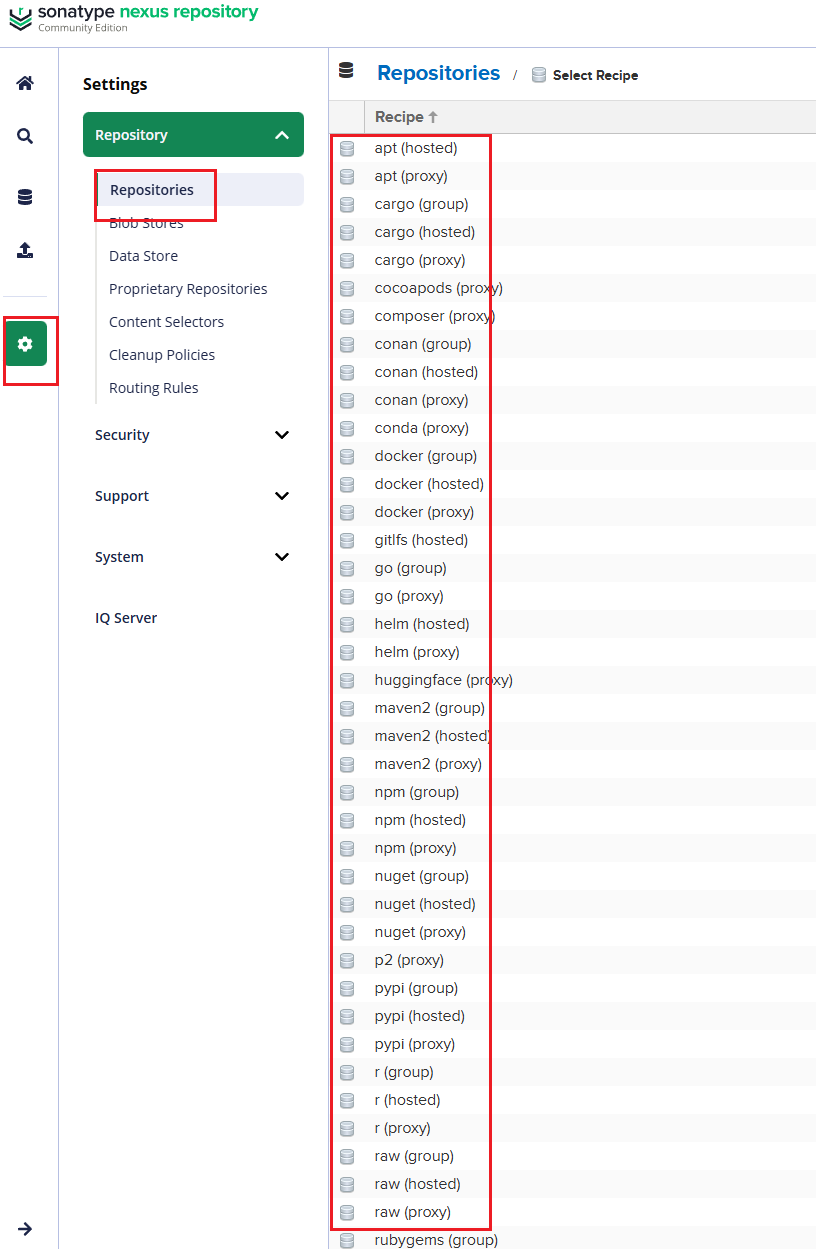
nesux部署 一、Nexus是什么?能干什么?#nexus施舍么? Nexus 跟 Harbor 一样都是“仓库”,但 Nexus 更偏语言包/构件(Maven、npm、PyPI…),Harbor 更偏 Docker/OCI 镜像。 作为运维,一般会用 Nexus 来做:Maven 私服、npm 私服、Python 包、甚至 Docker / Helm 仓库。#能干什么? - 加速依赖下载(代理公网仓库 + 本地缓存) - 私有包托管(比如你们内部的 Java 包、npm 私有库) - 统一出口(所有构建机器都从 Nexus 下载依赖,方便管控和审计) - 配合 CI/CD:构建产物统一上传 Nexus,后续部署环境只从 Nexus 拉。二、Nexus 里的核心概念 2.1 三种仓库类型(很重要)不管是 Maven、npm 还是 Docker,Nexus 里都只有三类仓库: 1、Hosted(宿主仓库 / 私有仓库) - 放你们自己发布的包。 - 比如:maven-releases、npm-private、docker-private。 2、Proxy(代理仓库) - 代理公网源,并把下载的东西缓存在本地。 - 比如: - aven-central 代理 https://repo.maven.apache.org/maven2 - npm-proxy 代理 https://registry.npmjs.org - docker-hub 代理 https://registry-1.docker.io 3、Group(聚合仓库) - 把若干 Hosted + Proxy 打包成一个虚拟仓库,对外只暴露一个地址。 - 比如:maven-public = maven-releases + maven-snapshots + maven-central - 开发/CI 只配 maven-public,不用管具体后端有多少仓库。2.2 格式(Format)创建仓库时要选择 格式,比如: - maven2、npm、pypi、docker、helm 等。 - 格式决定了:URL 路径结构、客户端怎么访问、支持哪些功能。2.3 Blob Store(存储)- Nexus 会把真实的文件放在叫 Blob store 的路径里(默认在 /nexus-data 下面)。 - 一般建议: - 如果是k8s建议用独立磁盘或 PV - 大一点,后面所有包/镜像都在里面。 - 我这里是使用docker单独部署 挂载建议内存和磁盘空间给多一些 root@ubuntu:/work/nexus# cat docker-compose.yml version: '3.8' services: nexus: image: sonatype/nexus3 container_name: nexus restart: always ports: - "8081:8081" volumes: - ./nexus-data:/nexus-data # 如有需要可以限制内存,比如: # deploy: # resources: # limits: # memory: 4g 2.4 用户、角色、Realm- 用户 / 角色 / 权限:可以控制谁能读、谁能发包。 - 如果接 LDAP/AD,就在 Security -> Realms 里启用对应 Realm。三、怎么部署 Nexus(最常用:Docker)- 说明: - Web UI 默认是 http://<服务器IP>:8081 - 数据都在 /data/nexus-data(持久化很关键,别丢) - 初始 admin 密码在 /nexus-data/admin.password 文件里。 - 生产环境建议: - 做反向代理(Nginx / Ingress) - 配置 HTTPS - 定期备份 /nexus-data。 root@ubuntu:/work/nexus# cat docker-compose.yml version: '3.8' services: nexus: image: sonatype/nexus3 container_name: nexus restart: always ports: - "8081:8081" volumes: - ./nexus-data:/nexus-data # 如有需要可以限制内存,比如: # deploy: # resources: # limits: # memory: 4g